How to Create a Road Export Job
Overview
A Job contains all the records and documentation related to a consignment of goods that a customer wants you to move from one place to another. From within your Job you can conveniently make customs declarations, add cost and sales amounts, create collection and delivery notes and raise invoices. You can also add any documents related to your Job.
Create a Road Export Job
There are two ways to start creating a Road Export Job:
Either
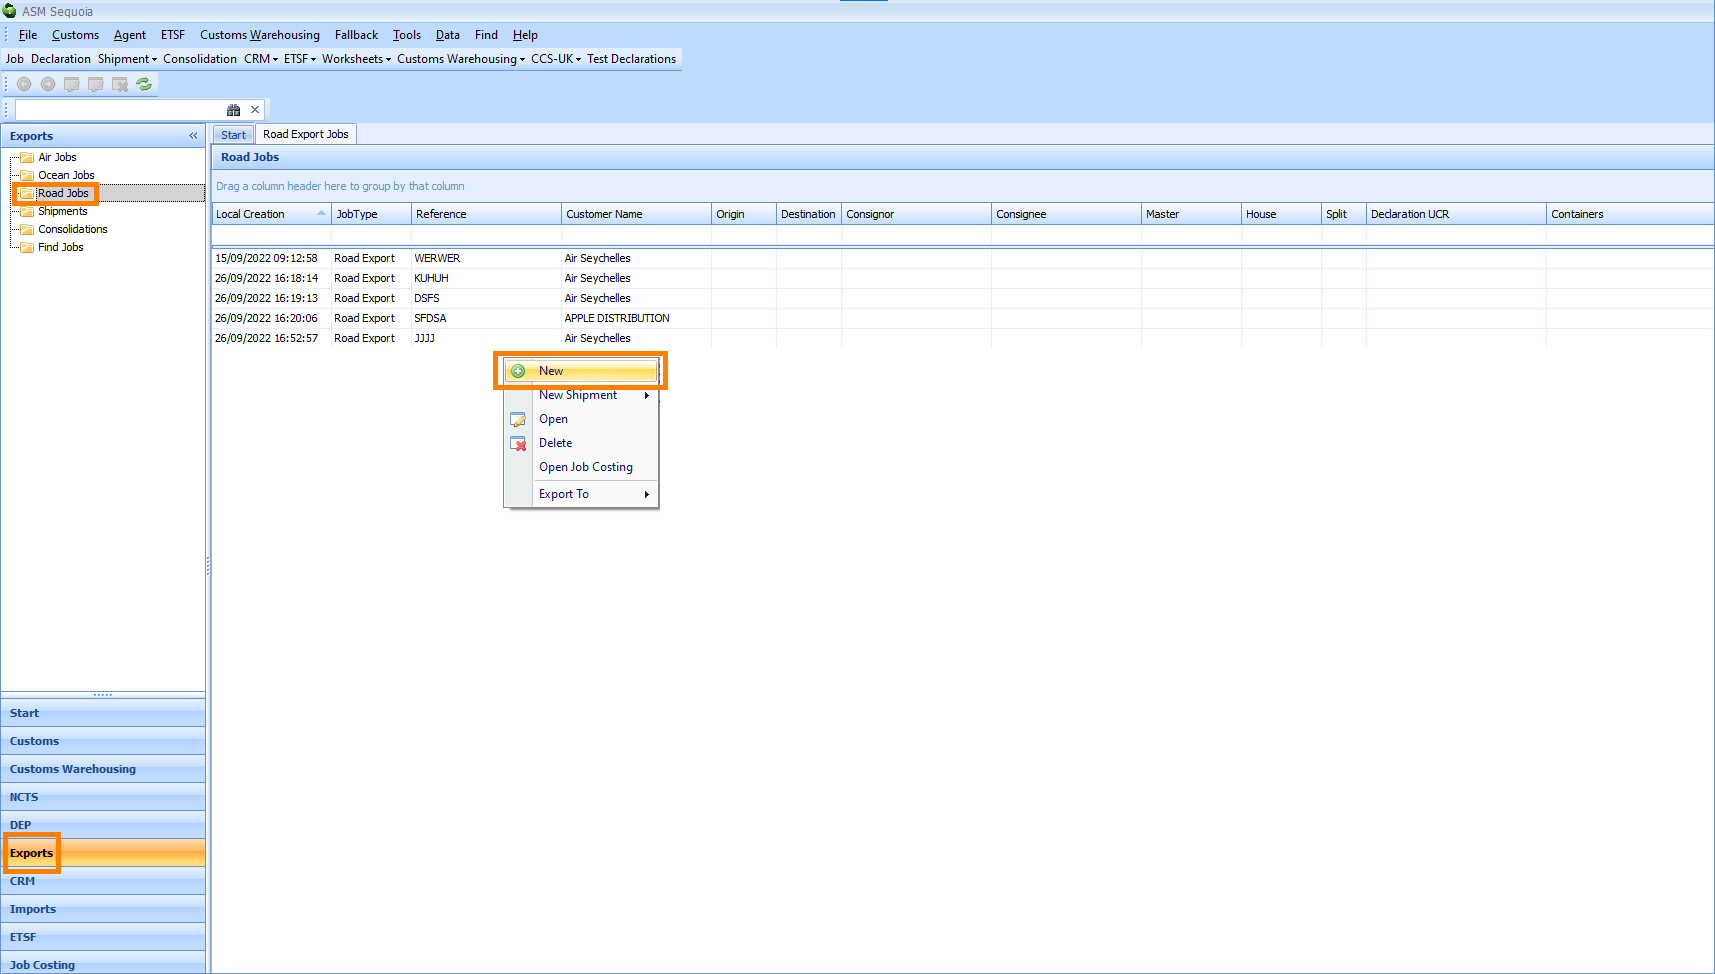
1) Click on the Exports module at the bottom left hand side of the screen. Then, click on the Road Jobs folder at the top left hand side of the screen. Next, right click on the List Panel area of the screen and a context menu will appear. Click on New in the context menu.
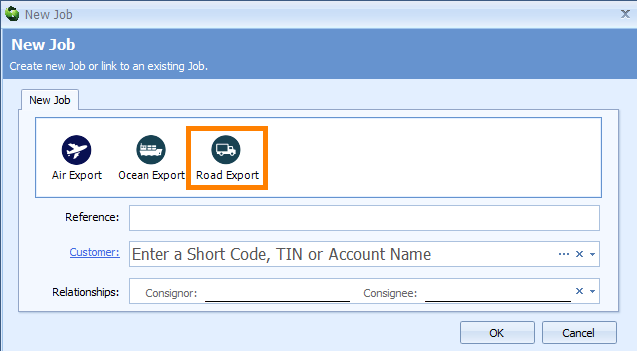
A New Job dialog box will appear. Click on the Road Export icon.
or
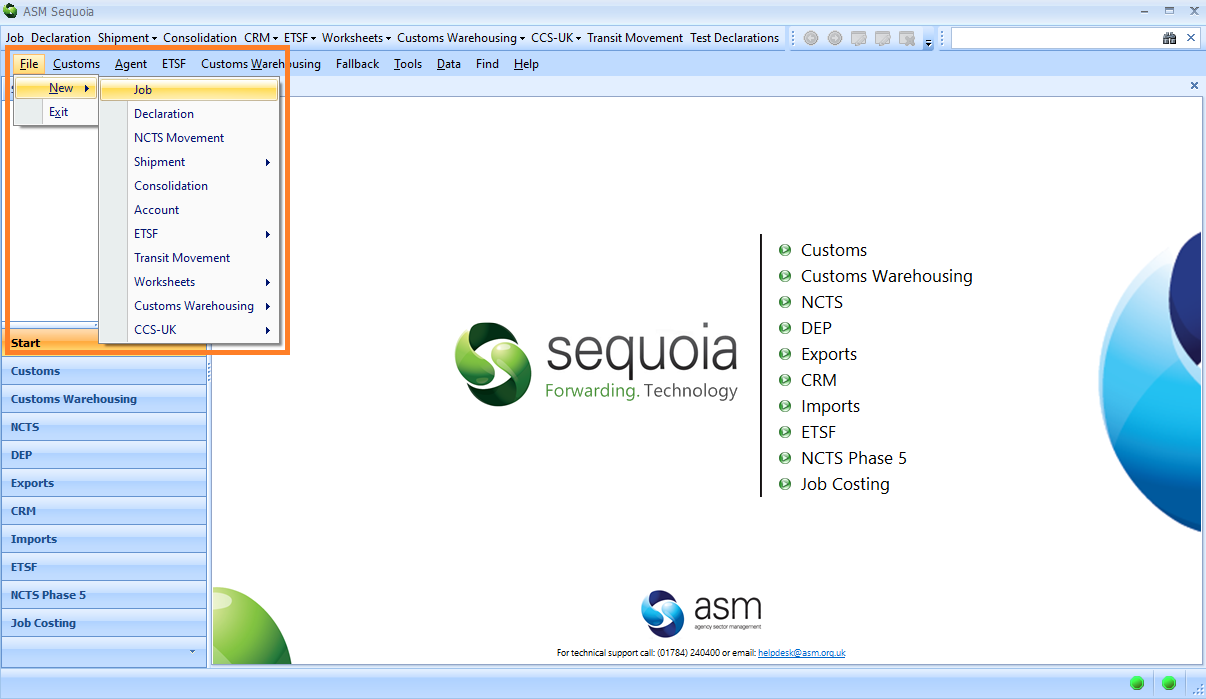
2) Select File from the main Sequoia toolbar at the top left hand side of the screen. A context menu will appear. Click on New followed by Job in the context menu.
A New Job dialog box will appear. Click on the Road Export icon.
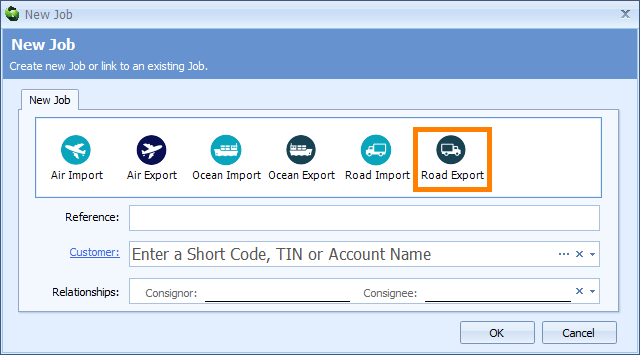
If you create your Job this way then you will see that the New Job dialog box also includes Import Job icon options.
Next, enter the information described in the table below into the boxes of the New Job dialog box.
| Box | Information |
|---|---|
| Reference | Create your own reference for this Job and enter it into this box If you have set up Sequoia to automatically generate Job references for you then you can leave this box blank and Sequoia will automatically enter a Job reference into it. To learn how to set up Sequoia to automatically generate Job references for you click here |
| Customer | You must enter either your customer's name, Short Code, or EORI/ TIN number into this box You can select this information from a list by either typing a ? into this box or by clicking on the ellipsis (the 3 dots) to the right of this box to display the Account Lookup Dialog box. Next, enter the information or part of it into the search box, click on the binoculars icon to search for it and then select it from the resulting list by double clicking on it |
| Relationships | Enter the details of the consigner (the person sending the shipment) and the consignee (the person receiving the shipment) You can select this information from a list by clicking on the |
Next, click on the OK button at the bottom of the New Job dialog box. A Road Export editor will appear.
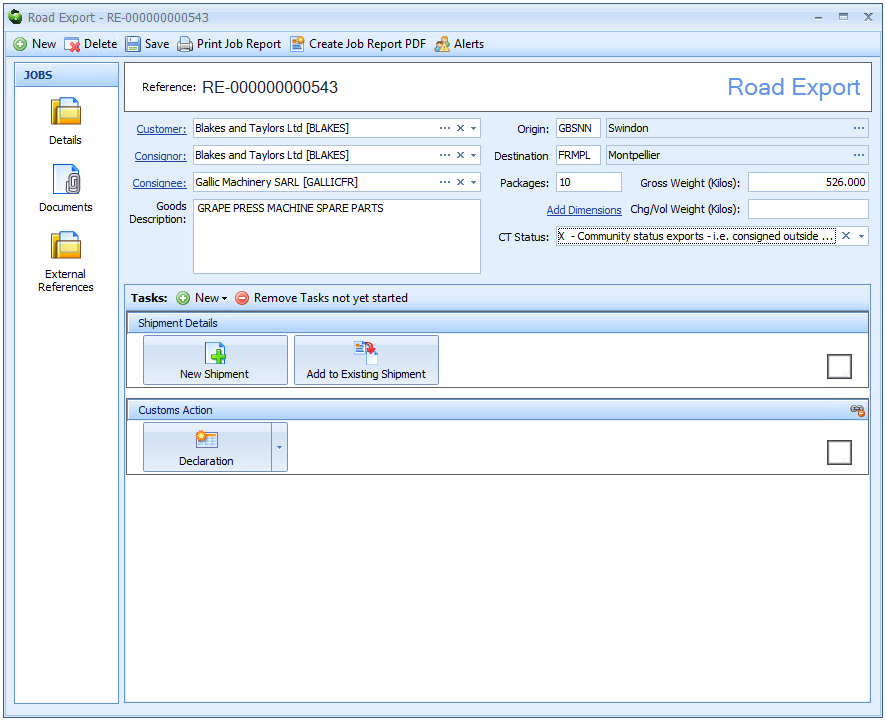
Next, enter the information described in the table below into the Road Export editor boxes.
| Box | Information |
|---|---|
| Customer | The customer information that you entered when you first created the Job via the New Job dialog box will be automatically entered into this box |
| Consignor | The consignor (the shipper) This box will automatically display the consignor (the shipper) information that you entered into the Relationships box when you first created the Job via the New Job dialog box. When you create a declaration for this Job the name and address of the consignor that is entered here will be automatically added to the Consignor box [box 2] of that declaration |
| Consignee | The consignee (the receiver) This box will automatically display the consignee (the receiver) information that you entered into the Relationships box when you first created the Job via the New Job dialog box. When you create a declaration for this Job the name, address and EORI number of the consignee that is entered here will be automatically added to the Consignee box [box 8] of that declaration |
| Goods Description | A description of the goods being exported When you create a declaration for this Job what is entered here will be automatically added to the Goods Description box [box 31] of the first item of that declaration |
| Origin | The UN/LOCODE of where the goods are coming from This will be a 5 character code made up of the 2 letter country code and 3 letter port code. When you create a declaration for this Job, what is entered here will be automatically added to the Dispatch Country box [box 15a] of that declaration. You can select this information from a list by either typing a ? into this box or by clicking on the ellipsis (the 3 dots) to the right of this box to display the Origin Lookup Dialog box. Next, enter the code or part of the code into the search box, click on the binoculars icon to search for it and then select it from the resulting list by double clicking on it |
| Destination | The UN/LOCODE of where the goods are going to This will be a 5 character code made up of the 2 letter country code and 3 letter port code. You can select this information from a list by either typing a ? into this box or by clicking on the ellipsis (the 3 dots) to the right of this box to display the Destination Lookup Dialog box. Next, enter the code or part of the code into the search box, click on the binoculars icon to search for it and then select it from the resulting list by double clicking on it |
| Packages | The number of packages in the consignment When you create a declaration for this Job what is entered here will be automatically added to the Total Packages box [box 6] of that declaration |
| Gross Weight (Kilos) | The gross weight of the consignment |
| Chg/Vol Weight (Kilos) | To find out the chargeable weight of your export, you can use the Sequoia calculator to multiply the length x height x width in cm and divide the answer by the Volume Conversion amount. The result will be the volumetric weight and should be compared with the actual weight in kg. Whichever is the greater figure will be the chargeable weight. Click on Add Dimensions to use the calculator (see below for instructions). The calculated amount will automatically appear in this box |
| Add Dimensions | Calculate your chargeable weight here with our calculator. Click on the word Add Dimensions and a Chg/ Vol Weight and Dimensions pop up box will appear. If you do not know the dimensions click in the box to add a tick in the No Dimensions Available tick box. Next, click in the Volume Conversion box and select the volume conversion amount from the drop down list. Click in the Volume Code box and select the volume code from the drop down list. Next, click on the green plus button next to the word Dimensions. A row will appear in the table below. Click in each column in the row to enter information. Enter the number of packages in the Nop column. Enter the Length (cms), Width (cms), Height (cms) and the Gross Weight in the corresponding columns. Click in the Package Kind column to enter the type of package. In the Package Marks column enter the identifiable marks on the package. Sequoia will automatically multiply the length x height x width in cm and divide the answer by the Volume Conversion amount to calculate the volumetric weight. This will be compared with the actual weight in kg. Whichever is the greater figure will be the chargeable weight. You will see that the Total Gross Weight (Kilos) box, the Total Chg/Vol Weight (Kilos) box and the Total Volume box in the top right hand corner of the Chg/ Vol Weight and Dimensions editor will automatically update with the calculated amount. Click on the OK button to return to the Road Export editor and you will see that the Chg/ Vol Weight (Kilos) box has automatically updated with the calculated amount |
| CT Status | The CT Status (the Community Transit Status) You can enter the status manually or click on the |
Add a Shipment Record
A shipment record contains the details of the transport of goods of a Groupage Load (House) or a Full Load (Master).
A shipment can include more than one Job, for example when you ship goods from more than one consignor on the same load. It is, however, more common for one Job to contain just one shipment.
To add a shipment record to your Job click on the New Shipment button in the Shipment Details Tasks section of the Road Export editor.
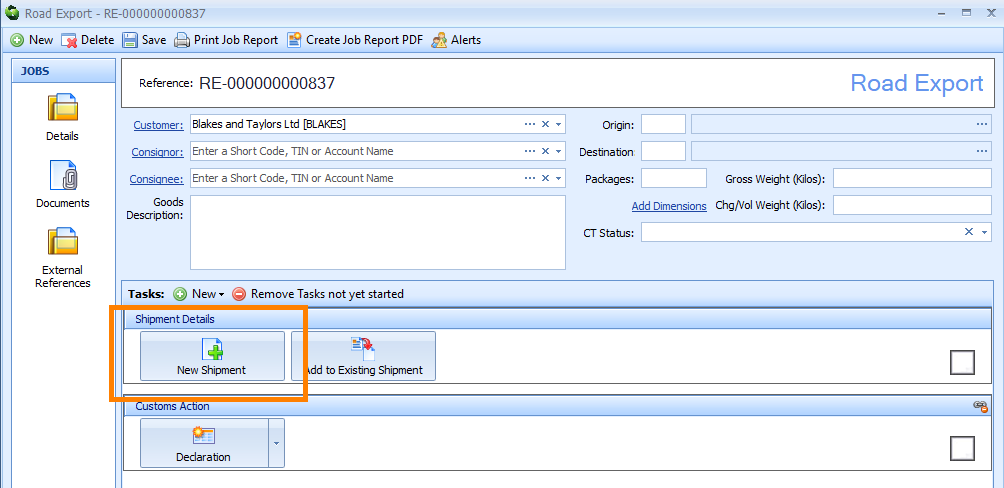
This will open the Road Export Shipment editor.
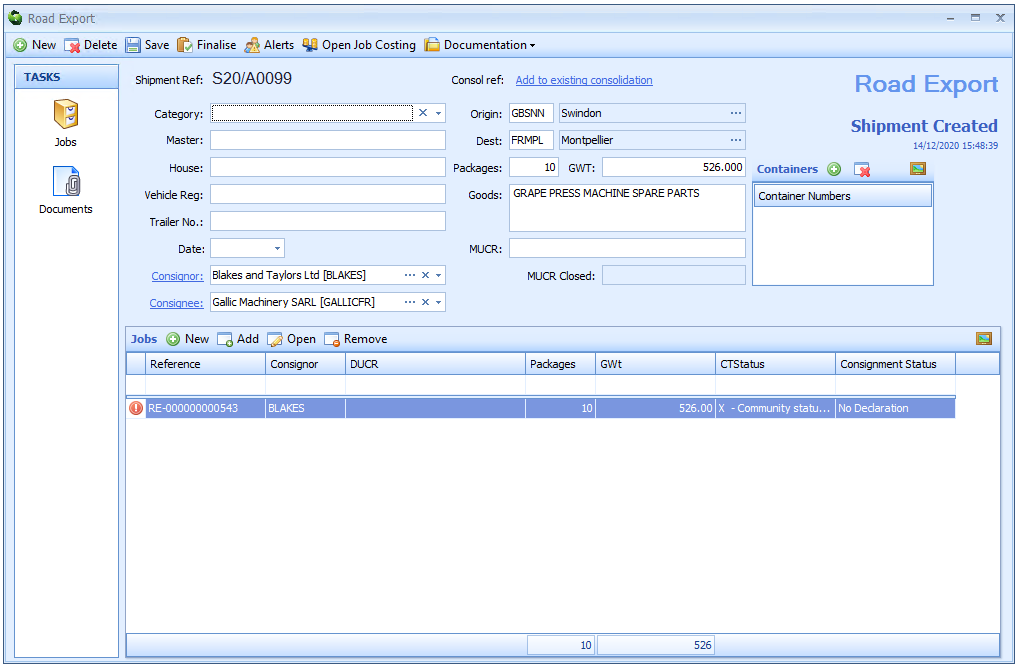
The image above shows that some of the information that you previously entered into the Road Export editor (for example the origin and the destination) will be automatically entered into the Road Export Shipment editor boxes. Next, enter the information described in the table below into the remaining empty boxes of the Road Export Shipment editor.
| Box | Information |
|---|---|
| Category | You must enter either House or Master You can type H or M into this box or click on the |
| Master | The Master transport document reference When you create a declaration for the Job that this shipment is linked to, what is entered into this box will be automatically entered into [box 40] of that declaration |
| House | The House transport document reference You would only have this information to enter if this shipment is part of a consolidation. When you create a declaration for the Job that this shipment is linked to, what is entered into this box will be automatically entered into [box 40] of that declaration |
| Vehicle reg. | The expected vehicle registration number, if known When you create a declaration for the Job that this shipment is linked to, what is entered into this box will be automatically entered into the Transport ID box [box 21] of that declaration |
| Trailer No. | The expected vehicle trailer number, if known |
| Date | The departure date of the shipment You can type this in using the format DD/MM/CCYY or click on the |
| Consignor | The consignor (the shipper) This box will automatically display the Consignor information of the Job that this shipment is linked to. This box can be edited manually and will not change the information in that linked Job. You may need to edit this box, for example, if the shipment is being sent from a third party agent |
| Consignee | The consignee (the receiver) This box will automatically display the Consignee information of the Job that this shipment is linked to. This box can be edited manually and will not change the information in that linked Job. You may need to edit this box, for example, if the shipment is being sent to a third party agent |
| Consol Ref | If you have created a consolidation record in Sequoia that you would like to link this shipment to, click on Add to existing Consolidation. Double click on the consolidation record in the list that appears to select it. This can only be done if 'House' has been entered into the Category box in this editor |
| Origin | The UN/LOCODE of where the goods are coming from This will be a 5 character code made up of the 2 letter country code and 3 letter port code. This box will automatically display the Origin information of the Job that this shipment is linked to. This box can be edited manually and will not change the information in that linked Job |
| Dest | The UN/LOCODE of where the goods are going to This will be a 5 character code made up of the 2 letter country code and 3 letter port code. This box will automatically display the Destination information of the Job that this shipment is linked to. This box can be edited manually and will not change the information in that linked Job |
| Packages | The total number of packages in the shipment This box will automatically display the Packages information of the Job that this shipment is linked to. This box can be edited manually and will not change the information in that linked Job |
| GWT | The gross weight of the shipment This box will automatically display the GWT information of the Job that this shipment is linked to. This box can be edited manually and will not change the information in that linked Job |
| Goods | A description of the goods This box will automatically display the Goods information of the Job that this shipment is linked to. This box can be edited manually and will not change the information in that linked Job |
| MUCR | MUCR (Master Unique Consignment Reference) If this shipment contains goods that are covered by more than one export declaration you can specify a MUCR (Master Unique Consignment Reference) to which all of the DUCRs (Declaration Unique Consignment Reference) will be associated. This will mean that you only have to give the MUCR to the carrier when booking the goods |
| MUCR Closed | The MUCR (Master Unique Consignment Reference) Closed message This box will automatically update with the date and time that the MUCR closure message is received by Sequoia |
| Container numbers | If the goods are containerised and the numbers are known, enter the container number(s) here Click on the green plus button to the right of the word 'Containers'. You can then type the number into the Container Numbers box. To add more numbers click on the green plus button again and repeat the process. When you create a declaration for this Job the numbers entered here will be automatically entered into [box 31] of that declaration |
Next, click on Save at the top left hand corner of the Road Export Shipment editor toolbar and then click on the X at the top right hand corner to close the editor.
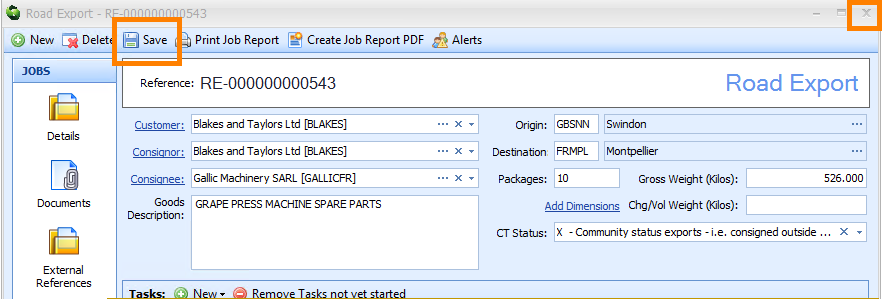
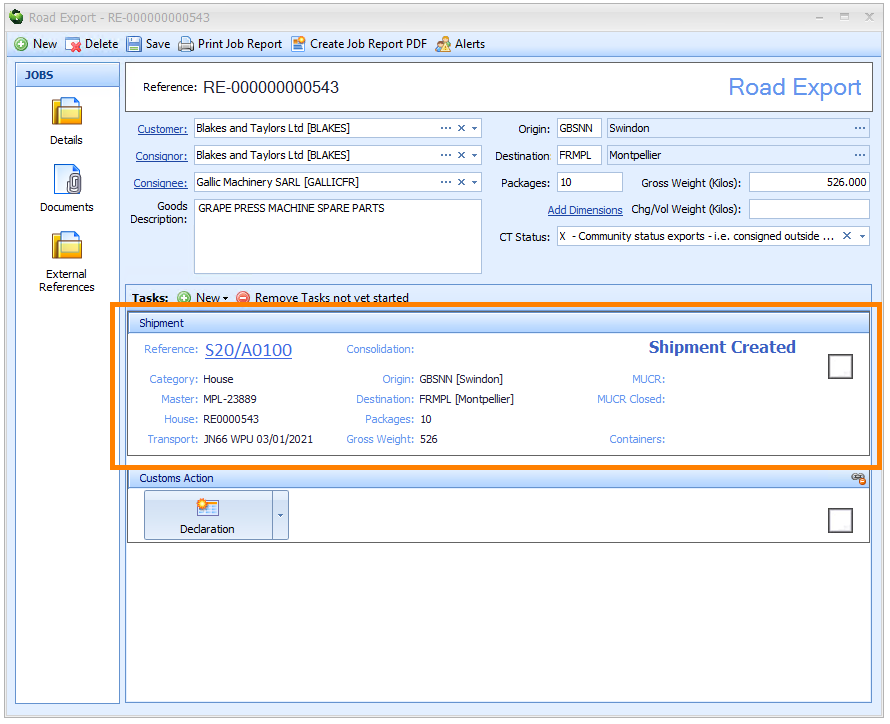
You will then be returned to the Road Export editor which will now display a summary of the shipment details on the Shipment Tasks area as highlighted below.
Add a Customs Declaration
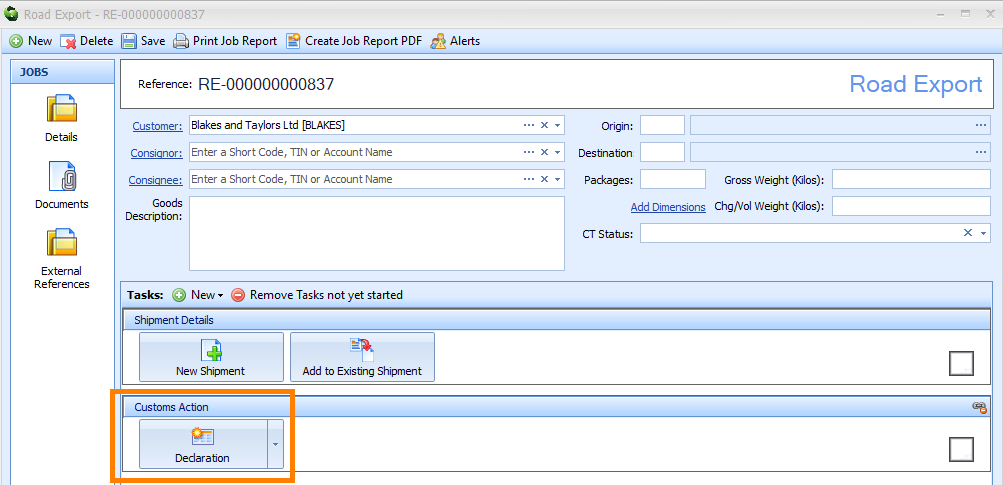
To create a customs declaration for this Job click on the Declaration button in the Customs Action Tasks area of the Road Export editor.
A New Customs Declaration dialog box will appear displaying a list templates of different types of declarations.
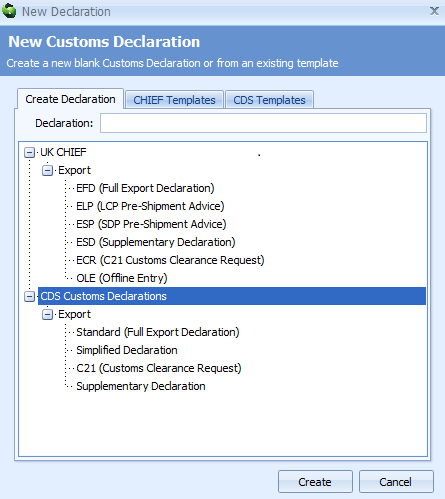
Select the type of declaration by either double clicking on it or by clicking on it once and then clicking on the Create button. This will display the Export Declaration editor.
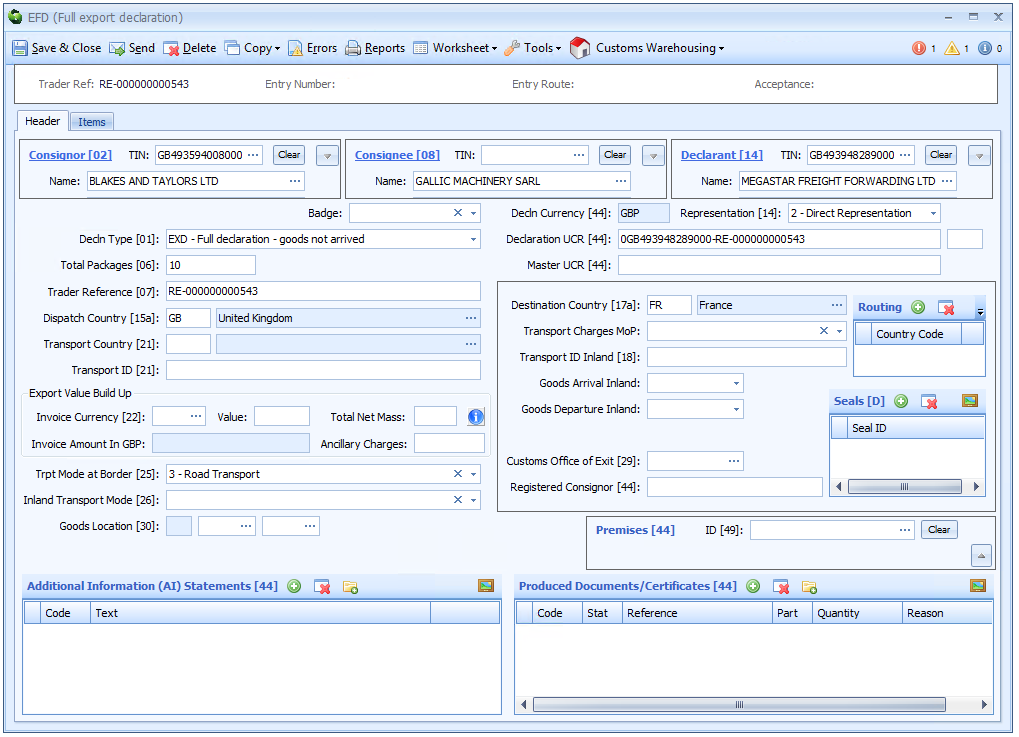
As you can see from the example above, information from the Job and the shipment has been automatically entered into the Export Declaration editor. Enter any missing information into the Export Declaration editor boxes.
Important information
If the goods to which the declaration relates are to be exported moving via locations without existing customs control systems (including RoRo listed locations and other non-inventory linked locations) an ARRIVED Declaration (i.e. by declaring
EXAor similar in Box 1) must be submitted before the goods have left the trader's premises.In these circumstances the mode of transport (box 26) should be declared as
6.This MUST be done in the original declaration; you cannot amend a pre-lodged declaration to an arrived one.
You should refer to the guidance from the UK Trade Tariff: volume 3 for CHIEF for more information on requirements.
Once you have entered all of the required information, click on Send on the toolbar at the top left hand side of the Export Declaration editor. This will send the declaration to CHIEF and close the Export Declaration editor.

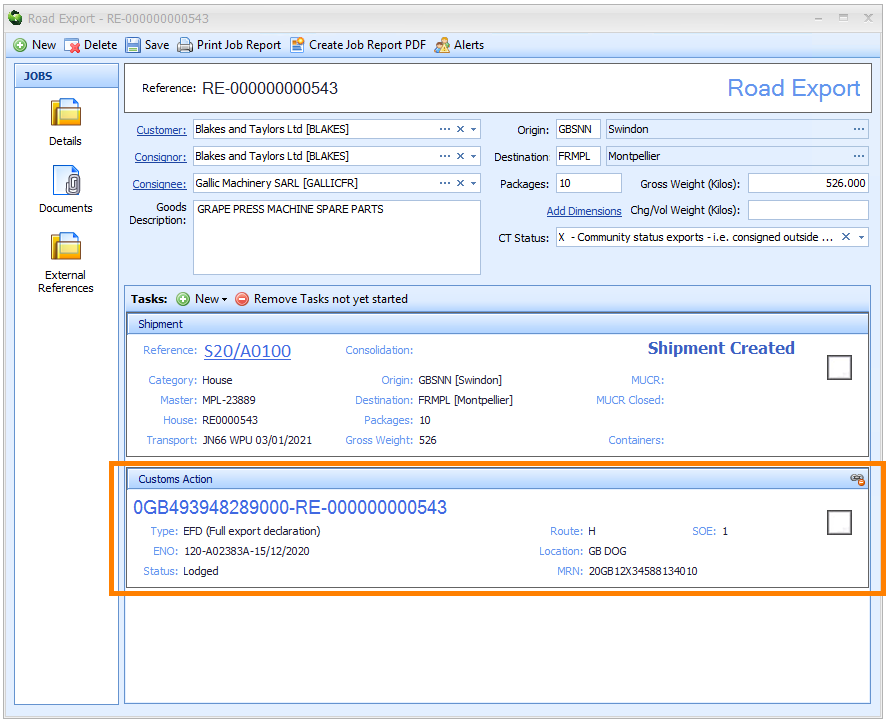
The Customs Action Tasks area of the Road Export editor will update to reflect the current status of the declaration as it is processed by customs (as shown below).
Add Additional Declarations
A Job may require multiple declaration. This could be due to the nature of the goods being exported, for example, you may have reached the maximum number of items (99) able to be listed on one declaration or the goods are being exported under Simplified Procedures and one or more supplementary declarations are required.
If additional declarations are required click on New in the Tasks section of the of the Road Export editor and a context menu will appear. Click on Customs Action Task in the context menu.
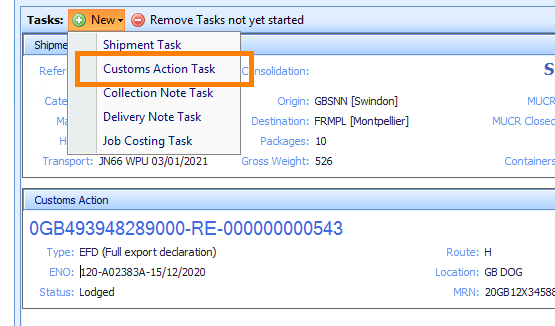
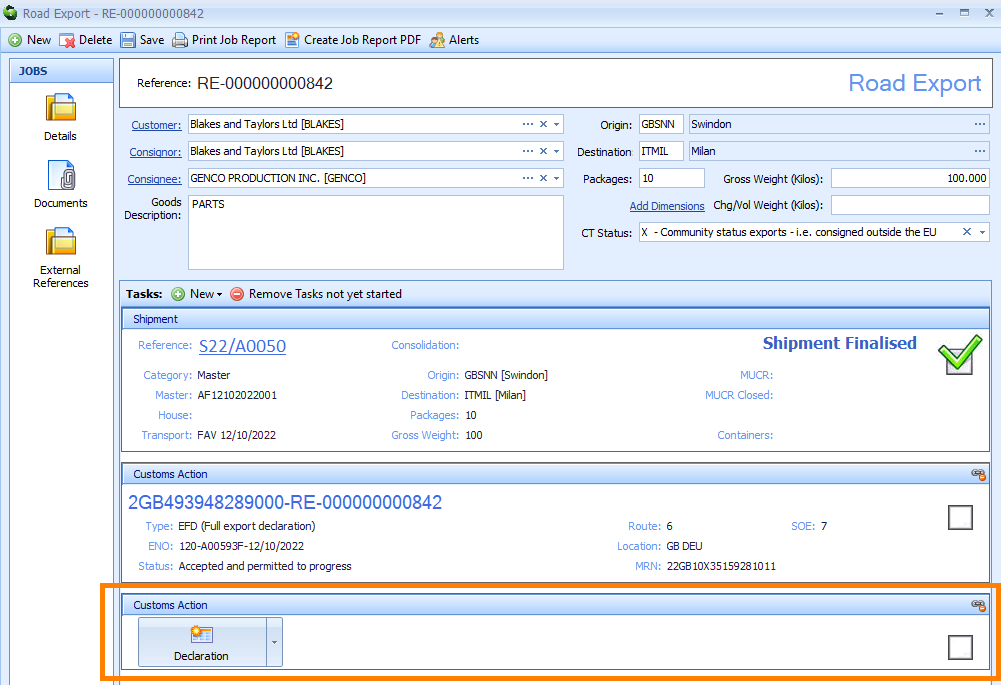
A new declaration will appear in the Road Export editor Customs Action Tasks section which you can edit as described in the instructions above.
Finalise a Shipment
Once you have entered all the information into the Job and shipment records and all Tasks have been completed it is important to 'finalise' the shipment.
If the shipment has been associated with a consolidation then you do NOT need to finalise the shipment. Please refer to the Finalising a Consolidation guide.
Finalising a shipment serves a number of important purposes:
- It acts as a visual check that everything you need to do has been done
- It prevents further changes being made to the shipment - although this can be overridden later if necessary
- If you have specified a MUCR (Master Unique Consignment Reference) on the shipment record then Sequoia will automatically associate the DUCRs (Declaration Unique Consignment References) of Jobs linked to the shipment to the MUCR you have specified
- Sequoia will also 'shut' the MUCR if you have specified one
- After a specified time (normally 30 days) finalised shipments will no longer appear on the list of shipments in the Export module. If all the Tasks on a Job (including the Shipment Task) have been completed/finalised then the Job will also not appear on the Jobs list after that period
If the shipment is departing through a GVMS location, you should not use a MUCR and instead associate all of the DUCRs to the GMR.
If the shipment is departing through an inventory linked location, and if the shipment is covered by one declaration, then you should not use a MUCR and instead just give the haulier/loader the DUCR.
To finalise the shipment open the Shipment record by double clicking on the Shipment Task in the Road Export editor. You can also click on the Reference link (as highlighted below) in the Shipment Task.
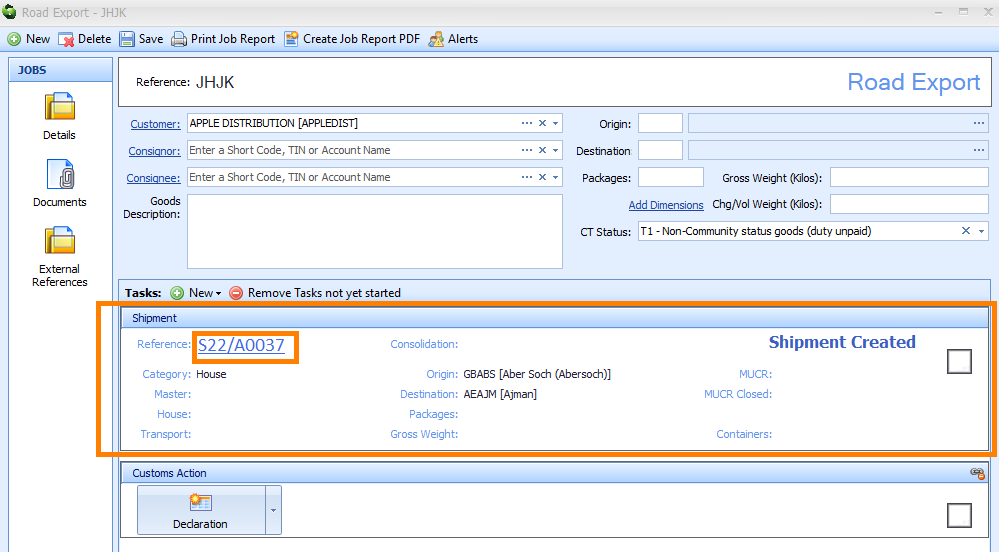
This will open the Road Shipment editor. Click on Finalise on the toolbar in the top left hand corner of the editor.
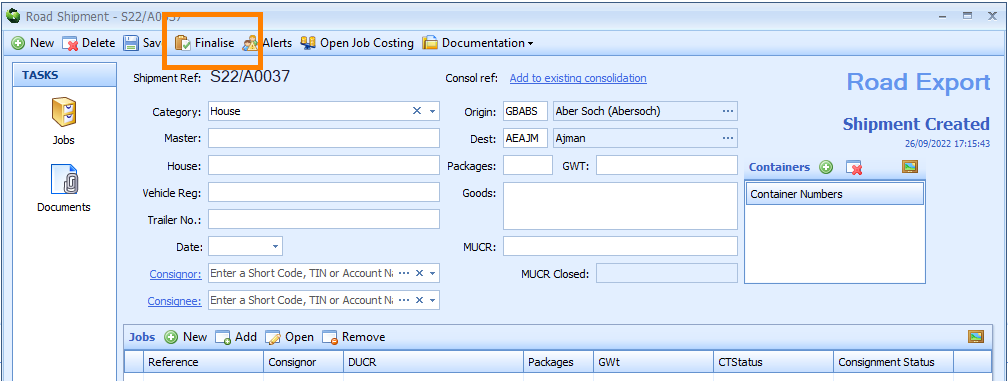
A dialog box will appear letting you know that continuing will prevent you from making any further changes to the shipment and asking you to confirm that you are happy with this. If you click on the Yes button then the Finalise Shipment dialog box will appear (as shown below).
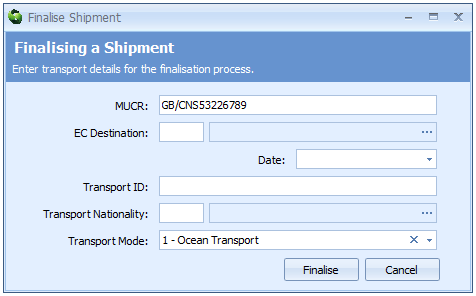
You only need to enter the date and a MUCR (Master Unique Consignment Reference) if one has not been automatically entered into the Finalise Shipment dialog box to finalise the shipment. The rest of the information is not required and Sequoia will remove it from the editor in due course. Once you done this click on the Finalise button.
You will see that the Shipment Task status will change to 'Finalisation in Progress' in the Road Export editor - as highlighted below.

Once all of the DUCRs (Declaration Unique Consignment References) have been associated to the MUCR (Master Unique Consignment Reference) and confirmation has been received from CHIEF that the MUCR has been 'shut' then the status of the shipment will change to 'Shipment Finalised' and the date and time that the MUCR was closed will be displayed.

Unfinalise a Shipment
Finalising a shipment prevents any changes being made to it. If you have mistakenly finalised a shipment and need to make changes to it then you can 'unfinalise' it.
PLEASE NOTE that unfinalising a shipment will not dis-associate any DUCRs (Declaration Unique Consignment References) from the MUCR (Master Unique Consignment Reference) you have specified. Nor will it 'open' the MUCR again - it is not possible to do that.
It will, however, allow you to make any changes you require and if you add any more goods to the shipment it will associate any further DUCRs (Declaration Unique Consignment References) to the MUCR when you re-finalise it.
To unfinalise the shipment open the Shipment record by double clicking on the Shipment Task in the Road Export editor. You can also click on the Reference link (as highlighted below) in the Shipment Task.

A Shipment editor will appear. Click on Unfinalise on the toolbar at the top left hand corner of the editor.

You can now make changes to the shipment and when you have finished you can finalise it again by following the instructions above.
