
Sequoia Configuration - Enterprise Management
Overview
The Sequoia Configuration application allows you to configure the details of your company, such as badges, sites, roles.
This configuration is global in nature - i.e. it will affect all users of your Sequoia software.
This document will guide you through configuring Sequoia via the Sequoia Configuration application. It is installed as part of the Sequoia Server software installation and you can find a shortcut to it on your Sequoia Server machine.
The focus of this page is the Enterprise Management section of the Sequoia Configuration application.
Launch the Sequoia Configuration application

Sequoia
Configuration
Open the Sequoia Configuration application from one of the following locations:
- Your desktop, by double-clicking on the Sequoia Configuration icon (as shown right).
- The start menu [Start > Programs > ASM Sequoia > Sequoia Configuration]
- By browsing to the file location at
C:\Program Files (x86)\ASM\Sequoia Server\MMC Files\ASM.Sequoia.Configuration.LaunchMmc.exe. The file location may differ if your software administrator has requested installation onto another drive or directory.
You may find that your experience is different depending on the version of the Windows Operating System you are using.
You will be presented with a view of 'nodes' with varying titles. This guide is about configuring the node called 'Sequoia Enterprise Management'. You will find that if you click on the arrow to the left of the node, you can expand it to show more areas of configuration (more nodes).
You can configure functionality by drilling down through the nodes in the list - expanding the nodes to reveal more configuration and right clicking the node you are interested in for options (which are explained in this guide).
Start by expanding the 'Sequoia Enterprise Management' node, then expand the node which has your company name. At this point, you should see nodes for 'Access and Security' and 'Configuration'
Access and Security
Under Access and Security, you can configure the Enterprise, Badge Codes, Sites and Security Roles.
Badges
A badge codes is used by a CSP to identify who is sending a message, and also to know who to send messages to. Your company will have been issued one or more badge codes per CSP. There are computer systems (such as NCTS) which do not use badge codes, but may use your company's EORI to identify you instead.
To keep the user experience consistent within Sequoia, all CSP configuration is tied to a badge code (in some cases a pseudo badge code). Once your badge code has been set up, it will very rarely need to change. While you can make changes to your badge configuration, it is recommended that you contact the ASM helpdesk for support.
To setup badges:
- Expand out 'Sequoia Enterprise Management' > [Your Company Name] > 'Access and Security'
- You should see nodes for 'Badges', 'Sites' and 'Security Roles'
- You should see nodes for 'Badges', 'Sites' and 'Security Roles'
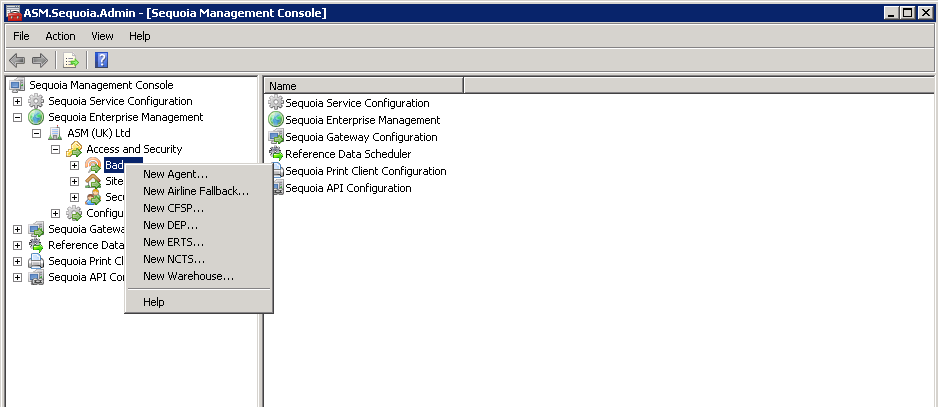
- Right click the 'Badges' node and select the type of Badge you want to create
- Complete the required fields, click create, this will then show your code on the right hand side of the form.
- This task is typically performed by experts on the ASM helpdesk during your initial installation - please only change these settings if you are sure about what you are doing.
Sites
At least 1 site per company is required, these are used to group users together, so you may want to group them geographically or by department.
To Create a Site:
- Expand out 'Sequoia Enterprise Management' > [Your Company Name] > 'Access and Security'.
- You should see nodes for 'Badges', 'Sites' and 'Security Roles'.
- Right click on the Sites node and select 'New Site'.
- Complete the required fields, click create, this will then show your code on the right hand side of the form.
Users
You can add user accounts to your Sequoia application. A user account will be linked to a site and will have a number of security roles which determine what functionality they can access within Sequoia.
- Expand out 'Sequoia Enterprise Management' > [Your Company Name] > 'Access and Security'.
- You should see nodes for 'Badges', 'Sites' and 'Security Roles'.
- Expand out the 'Sites' node.
- Expand out the Site node that the user is to be attached to
- e.g. if you have a site called 'Heathrow' expand out the 'Heathrow site'
- You will see 'Teams' and 'Users' under the site.
User accounts can be created in two ways - either with an Active Directory, or linked to a username / password.
Create User Account linked to Active Directory
Using this type of Sequoia user account - when loading the Sequoia client application, the user will not be prompted to enter their password as authentication will happen automatically using Active Directory.
To create an Active Directory User:
- Follow the steps above to get to the 'Users' node which is under a specific site.
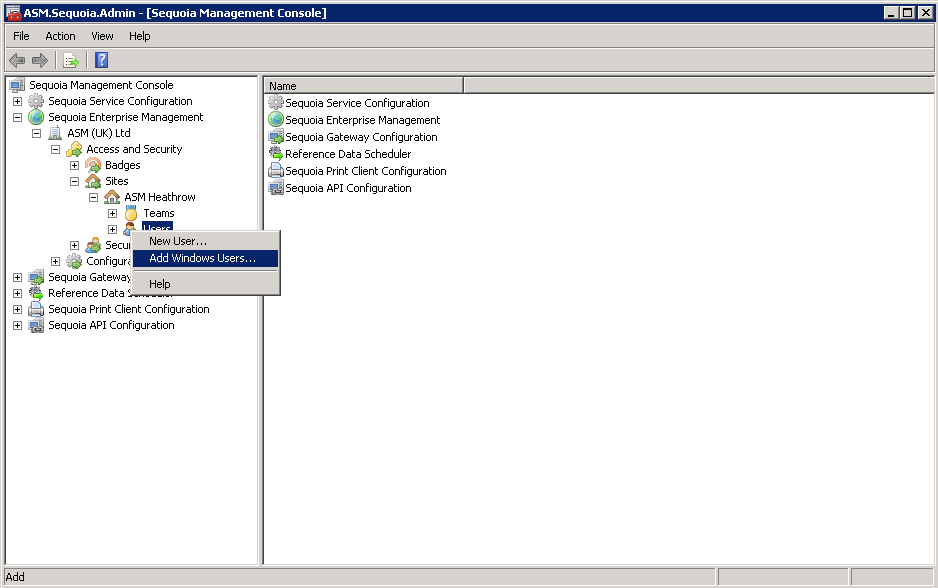
- Right click the 'Users' node and select 'Add Windows Users'.
- Within the 'Add Windows Users' form click 'Add User'.
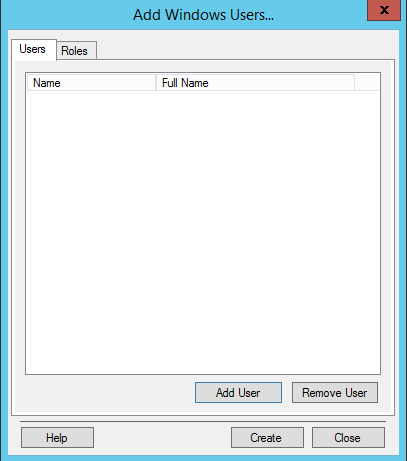
- Add in the Active Directory user name, ensuring the 'Location' is the correct network location for that user.
- Click 'OK' and then 'Create'.
- A user account will be created and linked to the specified Active Directory account.
Create a User Account with basic login credentials
Using this type of Sequoia user account - when loading the Sequoia client application, the user will be prompted to enter their password.
To create a User Account
- Follow the steps above to get to the 'Users' node which is under a specific site.
- Right click the 'Users' node and select 'New User'.
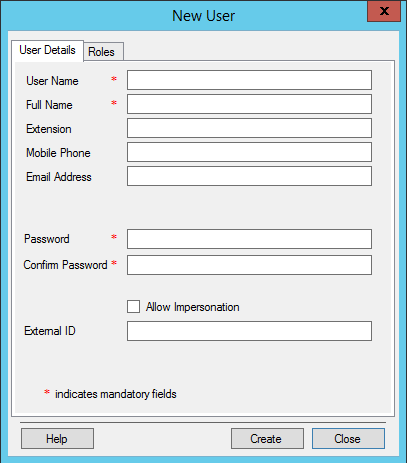
- Complete the user details.
- Click 'Create'.
- A user account will be created.
Extra concurrent usage
Sequoia allows a set number of people to use the system at any given time. This is the 'concurrent usage' allowance, and it is built into your software licence.
If you find that you need more active user logins, please contact the ASM Helpdesk via the ASM Service Desk Portal for more information.
Security Roles
Security Roles are used to assign permissions and access to users, print configuration can also be setup using Roles.
To create a Role:
- Right click Security Roles and select the type of role you want to create.
- Complete the required fields.
- Print client will typically be 'localhost' if the Sequoia print client is on the same machine.
- Multiple badge codes can be added to a single role.
- Limited functionality can be set using the 'Role privileges' tab within the Role Properties section.
Adding Users to Roles
Users need to be added to Roles to enable them access to Sequoia. Once a user is added to role[s] they will only have access to those roles permissions.
- Using the steps above create your required Roles.
- Once your Roles have been created Right click the Role and select 'Add/Remove Users'.
- On the left of the 'Add/Remove Users' form will be a list of users available to add.
- Users will need to be added one at a time Select the required user for the role and click 'Add', repeat this for each user.
- Once all the required users are showing on the right side of the form click 'OK'.
- Repeat steps 1 to 5 for each role.
Configuration
Under the configuration section you can set up automatic job references, item favourites and configure NCTS profiles.
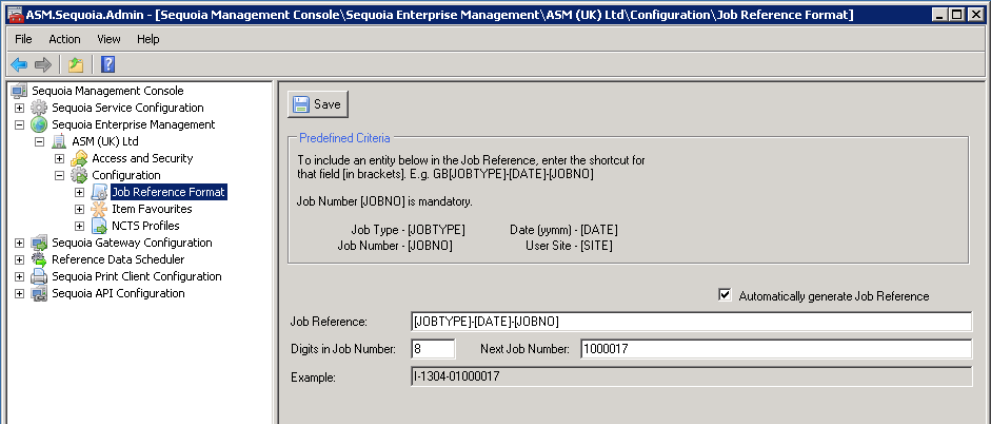
Job Reference Format
- Select 'Job Reference Format' and fill out the necessary Job Reference that you want it to generate, along with how many digits you want it to use and the next job number.
- Click Save, before closing this form.
Item Favourites
Depending on what options are checked in the Item Favourites section will depend on which fields of the declaration get saved as an Item Favourite
- Select Item Favourites, tick the required fields.
- Click Save, before closing this form.
NCTS
Refer to this separate guide for NCTS configuration.
Sequoia Gateway Configuration
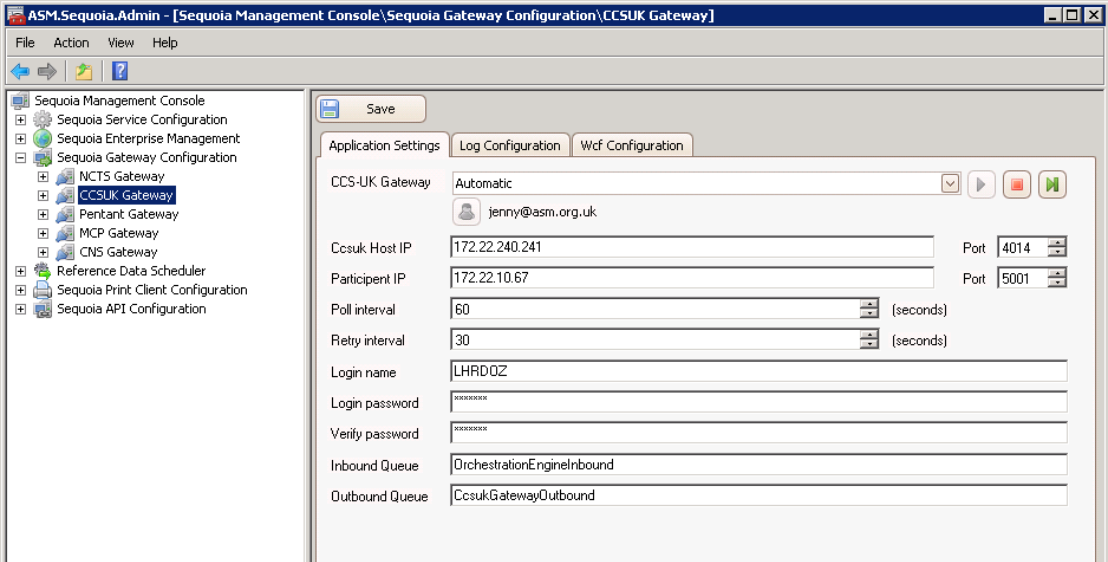
To Configure the Gateways:
- Expand the 'Sequoia Gateway Configuration'.
- Select the gateway you want to configure.
- Under the Application Settings tab, complete the relevant data.
- Under the Log configuration tab you will be able to set how much or how little info Sequoia logs for that gateway, this is the same on all of the gateways.
Service Configuration
The level of logging can be changed depending on what needs to be logged. This can easily be changed by using the service configuration options within Sequoia Configuration application.
- Open the Sequoia Configuration application and select the Service Configuration you need to change
- Under the 'Log Configuration' There are 5 logging options:
- Rolling Log File Appender - sets levels for the specific log file. This is the one that the ASM Help Desk will use the most and change logging levels to suit when troubleshooting.
- Coloured Console Appender - when the application is running console windows instead of windows services. The Developers use when testing on their computers, so this is not usually used on customer sites.
- Output Debug String Appender - is for the debug output that is created before the events are written to a log file. It is a tool for Developers to view errors instead of reading logs and is handy for viewing errors in real time. This will almost never be used by the Help Desk
- Event Log Appender - set levels for writing to the event log. The default is Warning and Fatal and should not be changed.
- Global Minimum Logging Level - Minimum sets the minimum for all and takes precedence over the minimums set for each Appender*. The Global Each log file is set to grow to 100 MB maximum. Once the max is reached the service will start logging to a new file (default maximum is 10 files).
- WCF Configuration Enables diagnostics allows auditing of the config file.
*for example if the Rolling log file Appender has a minimum of 'ALL' but the Global Minimum level is 'INFO' the Rolling log file will only log at a minimum of 'INFO', To override the Global logging level the Rolling log file will need to be at a higher level than the Global logging, the order form minimum to maximum is - ALL, DEBUG, INFO, WARN, ERROR, FATAL
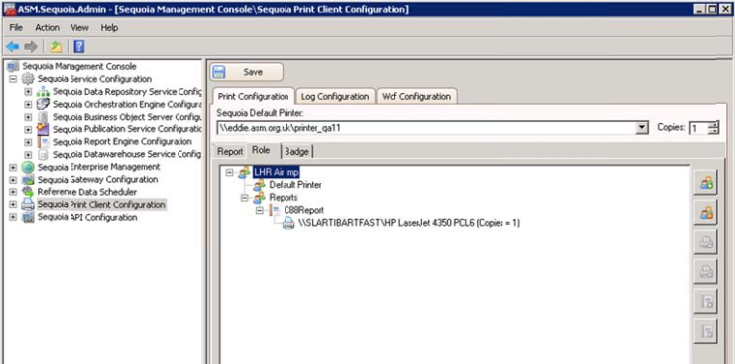
Print Client Configuration
The Print Client Configuration allows the setup of reports either on a per report, role or badge basis.
Report Configuration - Report
Configuring reports via the 'Report' tab will change all reports across the entire enterprise.
Configuring the Reports Tab
- Click 'Add a default printer for a specific report'
- Select the report from the drop down list.
- Select the default printer from the drop down list.
- Select the number of copies, if more than one is required.
- Click 'OK' then click 'Save'.
- Repeat steps 1-5 for each report.
Configuring the Role Tab
Using this tab you can either configure a default printer for the role, or individual reports per role.
- Click 'Add Role printer configuration'.
- Type in the name of the Role - This must be exactly as the Role name is displayed, click OK.
- If configuring a default printer for a role - select 'Default Printer' then 'Add a default printer to the selected role'.
- Select the printer and the number of copies, if more than 1 is required, click OK.
- If configuring different reports to different printers per role - select 'Reports' then 'Add report specific configuration to the role'.
- Select the report, default printer and number of copies of more than 1 is required.
- Click 'OK' then click 'Save'.
- Repeat steps 1-7 for each report.
Configuring the Badge tab
Using this tab you can configure a default printer or individual reports per badge
- Click 'Add Badge Printer Configuration'.
- Type in the Badge code, click OK.
- If configuring a default printer for a badge - select 'Default Printer' then 'Add a default printer to the selected badge'.
- Select the printer and number of copies, if more than 1 is required, click OK.
- If configuring different reports to different printers per badge - select 'Reports' then 'Add report specific configuration to the badge'.
- Select the report, default printer and number of copies if more than 1 is required.
- Click 'OK' then click 'Save'.
- Repeat steps 1-7 for each report.
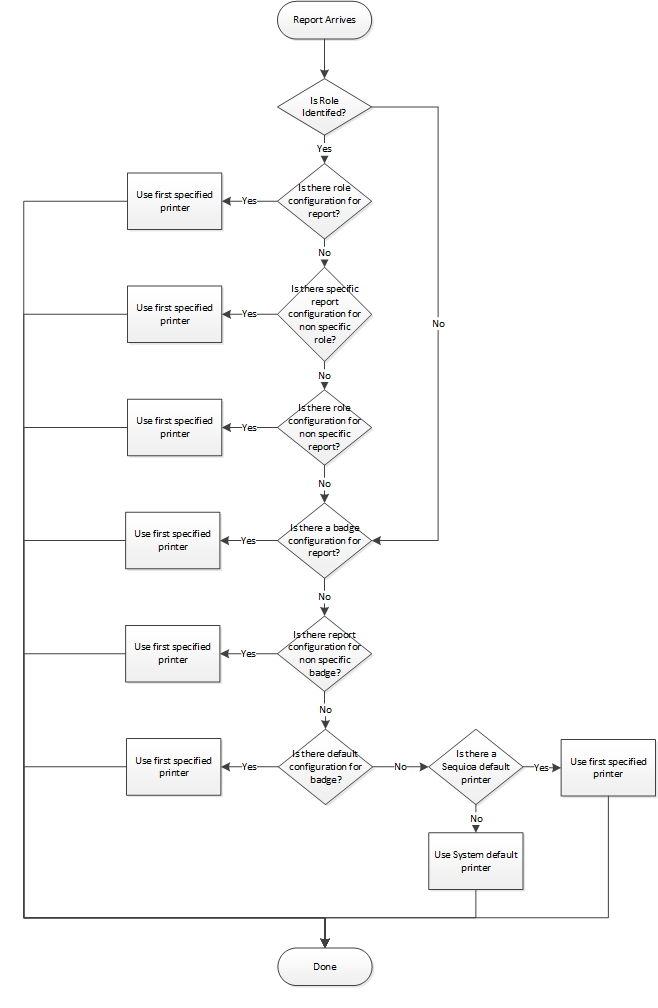
Printer Selection Flowchart
Worksheet Configuration
To be able to import Worksheets, Translators must first be registered, this can only be done within the Sequoia Configuration application.
Sequoia is shipped with 'default Translators', these cannot have Customers assigned to them and can be used by any Customer.
Translators registered have to have a Customer assigned in order to Import Worksheets.
Registering Translators
- Open Sequoia Configuration application, drill down through 'Sequoia API Configuration>Sequoia API Intermediary Configuration>Worksheet Registration'.
- Select 'Register New Translator'.
- Give the translator a name and description.
- Click 'Select Translator File' the 'Open' dialog will default to the Sequoia API directory, select 'ASM.Sequoia.Worksheet.Translators.dll' and click 'Open'.
- Select the translator class you wish to use.
ASM.Sequoia.Worksheet.Translators.Providers.ExcelXlsxExportWorksheetTranslatorProviderASM.Sequoia.Worksheet.Translators.Providers.ExcelBiffExportWorksheetTranslatorProviderASM.Sequoia.Worksheet.Translators.Providers.ExcelXlsxImportWorksheetTranslatorProviderASM.Sequoia.Worksheet.Translators.Providers.ExcelBiffImportWorksheetTranslatorProviderASM.Sequoia.Worksheet.Translators.Providers.XmlWorksheetTranslatorProvider
- Excel XLSX Translators are for use with Office 2007 and forward, Excel Biff Translators are for use with pre Office 2007. Excel does not need to be installed on the same machine as either the Sequoia Services or User Application.
- Select the provider and click 'OK'
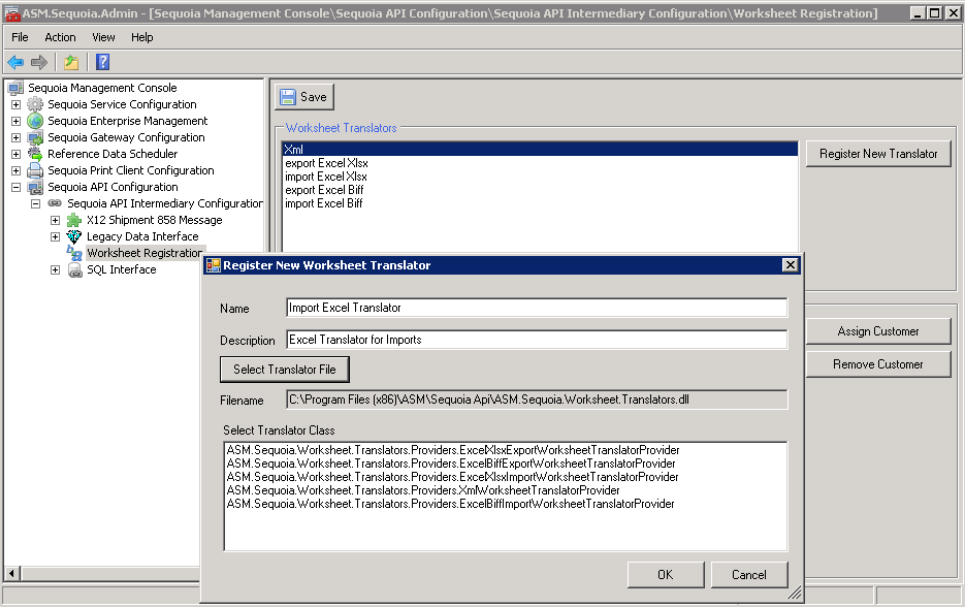
- Click 'Assign Customer', select the customer(s) to be used with the Worksheet translator and click 'OK' each customer that you wish you to use import worksheets for have to be assigned to each translator.
- Once all the required translators have been registered the API Intermediary service will need to be re-started before any Worksheets can be imported.