
NCTS - Create Arrival & Unloading Remarks
Create an NCTS Transit Movement
There are two ways to start creating a NCTS Transit Movement:
Either
1) Click on the NCTS module at the bottom left hand side of the screen. Then, click on either the Declarations or Arrivals folder at the top left hand side of the screen. Next, right-click on the list area of the screen and a context menu will appear. Click on New in the context menu.
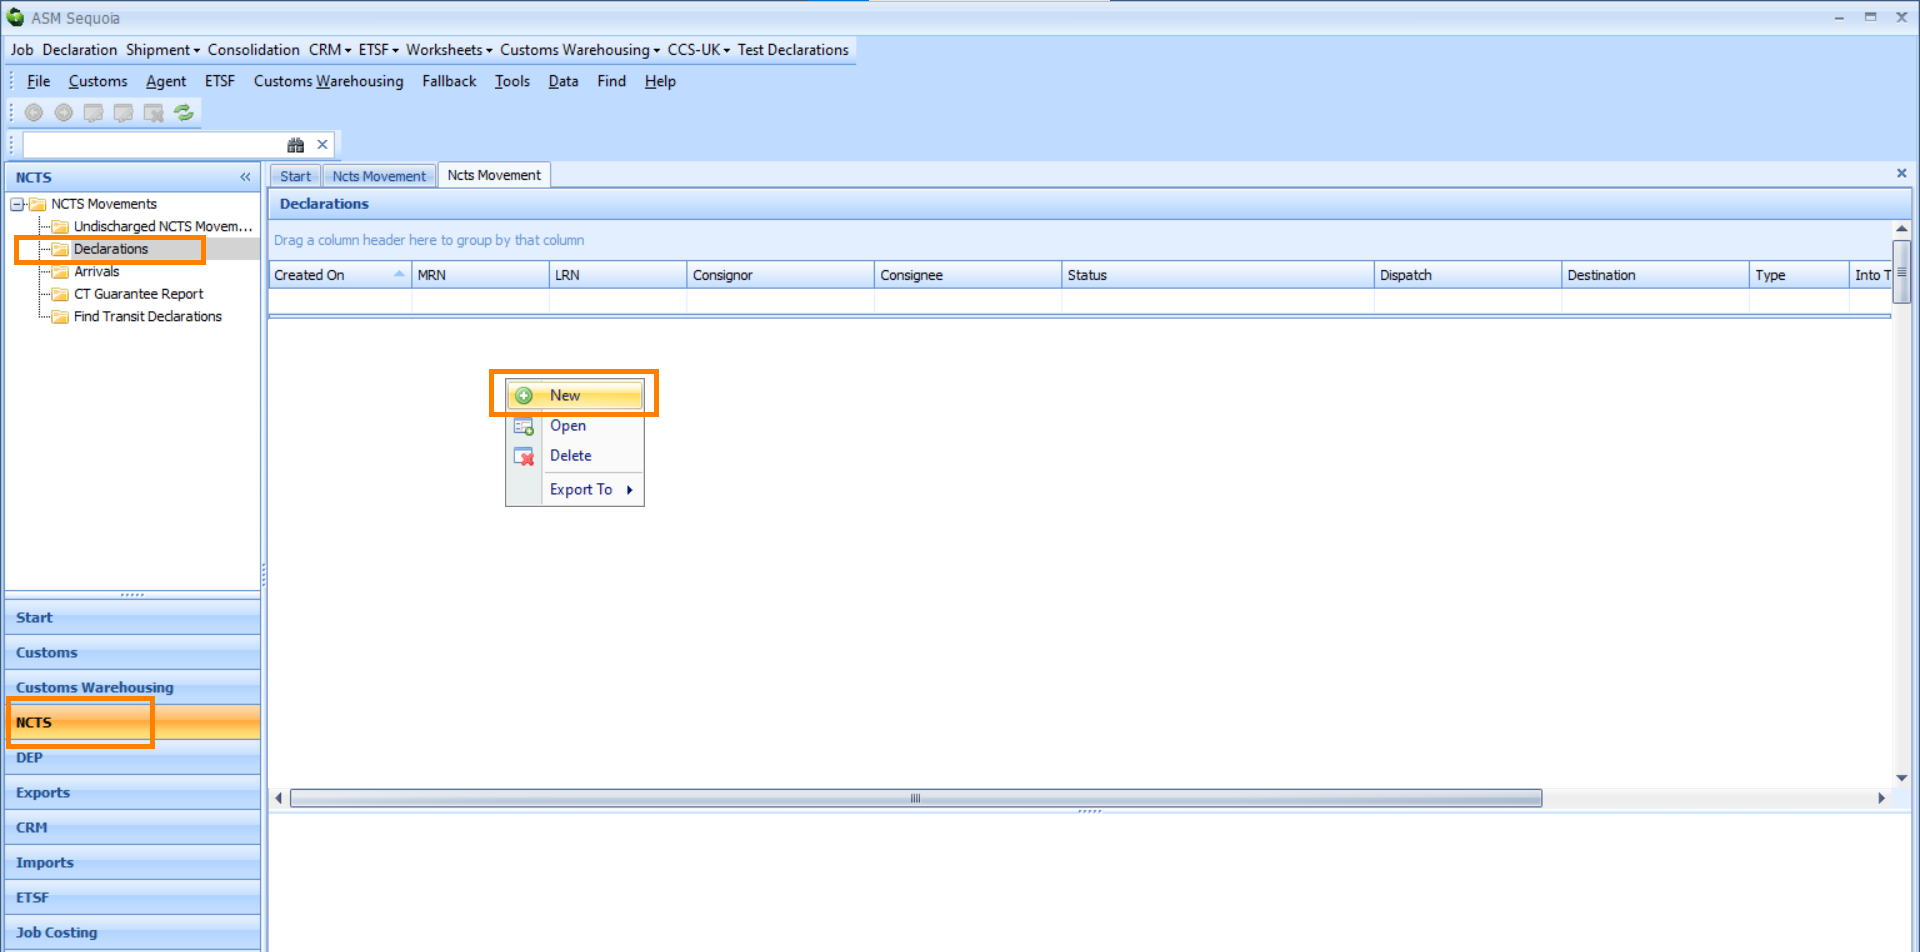
A New NCTS Transit Movement dialog box will appear. Click on either the Arrival or Declaration icon, depending on which type of Movement you are creating.

or
2) Select File from the main Sequoia toolbar at the top left hand side of the screen. A drop-down menu will appear. Click on New followed by NCTS Movement.
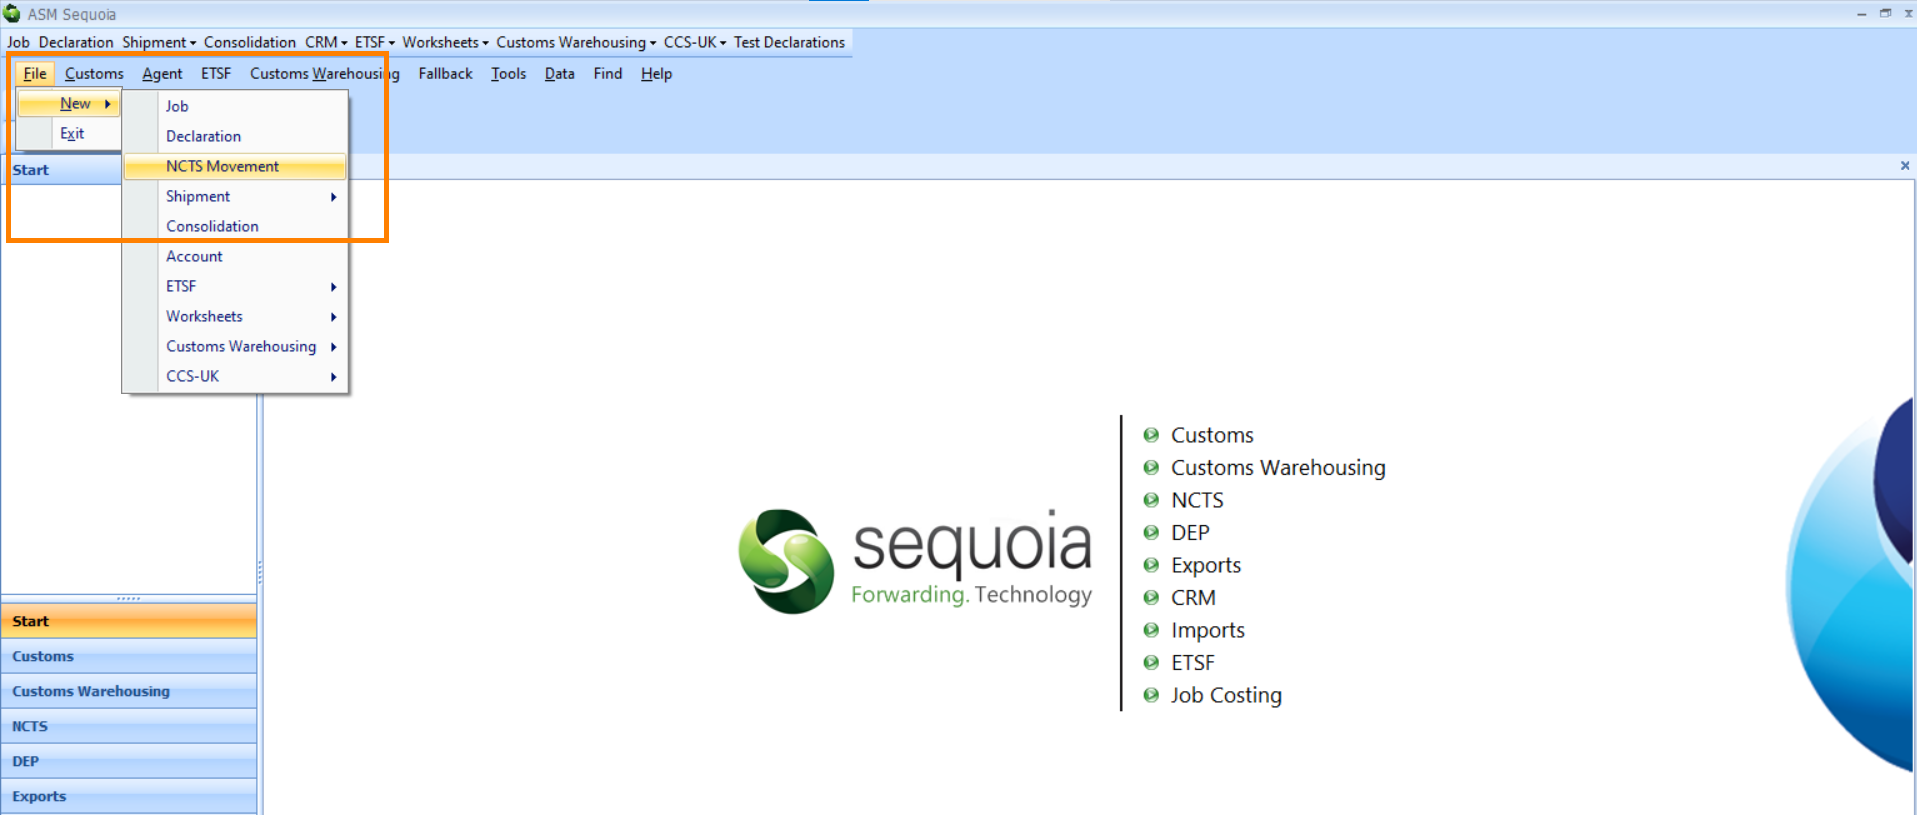
A New NCTS Transit Movement dialog box will appear. Click on either the Arrival or Declaration icon, depending on which type of Movement you are creating.
Next, enter the information described in the table below into the boxes of the New NCTS Transit Movement dialog box.
| Box | Information required |
|---|---|
| Reference [LRN] | You must create your own Local Reference Number (LRN) and enter it into this box This reference can be anything you choose and will allow you to identify this Movement in your records. It is only technically required for a declaration, but also must be entered to create a Movement record in Sequoia. |
| Consignor | The consignor (the shipper) Enter either the name, Short Code or EORI/ TIN number of the consignor. You can select this information from a list by either typing a ? into this box, or by clicking on the ellipsis (the 3 dots) to the right of this box to display the Account Lookup Dialog box. Next, enter the code or part of the code into the search box, click on the binoculars icon to search for it, and then select it from the resulting list by double clicking on it or by clicking on it once and pressing the return key |
| Consignee | The consignee (the receiver) Enter either the name, Short Code or EORI/ TIN number of the consignee. You can select this information from a list by either typing a ? into this box, or by clicking on the ellipsis (the 3 dots) to the right of this box to display the Account Lookup Dialog box. Next, enter the code or part of the code into the search box, click on the binoculars icon to search for it, and then select it from the resulting list by double clicking on it or by clicking on it once and pressing the return key |
Next, click on the OK button at the bottom of the New NCTS Transit Movement dialog box. A NCTS Transit Movement editor will appear.

Create the Arrival
Click on Arrival on the NCTS Transit Movement editor toolbar.

A New NCTS Arrival dialog box will appear.
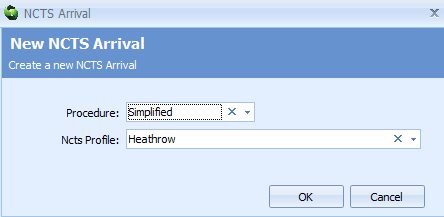
Click in the Procedure box and select either 'Simplified' or 'Normal' from the drop-down list depending on your authorisation. To find out more about Simplified Procedures click here.
Click in the NCTS Profile box and a list of available Profiles will appear. Select the appropriate Profile to apply to the declaration by clicking on it. NCTS Profiles store information relating to any authorised consignor status, guarantees etc. Please note that any NCTS Profile(s) will need to be assigned to your user role in the Sequoia Management Console before they can be selectable from this list. To learn how to set up NCTS Profiles in the Sequoia Management Console, click here.
Next, click on the OK button to create the arrival. An NCTS Transit Arrival Notification editor will appear.
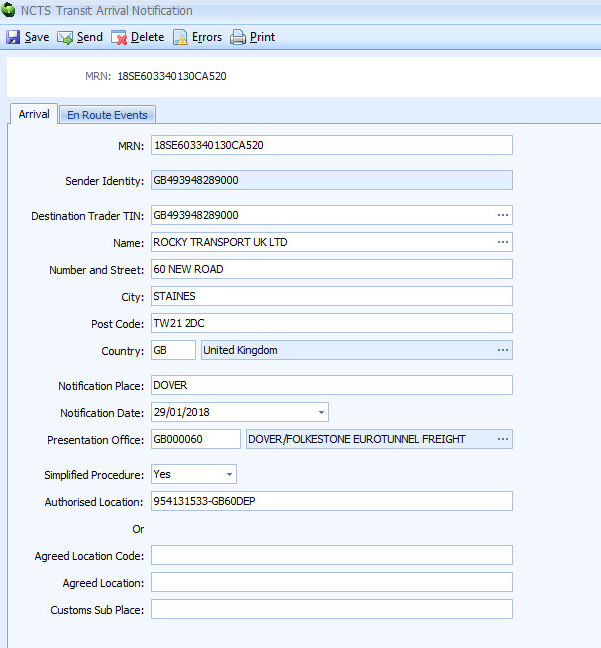
Next, enter the information described in the table below into the boxes of the NCTS Transit Arrival Notification editor.
| Box | Information required |
|---|---|
| MRN | The MRN (Movement Reference Number) found on the TAD (Transit Accompanying Document) |
| Sender Identity | The sender identity will be automatically taken from the selected Profile and entered into this box |
| Destination Trader TIN | Enter the TIN number of the destination trader. You can select this information from a list by either typing a ? into this box, or by clicking on the ellipsis (the 3 dots) to the right of this box to display the Account Lookup Dialog box. Next, enter the code or part of the code into the search box, click on the binoculars icon to search for it, and then select it from the resulting list by double clicking on it or by clicking on it once and pressing the return key. If there is an 'NCTS principle' selected in CRM, this will always default in (only one NCTS principle can be selected) |
| Name | Enter the name of the destination trader. You can select this information from a list by either typing a ? into this box, or by clicking on the ellipsis (the 3 dots) to the right of this box to display the Account Lookup Dialog box. Next, enter the code or part of the code into the search box, click on the binoculars icon to search for it, and then select it from the resulting list by double clicking on it or by clicking on it once and pressing the return key. If there is an 'NCTS principle' selected in CRM, this will always default in (only one NCTS principle can be selected) |
| Address | Enter the address of the destination trader. If there is an 'NCTS principle' selected in CRM, this will always default in (only one NCTS principle can be selected) |
| Notification Place | The place where the goods have arrived. This will be automatically taken from the selected Profile and entered into this box |
| Notification Date | The date that the goods have arrived. This will be automatically taken from the selected Profile and entered into this box |
| Presentation Office | The code for the customs office responsible for the place where the goods have arrived. This will be automatically taken from the selected Profile and entered into this box |
| Simplified Procedure | Select 'Yes' if simplified procedures are being used, and 'no' if they are not and normal procedures are being used |
| Authorised Location | If you are using simplified procedures, this is the code for your authorised location of where the goods have arrived. This will be automatically taken from the selected Profile and entered into this box |
| OR | |
| Agreed Location Code | If you are using normal procedures, this will be the agreed location code of where the goods have arrived. This will be automatically taken from the selected Profile and entered into this box |
| Agreed Location | If you are using normal procedures, this will be the agreed location name of where the goods have arrived. This will be automatically taken from the selected Profile and entered into this box |
| Customs Sub Place | If you are using normal procedures, this will be the customs sub place code of where the goods have arrived. This will be automatically taken from the selected Profile and entered into this box |
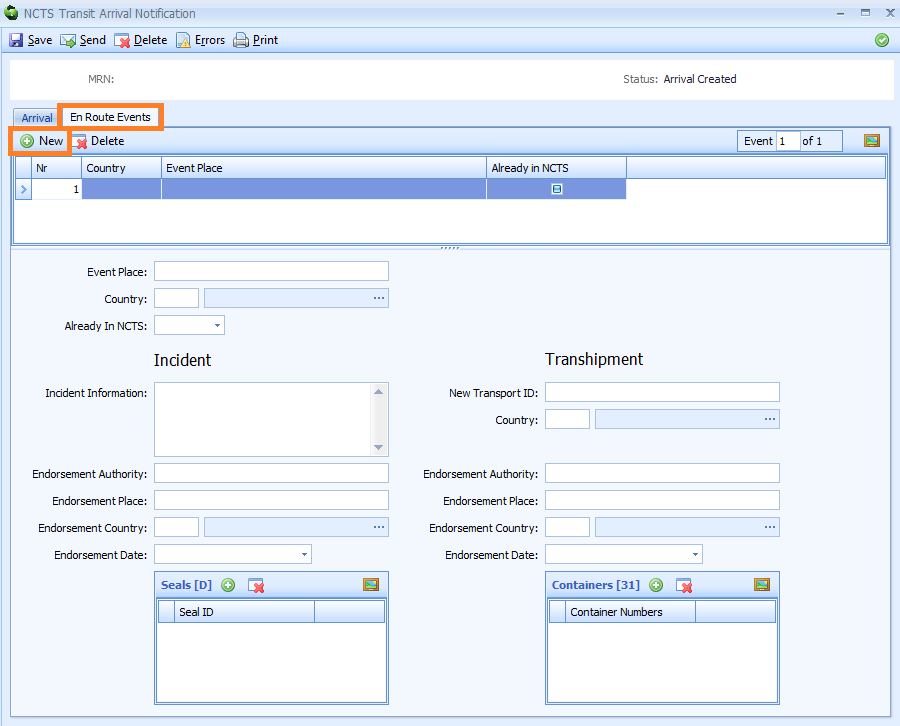
If there are any 'En Route Events' that customs should know about, click on the En Route Events tab and complete the details. Click on New to add new events.
Click on the Send button in the top right hand side of the NCTS Transit Arrival Notification to submit the arrival notification.
The NCTS status will initially update to 'Arrival Transmitted', and will update further once the response is received from NCTS.
Creating NCTS Unloading Remarks
Open the Movement to be unloaded. Note that unloading remarks can only be completed on a Movement with a Status of 'Unloading Permission granted'.
Click on the Unloading Remarks button on the NCTS Transit Movement editor toolbar.

This will display the NCTS Transit Unloading Remarks editor.
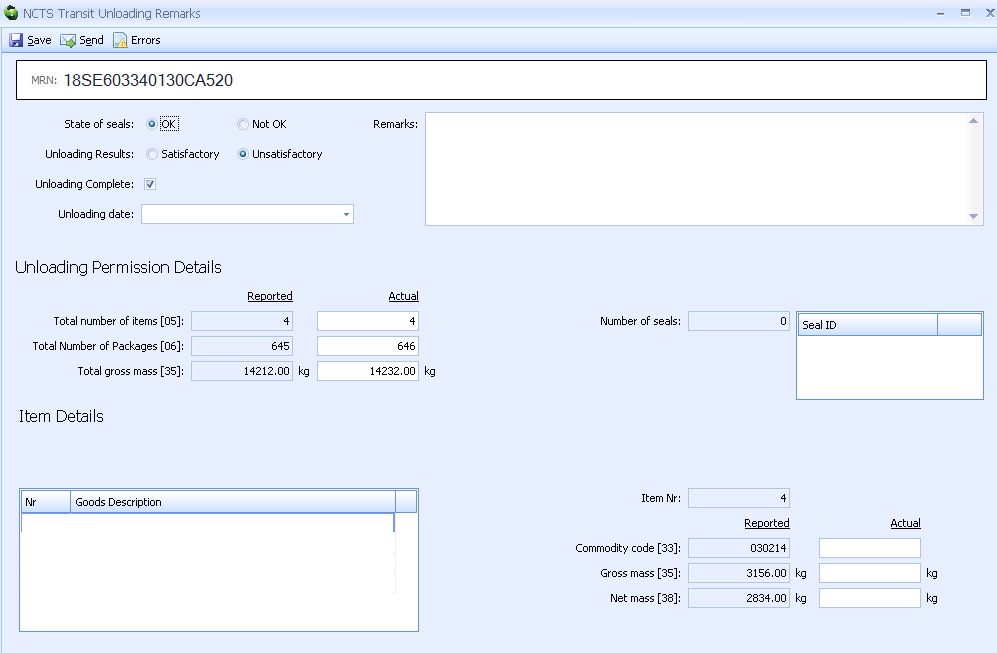
Next, enter the information described in the table below into the boxes of the NCTS Transit Unloading Remarks editor.
| Box | Information required |
|---|---|
| MRN | The MRN (Movement Reference Number) found on the TAD (Transit Accompanying Document) |
| State of Seals | Click in either the OK or Not OK box to report if the lorry seals are intact or not, and if they match up with the data or not |
| Unloading Results | Click in either the Satisfactory or Unsatisfactory box to report any discrepancies between the data and the physical goods |
| Unloading Complete | Click in the box to add a tick once unloading is complete |
| Unloading date | Enter the date when the goods are unloaded |
| Remarks | Enter any required remarks |
| UNLOADING PERMISSION DETAILS SECTION | |
| Total Number of items [05] Reported | The reported total number of items |
| Total Number of items [05] Actual | Enter the actual total number of items |
| Total Number of packages [06] Reported | The reported total number of packages |
| Total Number of packages [06] Actual | Enter the actual total number of packages |
| Total gross mass [35] Reported | The reported total gross mass |
| Total gross mass [35] Actual | Enter the actual total gross mass |
| Number of Seals | The number of seals |
| Seal ID | Enter the seal IDs |
| ITEM DETAILS SECTION | |
| Nr | This column displays the item numbers |
| Goods Description | This column displays the descriptions of each item |
| Item Nr | If you click on an item in the adjacent table, it's item number will appear here |
| Commodity Code [33] Reported | If you click on an item in the adjacent table, it's reported commodity code will appear here |
| Commodity Code [33] Actual | Enter the actual commodity code of the item that you have clicked on in the adjacent table |
| Gross Mass [35] Reported | If you click on an item in the adjacent table, it's reported gross mass will appear here |
| Gross Mass [35] Actual | Enter the actual gross mass of the item that you have clicked on in the adjacent table |
| Net mass [38] Reported | If you click on an item in the adjacent table, it's reported net mass will appear here |
| Net mass [38] Actual | Enter the actual net mass of the item that you have clicked on in the adjacent table |
Click on Send to submit the unloading remarks.
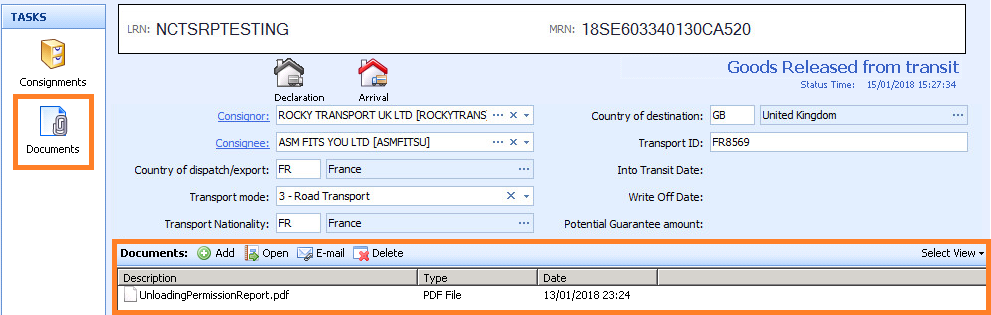
Click on the Documents icon on the left hand side of the NCTS Transit Movement editor to view and /or print the Unloading Permission Report.
If the unloading remarks are not accepted by customs, the status will show as 'Unloading Information Rejected'.