
NCTS - Create a Transit Declaration
Create a Transit Declaration
Once you have created an NCTS Movement (See Creating a transit movement), click on Declaration on the NCTS Transit Movement editor.
PLEASE NOTE
If NCTS is in Fallback and you are authorised by HMRC for 'Business Continuity' procedures, make sure you have ticked the Fallback box on the NCTS Transit Movement editor before creating a declaration.

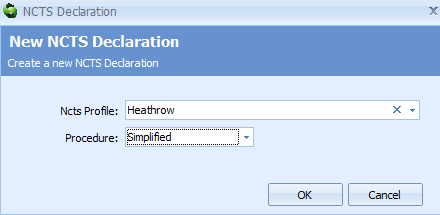
A New NCTS Declaration dialog box will appear.
Click in the NCTS Profile box and a list of available Profiles will appear. Select the appropriate Profile to apply to the declaration by clicking on it. NCTS Profiles store information relating to any authorised consignor status, guarantees etc. Please note that any NCTS Profile(s) will need to be assigned to your user role in the Sequoia Management Console before they can be selectable from this list. To learn how to set up NCTS Profiles in the Sequoia Management Console, click here.
Click in the Procedure box and select either 'Simplified' or 'Normal' from the drop-down list, depending on your authorisation. To find out more about Simplified Procedures click here. Next, click on the OK button.
An NCTS Transit Declaration editor will appear.
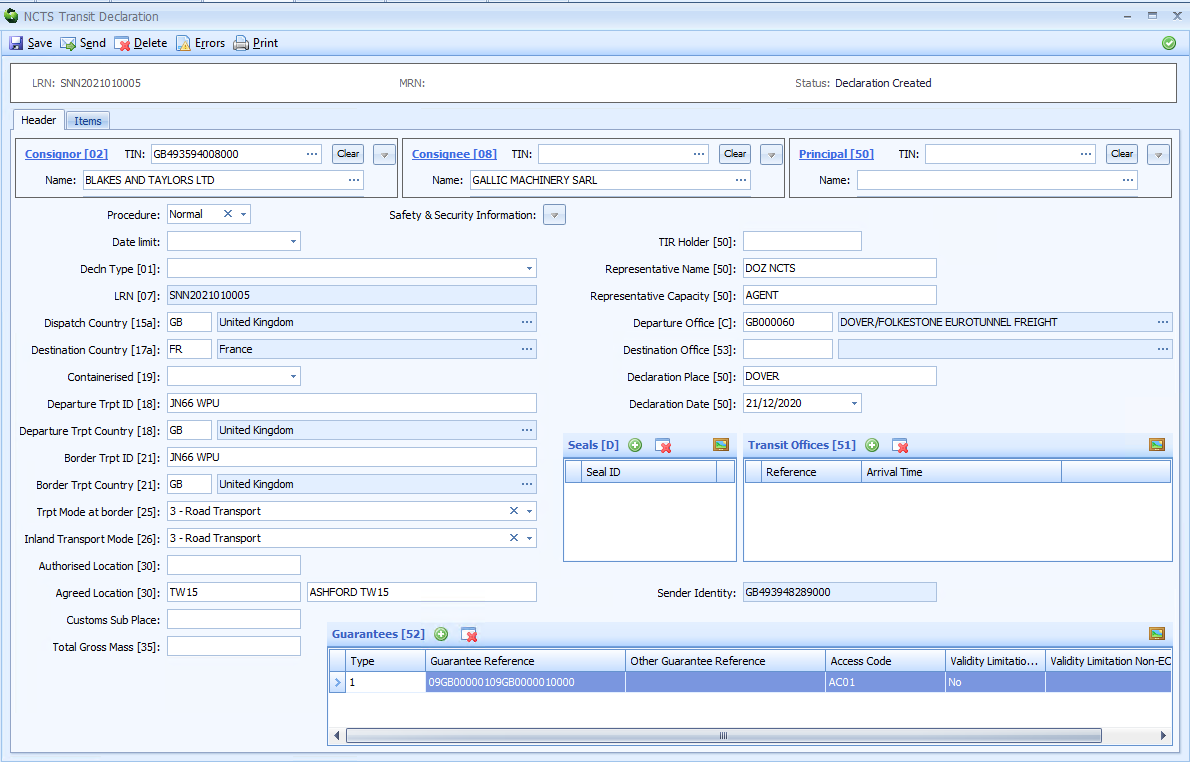
Some of the boxes in the NCTS Transit Declaration editor will be automatically filled with information taken from the Movement and from the NCTS Profile that you previously selected.
If export shipments, consolidations or inventory records have been linked to the Movement, then most of the information required at item level on the declaration will also be automatically entered. This will include commodity codes, net mass and gross mass from any export declaration items. However, although item level gross mass is required in a transit declaration, it is optional in most export declarations. Sequoia will therefore apply item level gross mass as follows:
If gross mass has been declared on the export declaration item, this will be mapped directly to the corresponding NCTS declaration item.
If gross mass has not been declared on the export declaration item, net mass will be used to apportion the shipment gross mass to the items on the NCTS declaration. If the sum of the net mass exceeds the shipment gross mass, then gross mass cannot be calculated and will not be set.
In the case where multiple export declarations are associated to the shipment, some with item level gross mass declared and some without; those items with gross mass declared will be mapped directly to the corresponding NCTS declaration items. If the sum of the gross mass of these items and the sum of the net mass of the remaining items is less than or equal to the shipment gross mass, then the gross mass of the remaining items will be apportioned using the net mass.
In all other cases the item level gross mass will not be set.
The user will see a validation warning in the cases where item level gross mass has not been calculated, or if there is a difference between the header level gross mass and the sum of the items gross mass.
The header level total gross mass will be taken from the associated shipment record(s) and automatically entered.
Complete any additional information required. To transmit the declaration to customs, click on the Send button on the toolbar at the top left hand side of the NCTS Transit Declaration editor.
Fallback
If you have ticked the Fallback box on the NCTS Transit Movement editor, then you will not be able to send the declaration to customs. In this case, you should click on the Print button on the toolbar at the top of the NCTS Transit Declaration editor. The TAD (Transit Accompanying Document) will then print with the required 'Business Continuity' stamps in red, as required by the legislation.
Updating the Declaration Status
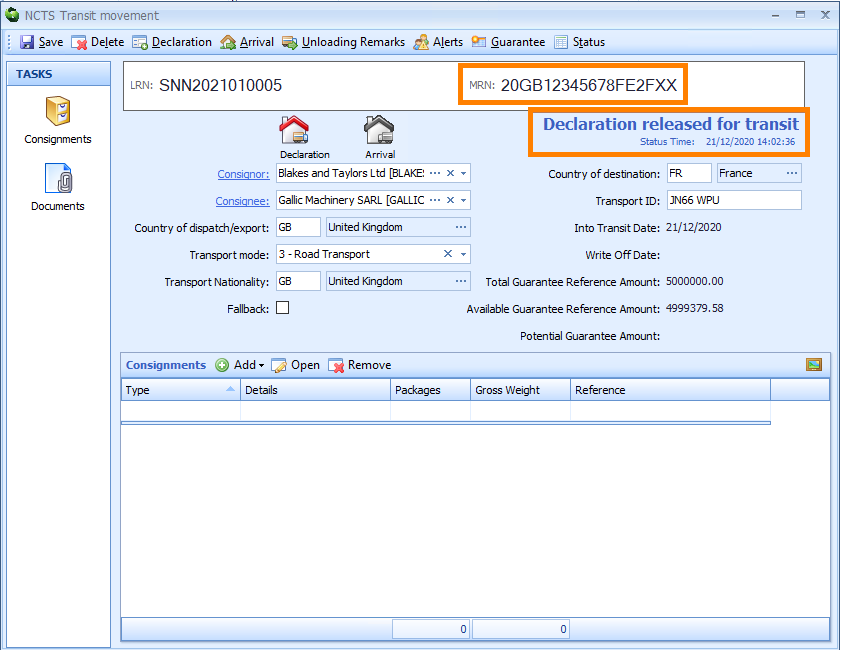
The transit Movement status will update in the top right corner of the NCTS Transit Movement editor as responses and updates are received from customs. In the example below, the status is showing as 'Declaration released for transit'. The MRN (Movement Reference Number) will also appear in the top right hand corner of the NCTS Transit Movement editor, once it has been allocated by customs.
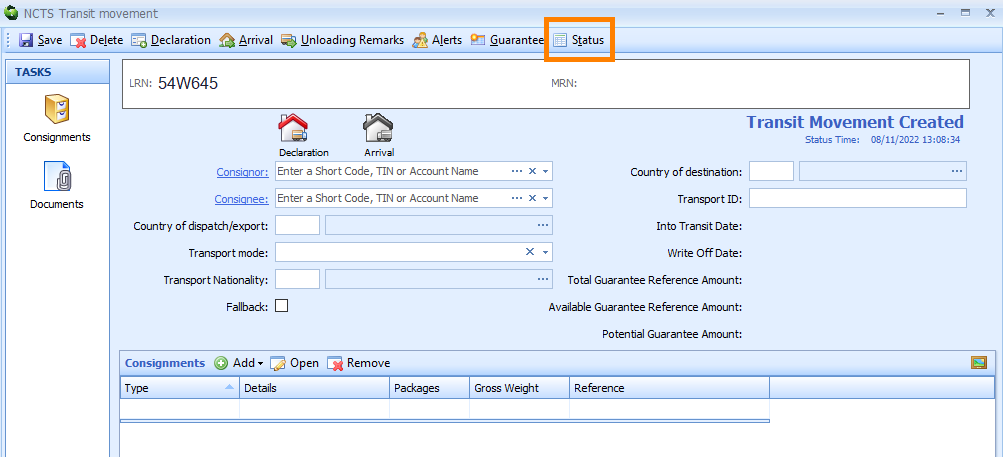
The Status History
The NCTS status history can be viewed by clicking on Status on the toolbar at the top of NCTS Transit Movement editor.
A NCTS Status History dialog box will appear, displaying the date and time of each customs 'event', the resulting status and the EDI (Electronic Data Interchange) message that caused the status to change.

Printing the Transit Accompanying Document (TAD)
The TAD (Transit Accompanying Document) report will automatically print to your specified printer when the goods are 'Released for transit'. The TAD is then stored in the Documents folder in the NCTS Transit Movement editor. You can open documents to print them, or attach them to an email and send them. You can also add documents to the Documents folder by either clicking on the Add button and following the on-screen instructions, or by dragging documents from your computer into the folder.
