Job Costing and Invoicing
Configuring Sequoia for Job Costing
Job Costing in Sequoia requires a specific licence key in order for the functionality to be available to the user (although it is provided at no extra cost).
Once a licence key has been provided, there is some initial configuration to be carried out to ensure that the system works properly. This section describes that configuration.
Enterprise Level Configuration
In the Sequoia Management Console application, select your Enterprise from the left-hand panel and the ‘Job Costing Configuration’ tab (as illustrated below).
There are then two tabs under the Job Costing Configuration tab, labelled ‘General’ and ‘Accounting System’ (circled in the illustration below).
Important Information - After entering all the required information, remember to click [Save] as shown below.
General Information
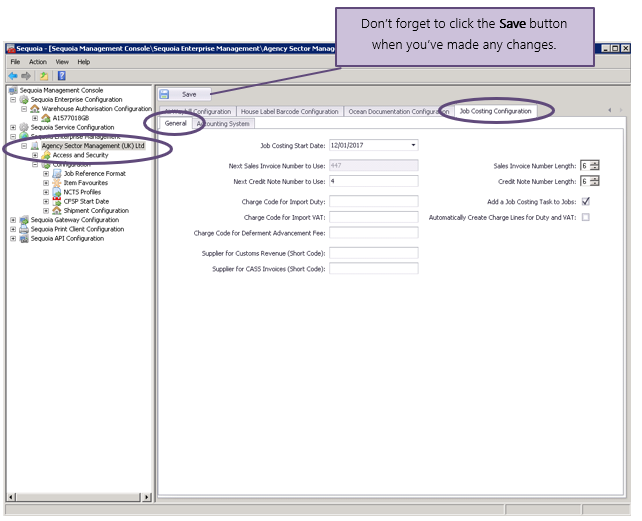
The configuration details required on the General tab are described below.
| Configuration Data | Description |
|---|---|
| Job Costing Start Date | You must specify the date from which you wish to start costing jobs in Sequoia. It is only from this date that job costing tasks will be added to jobs automatically – if you tick Add a Job Costing Task to Jobs – see below. |
| Next Sales Invoice Number to Use | If you have been using another system to generate your Sales Invoices and want to continue with the same numbering sequence then you can specify the next number to use here. You only need to specify this once. Sequoia will automatically increment the number for each subsequent invoice generated. |
| Sales Invoice Number Length | You can specify the minimum length of your Sales Invoice numbers here (e.g. the next number to use is 2353 but you want it to show as 002353). |
| Next Credit Note Number to Use | If you have been using another system to generate your Credit Notes and want to continue with the same numbering sequence then you can specify the next number to use here. You only need to specify this once. Sequoia will automatically increment the number for each subsequent credit note generated. |
| Credit Note Number Length | You can specify the minimum length of your Credit Note numbers here (e.g. the next number to use is 2353 but you want it to show as 002353). |
| Add a Job Costing Task to Jobs | If you tick this box then every new job you create will automatically have a Job Costing task added to it. See Costing Jobs for more information on how to do that. |
| Automatically Create Charge Lines for Duty and VAT | If you tick this box then charge lines for customs duty and/or VAT will automatically be added to the job costing information for an import job on acceptance of an import declaration where: - One of the deferment numbers declared is yours or; - Where no deferment numbers were declared (e.g. FAS payment). See Automatic Creation of Duty/VAT Charge Lines for more details about this function. |
| Charge Code for Import Duty | If the above box is ticked then you must specify a valid charge code to apply to any duty. See Creating Charge Codes for details of how to do this. |
| Charge Code for Import VAT | If the above box is ticked then you must specify a valid charge code to apply to any VAT. See Creating Charge Codes for details of how to do this. |
| Charge Code for Deferment Advancement Fee | If the above box is ticked then you must specify a valid charge code to apply to any fee you charge for advancing duty and/or VAT. See Creating Charge Codes for details of how to do this. Whether or not an advancement fee is charged is is determined by the importer declared and is controlled by a setting in the CRM record for the Importer. |
| Supplier for Customs Revenue (Short Code) | If the above box is ticked then you must specify a valid CRM record as the supplier (HMRC) to be used for these charge lines. |
| Supplier for CASS Invoices (Short Code) | If you receive invoices from the IATA CASS Payment System then enter the shortcode of the CRM record you have created for CASS. See IATA CASS Invoices for more details of this process. |
Accounting System Information
Now select the ‘Accounting System’ tab (circled in the illustration below).
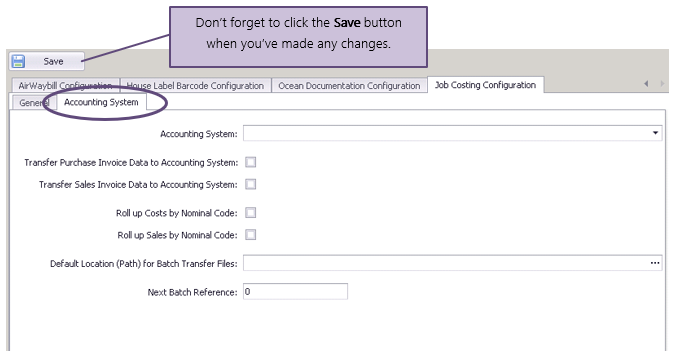
The list below details the information you need to provide and what impact it has on the system.
| Accounting System Data | Description |
|---|---|
| Accounting System | The accounting system you use. This is a drop-down list of accounting systems we support for the transfer of cost and sale data. |
| Transfer Purchase Invoice Data to Accounting System | Tick this box if you will want to transfer cost data to your accounting system. |
| Transfer Sales Invoice Data to Accounting System | Tick this box if you will want to transfer sales data to your accounting system. |
| Default Location (Path) for Batch Transfer Files | When data is extracted from Sequoia it will be written to a file ready for you to upload it into your accounts application. This is where you specify which folder to write the file to. See Transferring Data to an Accounting System for more information about the process and the file naming convention used. |
Site Level Configuration
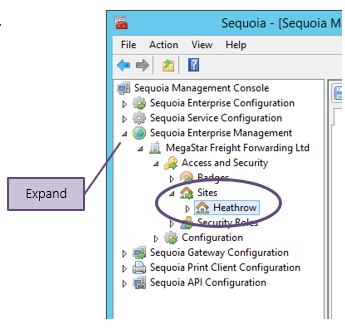
In the Sequoia Management Console application, select Sequoia Enterprise Management and expand by clicking the triangle icon to the left.
Then expand your Enterprise Name > Access and Security > Sites and highlight the Site for which you wish to upload graphics (as shown below).
The panel to the right of the form (as illustrated below) allows you to configure details for this site. Use the scroll bar to scroll right to the ‘Job Costing Site Configuration’ tab and click on it.
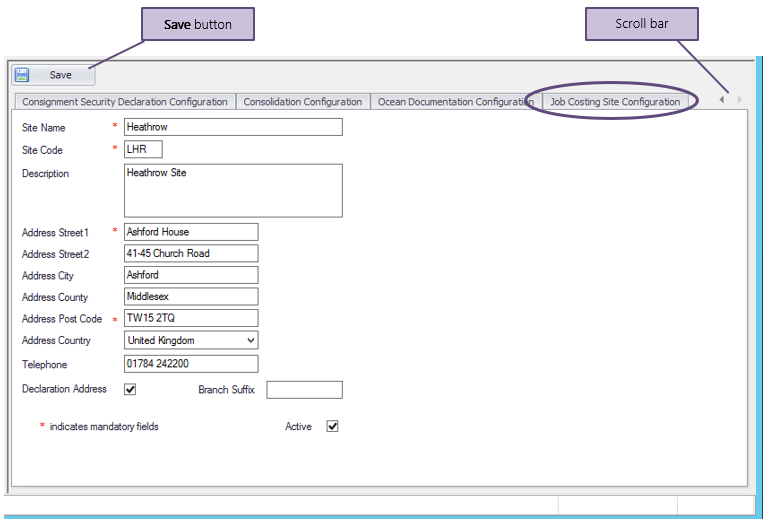
This Job Costing Site Configuration page has three tabs below it (as shown below) to allow you to add graphics which will appear on your sales invoices and credit notes.

Uploading Graphics for Sales Invoices
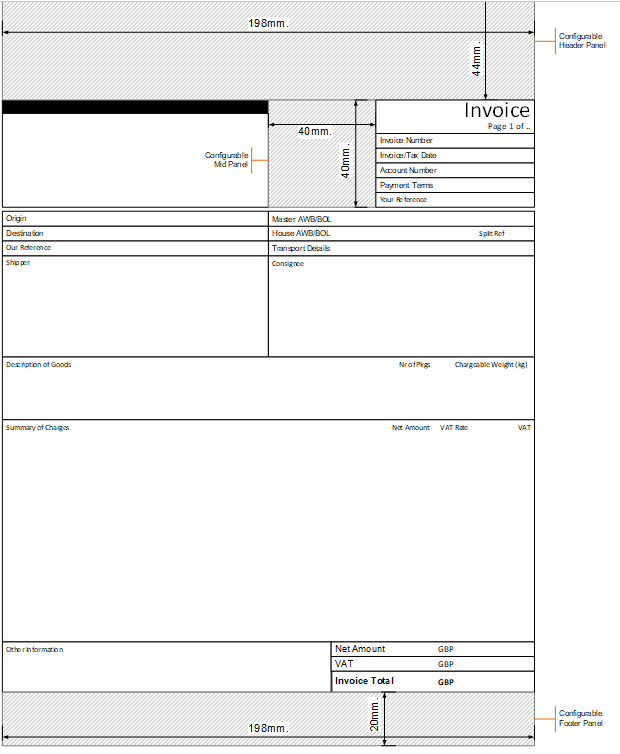
Sales Invoices generated in Sequoia have 3 panels available for you to upload your own graphics. The illustration below shows the general layout of a sales invoice and the location and size of the panels available to display these graphics.
Important Information
Note that your company name, address, phone number etc are NOT automatically printed on Sales Invoices. You should include this information in the graphics you provide.
There are three options (illustrated below) where you can upload a graphics file to be displayed on your sales invoices.
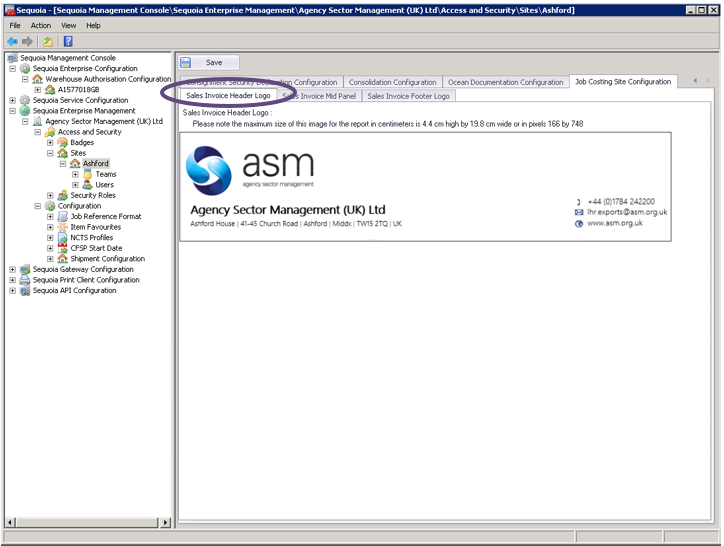
Sales Invoice Header Logo
This ‘header’ image can be up to a maximum of 19.8cm (748px) wide and 4.4cm (166px) high.
To upload your image, right-click the box labelled ‘No image data’ and select ‘Load’ from the menu. Then find the image you want to upload and click ‘OK’.
When the image is included on a sales invoice we will not try to stretch or manipulate it. The top left of the image will be placed at the top left of the panel (as shown in the layout above) and it will display the same size as the original image.
Sales Invoice Mid Panel
This ‘mid panel’ image can be up to a maximum of 4cm (151px) wide and 4cm (151px) high.
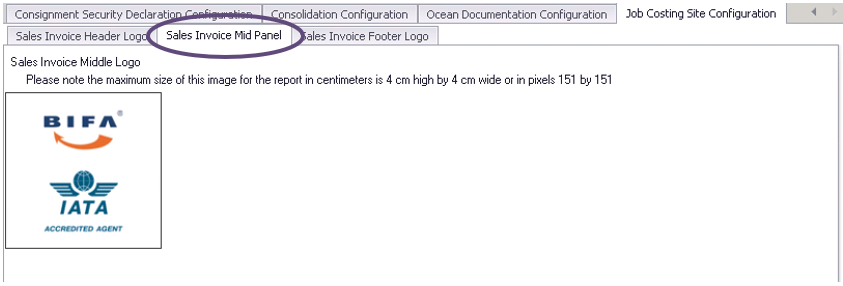
When the image is included on a sales invoice we will not try to stretch or manipulate it. The top left of the image will be placed at the top left of the panel (as shown in the layout above) and it will display the same size as the original image.
Sales Invoice Footer Logo
This ‘footer’ image can be up to a maximum of 19.8cm (748px) wide and 2cm (75px) high.

When the image is included on a sales invoice we will not try to stretch or manipulate it. The top left of the image will be placed at the top left of the panel (as shown in the layout on the previous page) and it will display the same size as the original image.
Security Roles and Permissions
In the Sequoia Management Console application, select your Enterprise from the left hand panel and then Security Roles > Job Costing (as illustrated below).
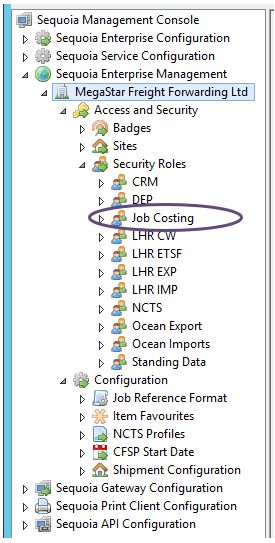
Job Costing Role
Each module in Sequoia has one or more ‘roles’ associated with it. These roles have a set of privileges associated to them which govern what you can and cannot do in the context of job costing.
You can have more than one Job Costing role, each with different levels of access and behaviour.
A user of Sequoia can only be associated to one job costing role. If a user does not have an associated Job Costing role then he or she cannot access any of the functionality associated with it.
Right click the Job Costing Role and select Privileges. The properties dialog (as shown below) will display.
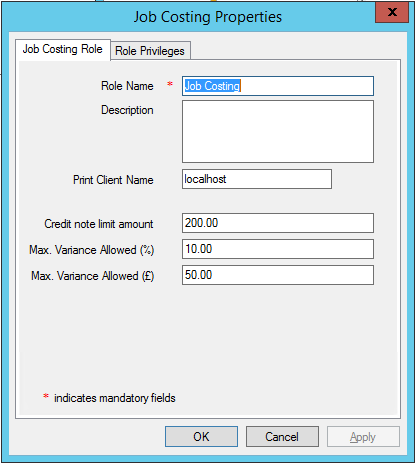
The dialog has two tabs, one for the role (as illustrated) and another for Role Privileges.
A Job Costing role has the following information:
| Job Costing Role Data | Description |
|---|---|
| Role Name | A unique name identifying the role. The role name is required. |
| Description | A longer description of the role if one is necessary or useful. |
| Print Client Name | The Sequoia Print Client to which this role is linked. |
| Credit Note Limit Amount | The maximum credit note amount (in GBP) that a Sequoia user, associated to this role, will be allowed to issue. |
| Maximum Variance Allowed (%) | The maximum difference (expressed as a percentage) that a Sequoia user, associated to this role, will be able to specify when reconciling a purchase invoice – the difference between the accrued amount and the actual amount. |
| Maximum Variance Allowed (£) | The maximum difference (expressed as a value in GBP) that a Sequoia user, associated to this role, will be able to specify when reconciling a purchase invoice – the difference between the accrued amount and the actual amount. |
Role Privileges
There are a number of ‘privileges’ associated to a Job Costing security role. These govern what you can and cannot do in the context of job costing.
The list below details the individual privileges and the effect these have across the system. A privilege can either be granted (by ticking the box beside it) or denied.
| Role Privilege | Description |
|---|---|
| Manage Job Costing Control Details | Allows the user to set the Current Accounting Period |
| Manage Charge Code Details | Allows the user to create, edit and delete charge codes. |
| Manage Payment Term | Allows the user to create, edit and delete Payment Terms records. |
| Manage CRM Job Costing Details | Allows the user to add, edit and remove Accounting Information on CRM records. |
| Manage VAT Codes and Rates | Allows the user to create, edit and delete VAT Codes and VAT Rates. |
| Manage Exchange Rates | Allows the user to create, edit and delete Exchange Rates, including adjusting buying and selling rates. |
| Create Sales Invoices | Allows the user to create and edit Sales Invoices. |
| Create Credit Notes | Allows the user to create and edit Credit Notes. |
| Authorised to Generate Sales Invoices | Allows the user to generate Sales Invoices. Without this privilege the user will be able to create a sales invoice record but will need another user, with this privilege granted, to authorise it before it is generated. |
| Authorised to Delete Sales Invoices | Allows the user to delete Sales Invoices. |
| Authorised to Generate Credit Notes | Allows the user to generate Credit Notes. Without this privilege the user will be able to create a sales invoice record but will need another user, with this privilege granted, to authorise it before it is generated. |
| Amend Sales Invoices | Allows the user to amend a Sales Invoice after it has been generated. This will not be possible once sales data for this invoice has been transferred to an accounting system. |
| Allow Job Costing Complete | Allows the user to complete the Job Costing Process. |
| Maintain Supplier Purchase Invoices | Allows the user to maintain Supplier Purchase Invoices. |
| Allow Supplier Purchase Invoice Reconciliation | Allows the user to reconcile Supplier Purchase Invoices. |
| Delete Supplier Purchase Invoices | Allows the user to delete Supplier Purchase Invoices. |
| Transfer to Accounting System | Allows the user to transfer cost and sales data to an Accounting System. |
Printer Configuration
You can specify a particular printer for sales invoices and credit notes. If you don’t do this, they will print to the default printer which should have already been set up. You can also specify how many copies are printed if you want more than one to be printed each time.
Note that you don’t have to print a sales invoice or credit note automatically when you create them.
They are stored as PDF documents in Sequoia and can be printed at any time. See Creating Sales Invoices and Credit notes for more details.
Configuring a Printer
In the Sequoia Management Console application, click on Sequoia Print Client Configuration tab (as illustrated circled below).
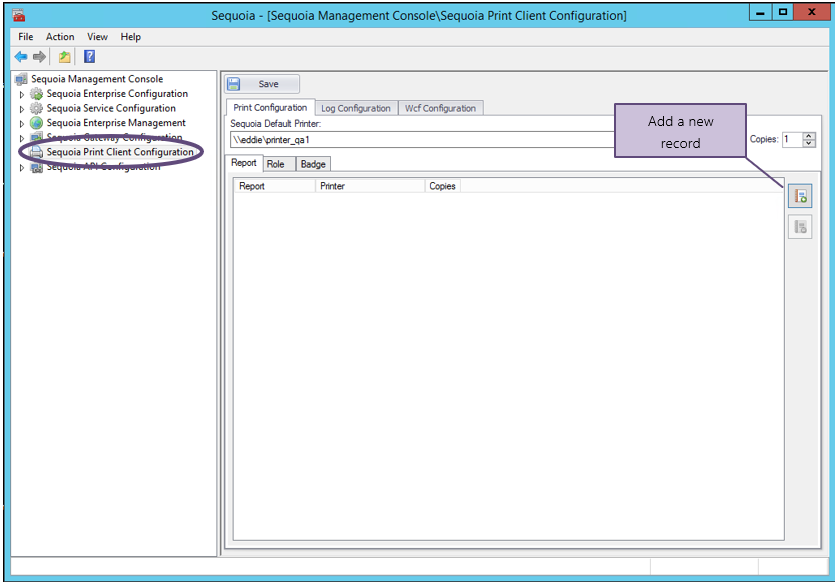
In the panel on the right hand side, click the button to add a new record (as shown above).
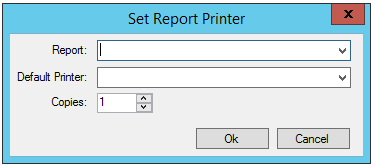
A dialog will display (as shown above).
In the Report field select SalesInvoice from the list of reports and then select the printer from the list of available printers in the Default Printer field.
Specify the number of copies to print and click [OK] to save the details.
Setting Up Reference Data
Before you can use Sequoia Job Costing you need to set up some reference data such as Charge codes, Payment terms etc.
This normally only needs to be done once, unless you decide to add new codes or make changes as you go along. The sections below tell you all you need to know to get up and running.
Creating Charge Codes
Select Charge codes from the Data > Job Costing > Reference Data menu.
The resulting display (as shown below) will list any existing Charge Code records.
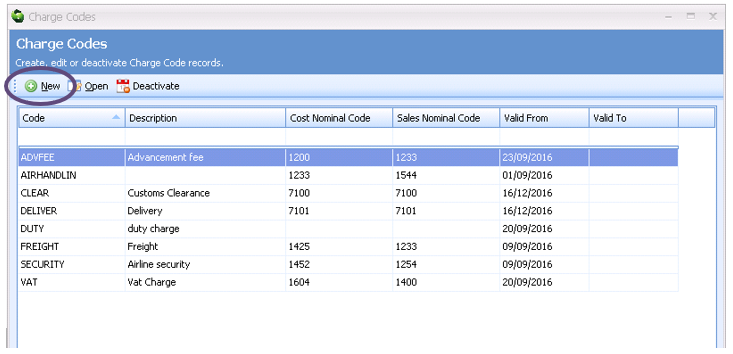
To create a new Charge Code record, click the New button on the toolbar (circled above) and the Charge Codes editor will display (as shown below).
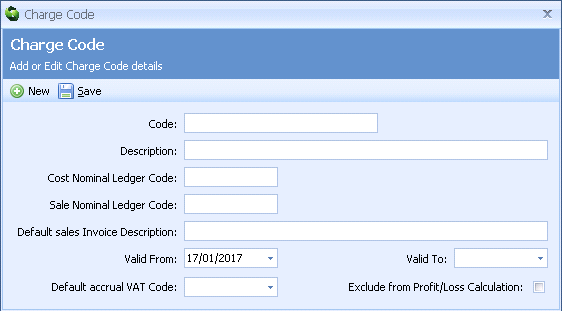
The list below details each of the controls on this panel; what you need to enter (or not) and what effect that information will have across the application.
| Charge Code Data | Description |
|---|---|
| Code | The code used to identify this Charge Code record. This code is required before a Charge Code record can be saved. |
| Description | A free text description associated to the above code. This will appear on the Sales Invoice unless a Default Sales Invoice Description below is specified, in which case that will appear instead. A description is required before a Charge Code record can be saved. |
| Cost Nominal Ledger Code | The nominal ledger code used by your accounting system against which to post any costs recorded with this charge code. If you have configured Sequoia to transfer costs to an accounting system then you must enter a valid nominal ledger code here. |
| Sale Nominal Ledger Code | The nominal ledger code used by your accounting system against which to post any sales recorded with this charge code. If you have configured Sequoia to transfer sales to an accounting system then you must enter a valid nominal ledger code here. |
| Default Sales Invoice Description | A free text description associated to the above code which will appear on any Sales Invoice. If this is not specified then the Description above will be used instead. |
| Valid From | The date from which this charge code is valid and is available to be used. |
| Valid To | The last date on which this charge code is valid and is available to be used. |
| Default Accrual VAT Code | When creating charge lines that use this charge code, you can default the VAT code of the accrual (cost) if you enter a valid VAT code here (see Creating VAT Codes and Maintaining VAT Rates). |
| Exclude from Profit/Loss Calculation | By default all costs and sales amounts you enter in job costing are included in the calculation of profit or loss (Profit = Total sales – Total Accruals and Actual Costs). If you want to exclude and charges with this Charge Code from that calculation then tick this box. See Calculating Profit and Loss for more details. |
Maintaining Exchange Rates
You can create exchange rate records to save having to key them in for every foreign currency cost or sale.
An exchange rate record can then store buying and selling rates that can automatically convert foreign currency costs and sales during the job costing process.
You can set up more than one record for a currency – for instance if you have default buying and selling rates but other rates that apply to particular suppliers or customers.
Select Exchange Rates from the Data > Job Costing > Reference Data menu.
The resulting display will list any existing Exchange Rate records.
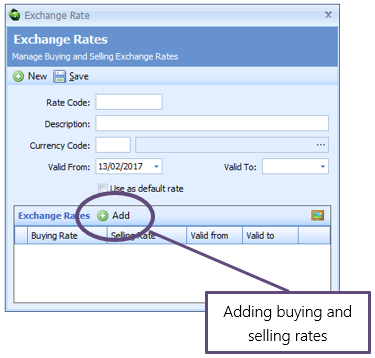
To create a new Exchange Rate record, click the New button on the toolbar (circled above) and the Exchange Rate editor will display.
The list below details each of the controls on this panel; what you need to enter (or not) and what effect that information will have across the application. The information you need to enter is as follows:
| Exchange Rate Data | Description |
|---|---|
| Rate Code | The code used to identify this exchange rate record. This code is required before an exchange rate record can be saved. |
| Description | A free text description associated to the above code. A description is required before an exchange rate record can be saved. |
| Currency Code | The currency code to which this exchange rate applies. You can set up more than one exchange rate record with the same currency code. A valid Currency Code is required before an exchange rate record can be saved. |
| Valid From | The date from which this exchange rate record is valid and is available to be used. |
| Valid To | The last date on which this exchange rate record is valid and is available to be used. |
| Use as default rate | If you want this exchange rate record to be the default one then tick this box. When you create charge lines in job costing, Sequoia will look for a default exchange rate record for the specified currency and use the rates you have set up here so that you don’t have to type in the buying and selling rate every time. |
Once you have set up an Exchange Rate record you can add the buying and/or selling rates that are applicable at any given point in time.
To do this click on the Add button on the toolbar of the Exchange Rates list at the bottom of the form (as shown in the illustration above) and enter the following information:
| Exchange Rate Data | Description |
|---|---|
| Buying Rate | This rate will be used to convert a cost in this currency into GBP. |
| Selling Rate | This rate will be used to convert a sale in this currency into GBP. |
| Valid From | The date from which this rate is valid and is available to be used. |
| Valid To | The last date on which this rate is valid and is available to be used. |
Creating Payment Terms
Select Payment Terms from the Data > Job Costing > Reference Data menu.
The resulting display (as shown below) will list any existing Payment Terms records. You can open an existing record by double-clicking a row on the list.
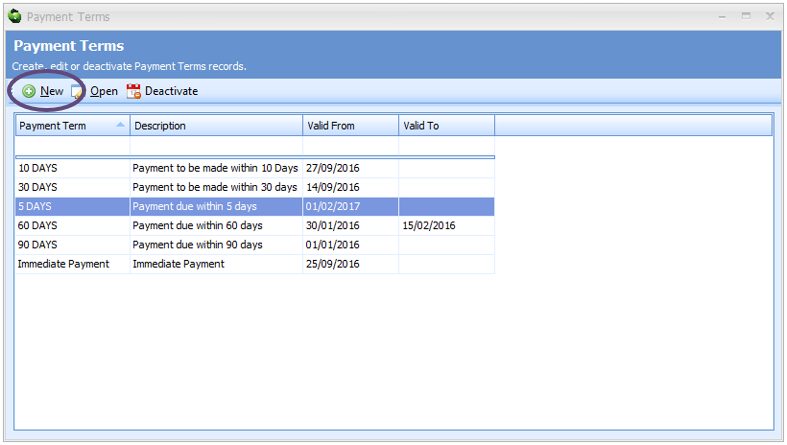
To create a new Payment Terms record, click the ‘New’ button on the toolbar (circled above) and the Payment Terms editor will display (as shown below).
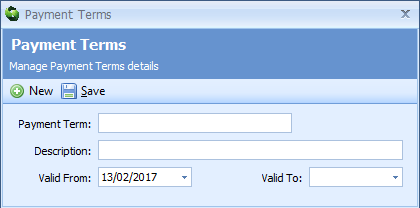
The list below details each of the controls on this panel; what you need to enter (or not) and what effect that information will have across the application.
| Payment Terms Data | Description |
|---|---|
| Payment Term | The code used to identify this payment term record. This code is required before a payment term record can be saved. This code will appear on any Sales Invoice for a customer for whom you have specified this payment term. See Adding Accounting Information to CRM Records below. |
| Description | A free text description associated to the above code. A description is required before a payment term record can be saved. |
| Valid From | The date from which this payment term is valid and is available to be used. |
| Valid To | The last date on which payment term is valid and is available to be used. |
Creating VAT Codes and Maintaining VAT Rates
Select VAT codes from the Data > Job Costing > Reference Data menu.
The resulting display (as shown below) will list any existing VAT code records. You can open an existing record by double-clicking a row on the list or by right clinking the row and selecting Open from the menu.
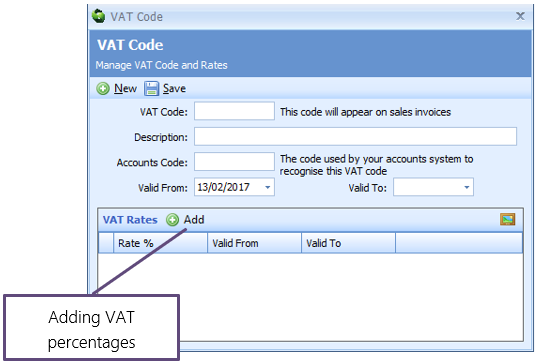
To create a new VAT Code record, click the New button on the toolbar and the VAT Codes editor will display (as shown above).
The list below details each of the controls on this panel; what you need to enter (or not) and what effect that information will have across the application.
| VAT Codes | Data Description |
|---|---|
| VAT Code | The code used to identify this VAT code record. This code is required before a VAT code record can be saved. This code will appear on a Sales Invoice line where this code is used against a Charge Code. |
| Description | A free text description associated to the above code. A description is required before a VAT code record can be saved. |
| Accounts Code | The code by which your accounting system recognises this VAT code. If you have configured Sequoia to transfer sales to an accounting system then you must enter a code here. |
| Valid From | The date from which this VAT code is valid and is available to be used. |
| Valid To | The last date on which VAT code is valid and is available to be used. |
Once you have set up a VAT Code record you can add the percentage rate that applies to it at any given point in time.
To do this click the Add button on the VAT rates grid (as circled in the above illustration).
The information you need to supply is as follows:
| VAT Rates Data | Description |
|---|---|
| Rate % | This rate is used to calculate the amount of VAT applicable to any cost or sale to which it is associated. |
| Valid From | The date from which this VAT percentage rate is valid. |
| Valid To | The last date on which this VAT percentage is valid. |
Adding Accounting Information to CRM Records
CRM records have a Job Costing panel (see illustration below) where you can store various default information relating to the Job Costing process.
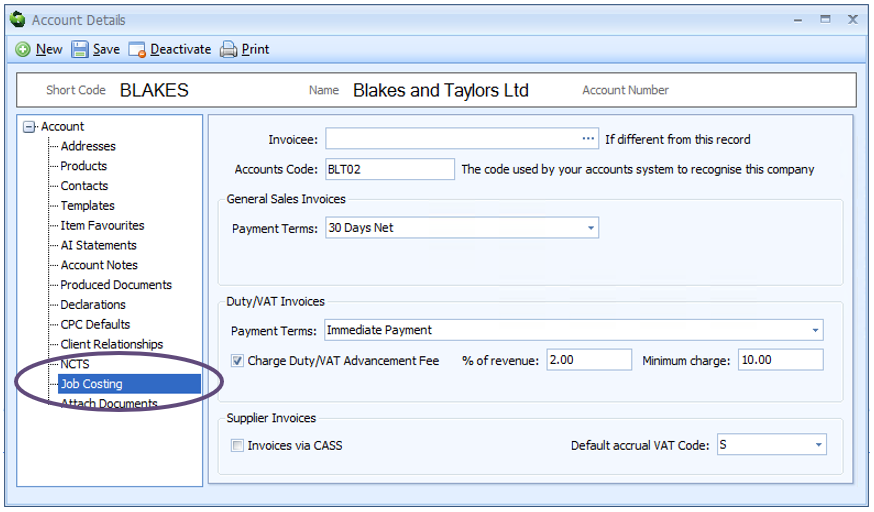
The list below details each of the controls on this panel; what you need to enter (or not) and what effect that information will have across the application.
| CRM Data | Description |
|---|---|
| Invoicee | Normally, the invoicee to whom a Sales Invoice is addressed is the Customer specified on the job record. However, if you use this account as the customer on a job but you want the invoicee on the sales invoice to default to another account, you can specify the Shortcode for that account here. |
| Accounts Code | The code by which your Accounts system recognises this company. If you have configured Sequoia to transfer sales amounts to an accounting system then you must enter a valid code here. |
| Payment Terms | The default payment term to appear on general sales invoices for this company. See Creating Payment Terms above. |
| Payment Terms (for Duty/VAT) | The default payment term to appear on Duty/VAT only sales invoices for this company. See Creating Payment Terms above. |
| Charge Duty/VAT Advancement Fee | Tick this box if you want Sequoia to automatically add a fee for advancing Import Duty and/or VAT. |
| % (Percentage) of Revenue | The percentage of the Import Duty and/or VAT calculated as the advancement fee (see line above). |
| Minimum Charge | If the percentage of the Import Duty and/or VAT calculated as the advancement fee is less than this minimum charge then use this value instead. |
| Invoices via CASS | Where this CRM record is used as the Supplier on a charge line then the purchase invoice will be generated by the IATA CASS payment system. See IATA CASS Invoices for more information about this. |
| Default Accrual VAT Code | When creating charge lines that use this charge code, you can default the VAT code of the accrual (cost) if you enter a valid VAT code here (see Creating VAT Codes and Maintaining VAT Rates). Any value stored here will override any default VAT code you have specified in the charge code record. |
Creating CRM Records from Agents, Air Carriers and Sheds
In order to record a cost against a supplier you must first create a CRM record for them. You can do this automatically where you already have a record for them in standing data as an Agent, Air Carrier or Shed.
To do this click on the Data menu at the top of the Sequoia workspace and select either Agent, Air Carrier or Shed from the menu options. A list of records will then display.
Find the record you want and highlight it on the list and then click on Add to CRM on the toolbar at the top of the list.
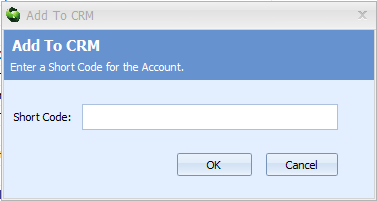
This will then display a dialog (as shown above) asking you to specify a shortcode for the CRM record.
If a CRM record with the same name already exists then you will be warned of this before a new CRM record is created.
Enter a shortcode and click [OK] to create the CRM record.
See Adding Accounting Information to CRM Records for more details about CRM records.
Setting the Current Accounting Period
Sequoia will prevent you from producing Sales Invoices for a month before you have closed off the previous month.
Select Job Costing Control from the Data > Job Costing menu.
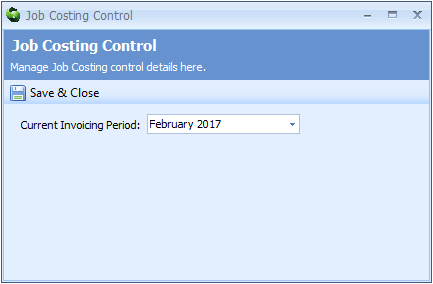
The resulting dialog will allow you to set the current invoicing period. This will allow you to produce sales invoices for any date up to and including the month you set here, but will prevent you from producing an invoice with a later date.
You can restrict who is allowed to set the accounting period. See Role Privileges for details of how to do this.
