Customs Freight Simplified Procedures (CFSP)
Overview
Sequoia automatically checks accepted import declarations to determine if they are required to be reported within its Enhanced CFSP licensed module.
The customs procedure codes (CPCs) of frontier import declarations are checked to see if they are CFSP related.
If they are, then the CRM account linked to Consignee [Box 08] followed by the Declarant [Box 14] will be checked to see if the account is set as an authorised CFSP trader and requires Final Supplementary Declarations. The settings for the Consignee [Box 08] will take precedence.
If so then the declaration is 'tagged' and forms part of the checks and count for the final supplementary declaration process detailed below.
The above check is carried out regardless of the type of frontier declaration submitted, including frontier declarations Submitted by a 3rd Party.
In addition, similar checks are made whenever a supplementary declaration is accepted.
All of these declarations are then presented for reporting in the month-end final supplementary declaration (FSD).
Setting up
The Sequoia Management Console
To configure Sequoia for CFSP, the date when you wish Sequoia to start tracking the relevant declarations must first be entered in the Sequoia Management Consol (MMC) on the Sequoia server.
During installation of Sequoia, a Sequoia Configuration shortcut would have been placed on the server's desktop; alternatively it can be accessed from the standard Windows Programs menu.
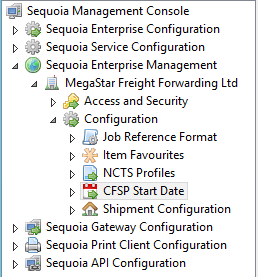
Launch the Sequoia Configuration application and navigate down through Sequoia Enterprise Management -> the name of your Organisation -> Configuration and select CFSP Start Date.
On the panel, enter the date you wish Sequoia to begin handling your CFSP declarations. Note, this date cannot be changed once it has been set.
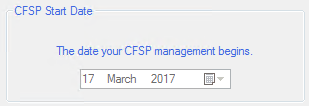
Click Save at the top of the page once you have input the date.
CRM Account Configuration
Each trader that is CFSP authorised should be configured through the Sequoia CRM module.
Locate the relevant account in the list and double click to open the account editor.
Navigate to the CHIEF Options -> Declarations page (as shown below) and switch to the CFSP/Warehousing Defaults tab.
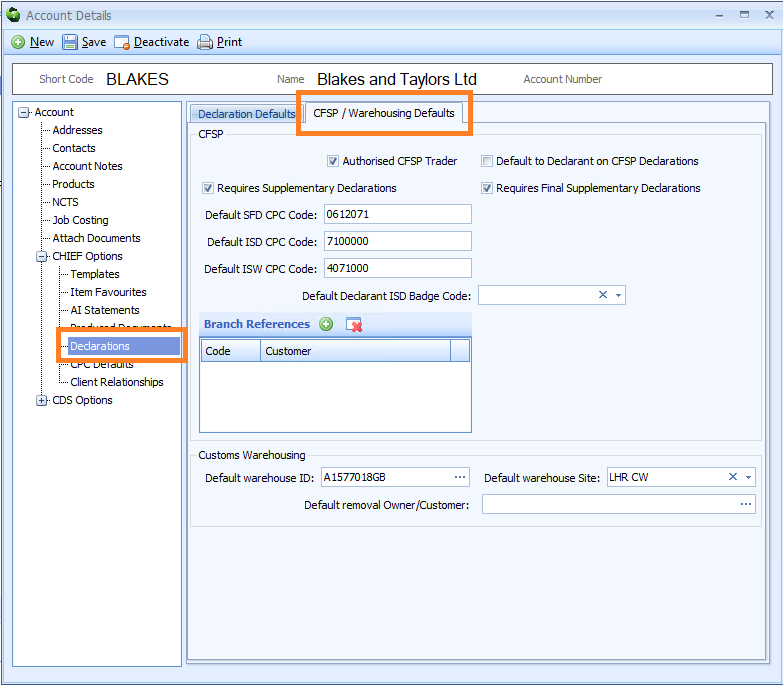
The settings are detailed below.
| Label | Information required |
|---|---|
| Authorised CFSP Trader | Tick this box so that Sequoia can track CFSP declarations for this trader. |
| Default to Declarant on CFSP Declarations | Sequoia supports a single account as the 'default Declarant' for all declaration types. However this setting allows a separate account to be defaulted for CFSP declaration types (SFD, ISD and ISW) if required. |
| Requires Supplementary Declarations | Tick this box if you will be completing supplementary declarations on behalf of this party. |
| Requires Final Supplementary Declarations | Tick this box only if the party is CFSP authorised in their own right and you are submitting the month-end Final Supplementary Declarations on their behalf. |
| Default SFD CPC Code | Defaults the procedure code [box 37] for any Simplified frontier declaration where this trader is used as the Consignee [box 08] or Declarant [box 14]. |
| Default ISD CPC Code | Defaults the procedure code [box 37] for any Import supplementary declaration where this trader is used as the Consignee [box 08] or Declarant [box 14]. |
| Default ISW CPC Code | Defaults the procedure code [box 37] for any Warehouse removal supplementary Declaration where this trader is used as the Consignee [box 08] or Declarant [box 14]. |
| Default Declarant ISD Badge Code | Only applicable to the account which is set as the 'default declarant' or the 'default declarant for CFSP'. Allows a specific badge code to be set for all supplementary declarations. This is useful if you have a badge with EDCS whereby all supplementary declarations could be sent via EDCS rather then through a CSP badge. |
| Branch References | These should be added if you are the CFSP authorised trader and your Authorisation requires them. Please refer to Branch References. |
Once you have configured the record as necessary, click [Save] on the toolbar at the top of the CRM account editor.
Branch References
Overview
Sequoia supports the usage of AG or BR AI Statements in CFSP declarations. These Branch References will be tracked within the CFSP process and allow multiple Final Supplementary Declarations to be submitted each period (one per Branch Reference).
Configuring Branch References
In order for Sequoia to track and distinguish these declarations, your declarant CRM Account should be configured with the various Branch References.
Locate the relevant account in the list and double click to open the account editor.
Navigate to the CHIEF Options -> Declarations page (as shown below) and switch to the CFSP/Warehousing Defaults tab.
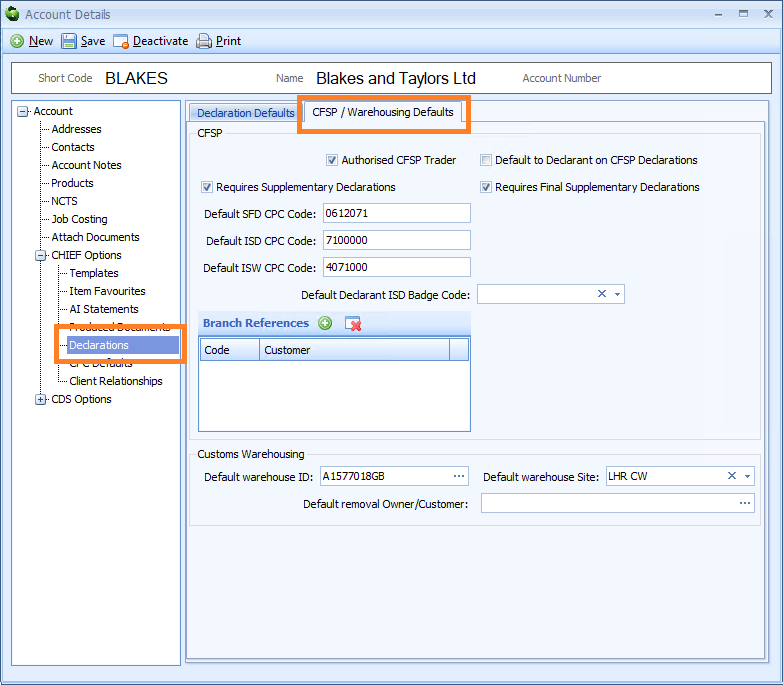
To add a Branch Reference for a given importer, click the Add button on the Branch References grid.
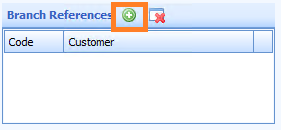
Enter the unique Branch Reference to use and the CRM Account of the importer. You can use the '?' in order to lookup the account if required.
An example where two importers are configured is shown below.
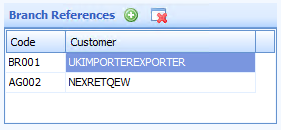
Configuring AI Statements
In order to ensure the correct Branch Reference is used every time for a given importer, an AI Statement can be configured against the importer's CRM Account.
Open the account editor for the importer.
Navigate to the CHIEF Options -> AI Statements page (as shown below).
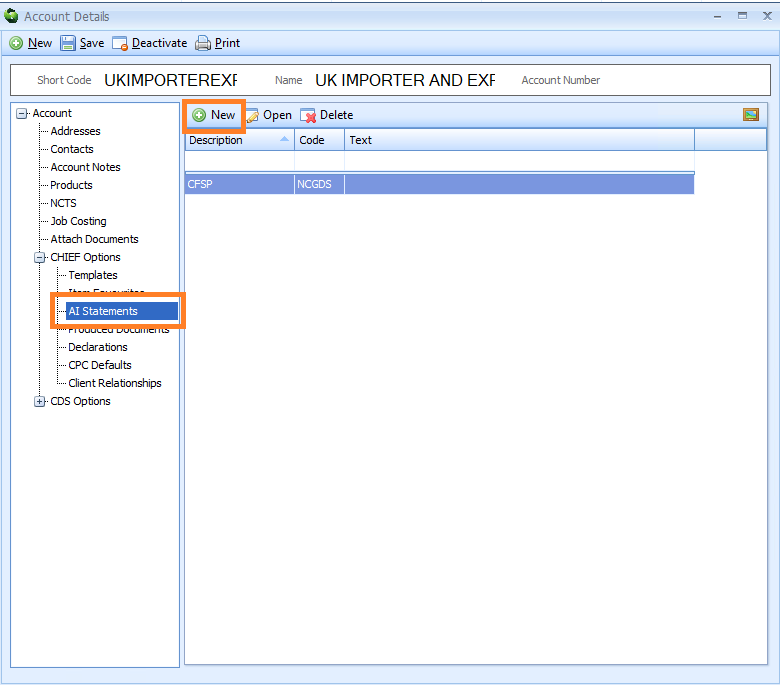
Click the New button to open the AI Statement editor and add the appropriate Branch Reference.
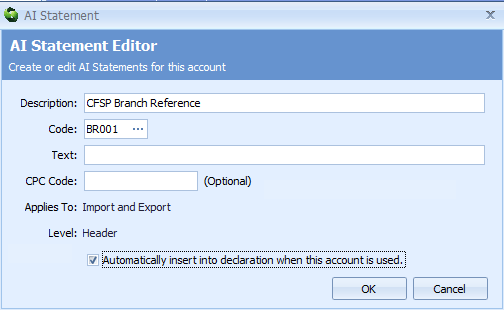
Ensure the checkbox is ticked to make sure the AI Statement is automatically added to any declaration where this CRM Account is used as the Consignee [Box 08].
Click the OK button to confirm the details and close the dialog. Remember to click the Save button at the top of the account editor to persist your changes.
Frontier Declarations
Once you have created the relevant import job, click the Declaration button on the Customs Action task of the job.

Choose the type of declaration you wish to create and click [Create].
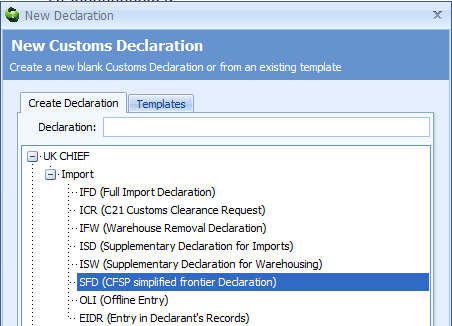
The declaration will be pre-populated with information from the job and from the CRM records that are used as the Consignee [box 08] and Declarant [box 14].
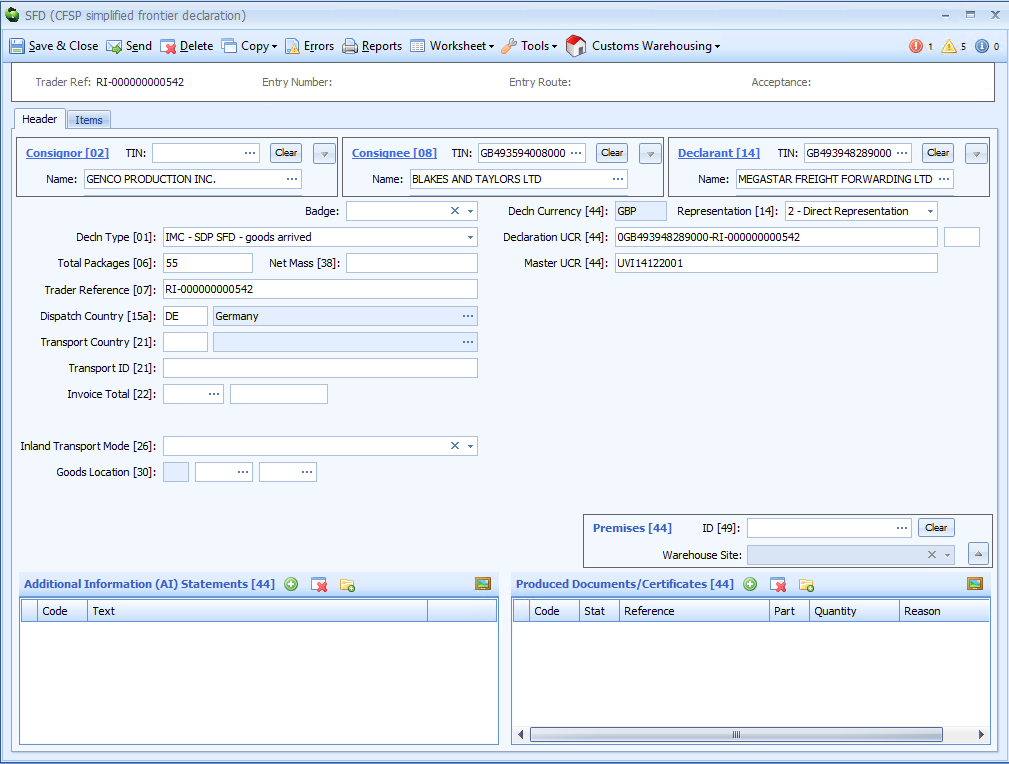
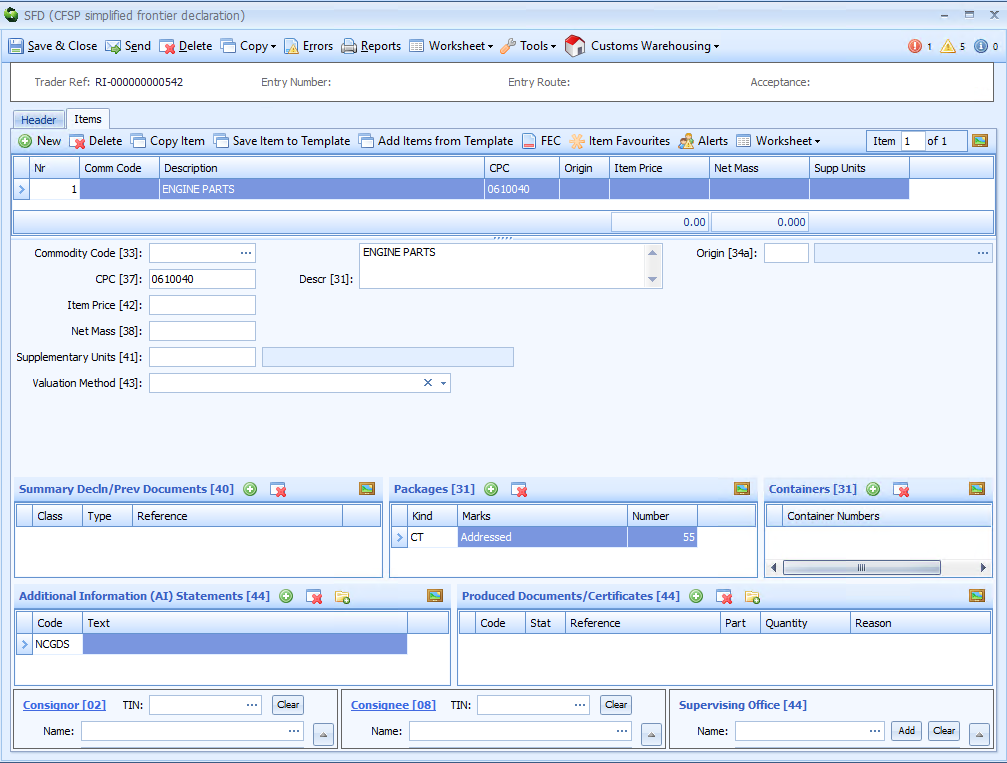
| Label | Mapping |
|---|---|
| Consignor [02] | Mapped from the job consignor. |
| Consignee [08] | Mapped from the job consignee. |
| Declarant [14] | Set from the CRM account set as the 'Default CFSP Declarant' (see CRM Account Configuration above). |
| Representation [14] | Set from the Declarant's default representation setting in CRM. |
| Total Packages [06] | Taken from the job and/or inventory record. |
| Trader Reference [07] | The job reference. This can be set to the importer's reference if the 'Always use EORI on Import declaration' setting is enabled in CRM for the consignee account. |
| Dispatch Country [14] | Derived from the job origin UN/LOCODE. |
| DUCR [44] | Constructed from the declarant's EORI and Trader Reference. If the 'Always use EORI on Import declaration' setting is enabled for the consignee CRM account then the consignee's EORI and importer's reference will be used. |
| Goods Description [31] | Mapped from the job's goods description. |
| CPC [37] | Set from the default SFD CPC code setting in CRM for the consignee (see CRM Account Configuration above). |
| AI Statement [44] | Set from a default AI Statement setting in CRM for the consignee (see Adding Default AI Statements below). |
Once the declaration is complete, click the [Send] button on the toolbar. The declaration editor will close, taking you back to the job editor.
The Customs Action Task will update to show the latest status of the declaration.
Once the declaration has been accepted, Sequoia will track that a CFSP frontier declaration has been completed and therefore that a supplementary declaration is required.
Adding Default AI Statements
Sometimes, a specific AI statement is required to be added to every declaration for a particular party, or for each declaration under a specific CPC code. Sequoia allows you to configure the CRM record for that party to automatically input that AI statement for you.
To do this, locate the CRM account for that party and open the editor.
Navigate to CHIEF Options and then AI Statements.
Click the [New] button on the toolbar.
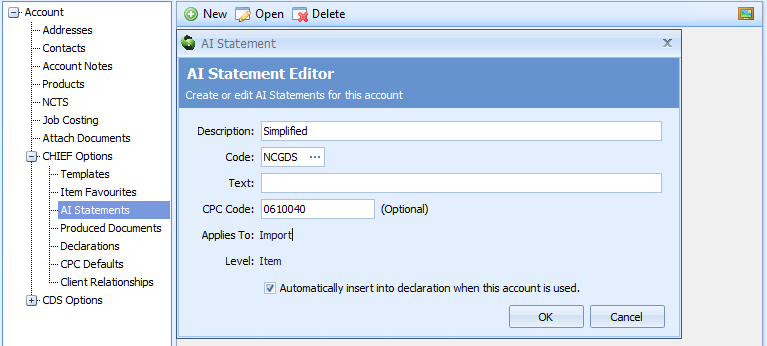
| Label | Details |
|---|---|
| Description | Just for your reference; to make it easier to identify. |
| Code | The AI statement code |
| Text | AI statement text, if any is required to be declared. |
| CPC code | The AI Statement will only be added when this CPC is used in the declaration. Leave blank to add the AI statement to every declaration. |
| Applies to | Indicates whether this AI statement is for import or export use (or both). |
| Level | Indicates whether this AI statement is used at header or item level. |
| Automatically insert .. | If ticked then the AI statement will automatically be added to the declaration where appropriate. |
Click the [OK] button to close the AI Statement editor once you have completed the required information and then click the [Save] button on the account editor toolbar.
Supplementary Declarations
Supplementary declarations are required by the end of the 4th working day of the month following the initial simplified declaration.
It is recommended that you add the supplementary declaration(s) to the same job as the frontier declaration was generated from.
To do this, a new Customs Action task should be added to the job.
Note that if you are using the Sequoia customs warehousing module then supplementary declarations for warehouse removals are generated automatically and you don't have to follow this step for those.
Open the job and click the New button on the Tasks menu and choose Customs Action Task from the options.
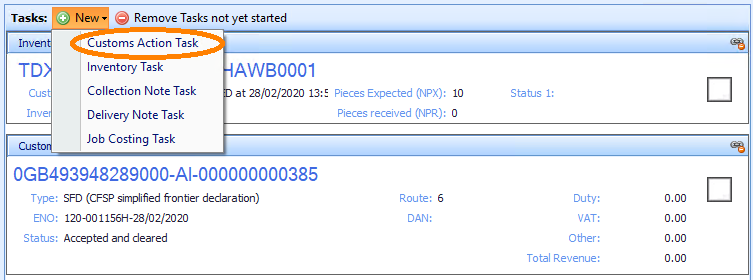
From the newly added task, click the Declaration button and choose ISD (Supplementary Declaration for Imports) from the list and click [Create].
The ISD declaration editor will be displayed with data mapped from the original frontier declaration.
Note that the DUCR [box 44] will be the same as the frontier declaration but a DUCR Part number will be added (the first of these will be 001 and it will increment if more supplementary declarations are required for this job).
The Acceptance Date (or Tax Point date) will reflect the date of acceptance of the frontier declaration in order for HMRC to calculate any duties or taxes due at that time.
Once the declaration has been completed, click [Send] and you will be returned to the job editor.
The Customs Action Task for the supplementary declaration will update to show the current status of the declaration.
Frontier Declarations Submitted by a 3rd Party
Where a 3rd party is submitting the frontier declaration on your behalf, and you are only required to submit supplementary declarations, Sequoia has an 'offline' data capture form for recording the details of the frontier clearance.
Create the relevant type of import job (air, road or ocean) and complete the details as necessary.
The Consignee must be completed with an account setup for CFSP (refer to the Account Configuration section) in order for the details to be recorded Sequoia's CFSP system.
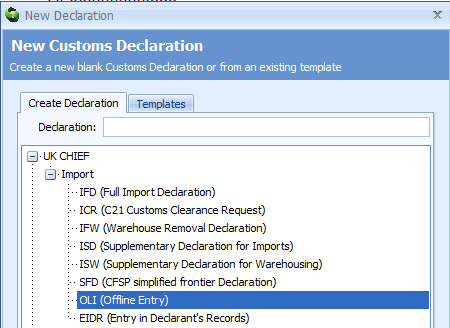
Click the Declaration button on the Customs Action Task and choose OLI (Offline Entry) from the New Declaration dialog.
The Offline Import OLI Declaration editor will be displayed.
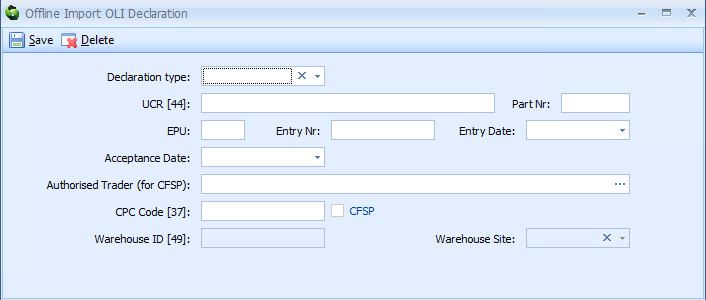
| Label | Mapping |
|---|---|
| Declaration type | This should be the type of frontier declaration created by the 3rd party. |
| UCR [44] | The DUCR of the frontier declaration. |
| Part Nr | The DUCR part number of the frontier declaration if one was declared. |
| EPU | The EPU number where the frontier declaration was made. This is the first part (3 digit number) of the entry number. |
| Entry Nr. | The Entry number of the frontier declaration. |
| Entry Date | The date the frontier declaration was lodged with HMRC. |
| Acceptance Date | The date the frontier declaration was accepted (cleared) by HMRC. |
| CPC Code | The Customs Procedure Code of the frontier declaration. |
| Warehouse ID & Site | Used for Customs Warehousing, if the goods were released into customs warehousing. |
The CFSP check box is a visual indicator to show whether the CPC code used on the frontier declaration was moving the goods into the CFSP regime.
Final Supplementary Declaration
A final supplementary declaration (FSD) is required at the end of each month's reporting period for each trader authorised for CFSP.
This FSD includes all supplementary declarations submitted up to the 4th working day of the following month.
This declaration is sent to HMRC as a 'normal' import supplementary declaration (ISD) with a specific procedure code and AI Statements showing the numbers of ISD and ISW declarations being reported.
To create this declaration, go to the Customs module.

Select the FSD (Final Supplementary Declaration) folder under the CFSP list.
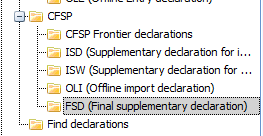
Right click in the list and choose New from the menu. The CFSP FSD Calculation editor will be displayed.
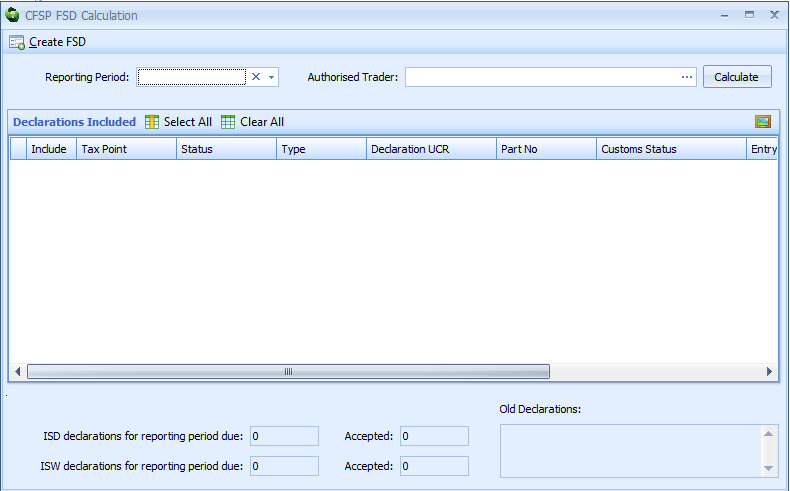
| Label | Mapping |
|---|---|
| Reporting Period | Select the month for which the FSD report is required. |
| Authorised Trader | Enter the shortcode or name of the authorised CFSP trader for whom the FSD is required. You can also perform a lookup to see a list of all accounts which are configured as requiring an FSD. |
At the point the Authorised Trader is confirmed, if there are Branch References configured for that CRM Account, a drop-down control is displayed to allow you to select which importer you are reporting for.
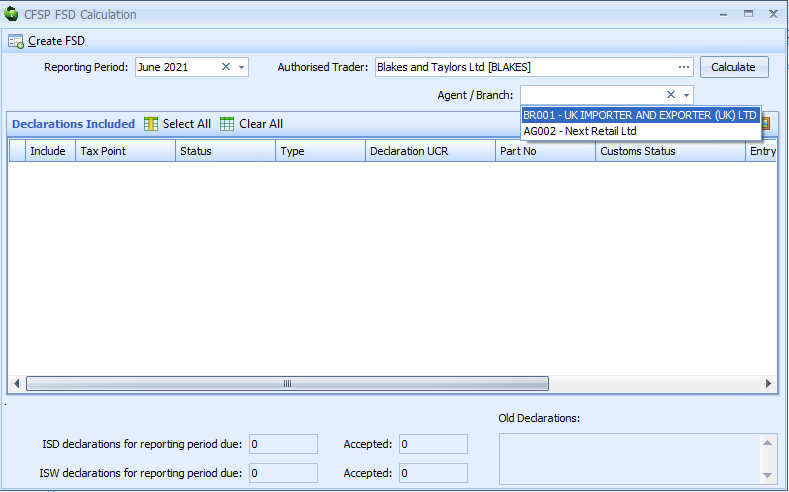
Once you have specified the reporting period and the authorised trader (and appropriate Branch Reference if applicable), click the [Calculate] button (as highlighted below) and Sequoia will locate and display all of the declarations which meet the criteria.
The 'Declarations included' list will update to show these declarations.
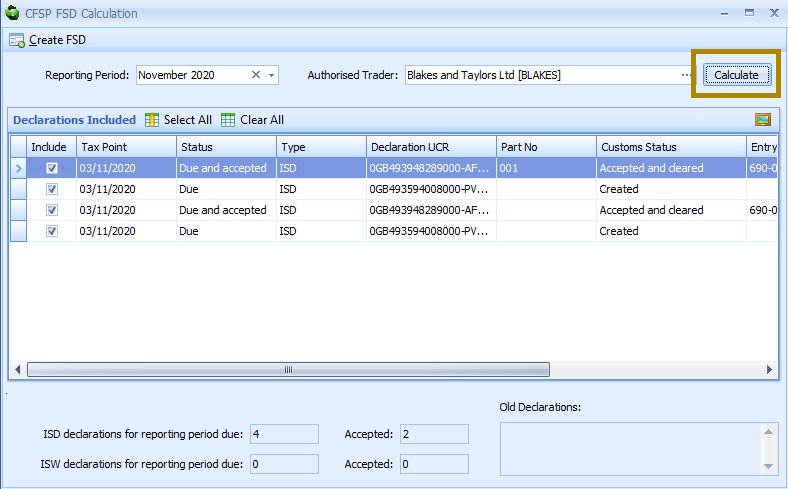
The Status column for each declaration indicates whether any further action is required.
A status of 'Due' indicates that a declaration has been found but the supplementary declaration has not been accepted.
A declaration can be removed from the report if required by deselecting (unticking) the Include checkbox for that row.
A summary is displayed below the list, which shows the number of ISD and ISW declarations (due and accepted) being reported.
The Old Declarations section will display the number of ISD or ISW declarations which were due to have been reported in previous months but have been accepted within the current reporting period.
Once you are happy with the selected declarations, click the [Create FSD] button on the toolbar at the top of the editor.
The import supplementary declaration editor will be displayed with the information required to report this final supplementary declaration (FSD).
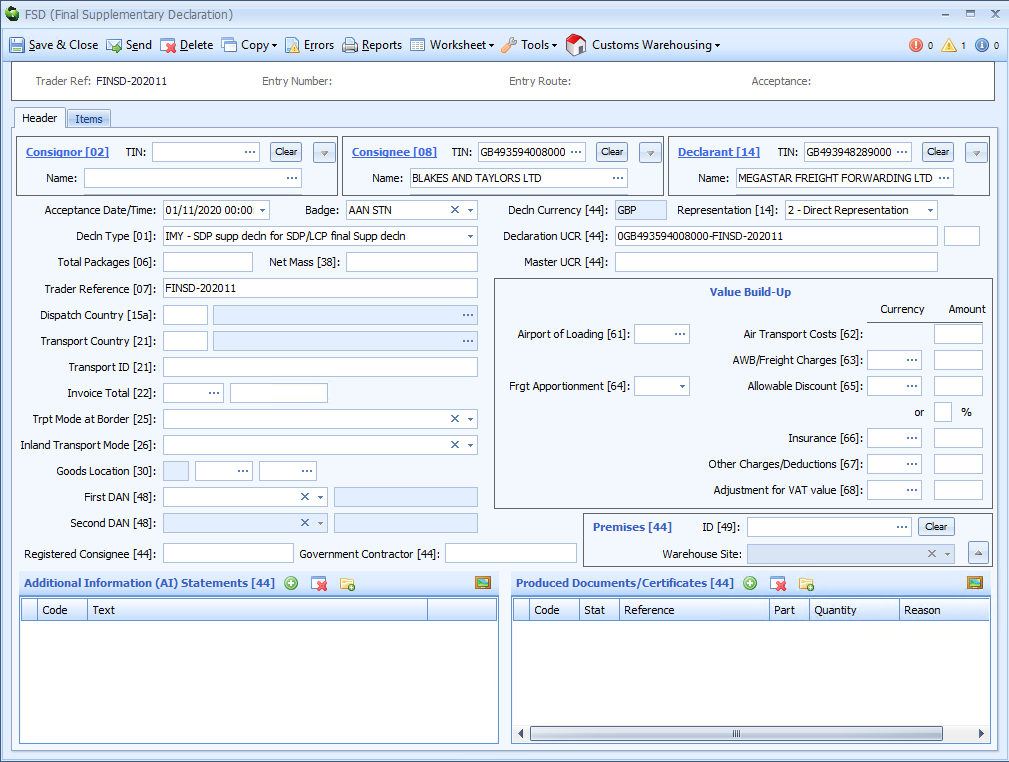
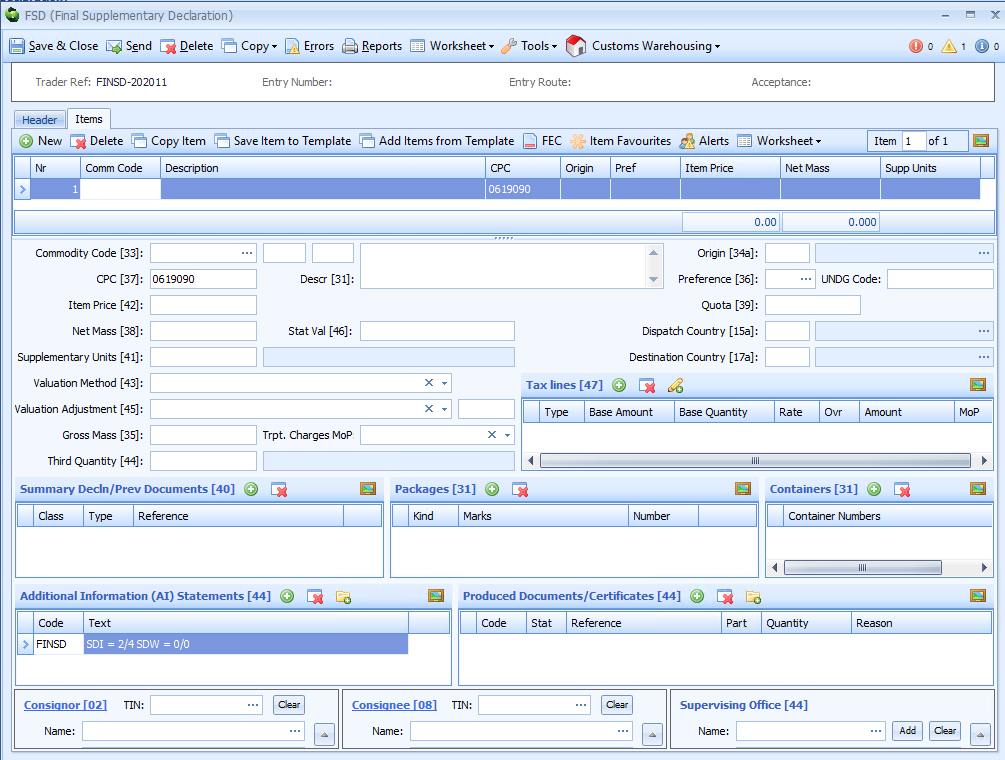
The declaration contains minimal information and should not require amending.
| Label | Mapping |
|---|---|
| Consignee [08] | The reporting trader. |
| Acceptance Date | The reporting month. |
| Trader Reference [07] | Auto generated by Sequoia in the format 'FINSD' (to identify Final Supp Dec) and the year and month being reported. The Branch Reference will be appended if applicable. |
| DUCR [44] | Auto generated by Sequoia using the Consignee [08] EORI and Trader Reference [07]. |
| (Header) AI Statement [44] | The Branch Reference if applicable. |
| CPC [37] | Procedure that identifies this declaration is a Final Supplementary Declaration. |
| (Item) AI Statement [44] | The number of ISD and ISW declarations being reported. |
Click the Send button on the toolbar at the top of the declaration editor when you are happy to submit the declaration.
If you are utilising Branch References then repeat the process for each reference.
Changes for CDS
Declaration Changes
The procedure codes starting 06 are no longer used.
CFSP declarations are identified by the declaration types - C & F for the simplified frontier declaration, Y for the supplementary declaration and Z for ex-warehouse supplementary declarations.
The authorised trader for the simplified and Y type declarations is determined by the declaration of an SDE Authorisation Holder. For Z type ex-warehouse declarations the EIR Authorisation Holder determines the authorised trader.
CRM Changes
The CFSP/Warehousing Defaults page within the CDS Options node in the CRM account editor should be configured for each authorised trader.
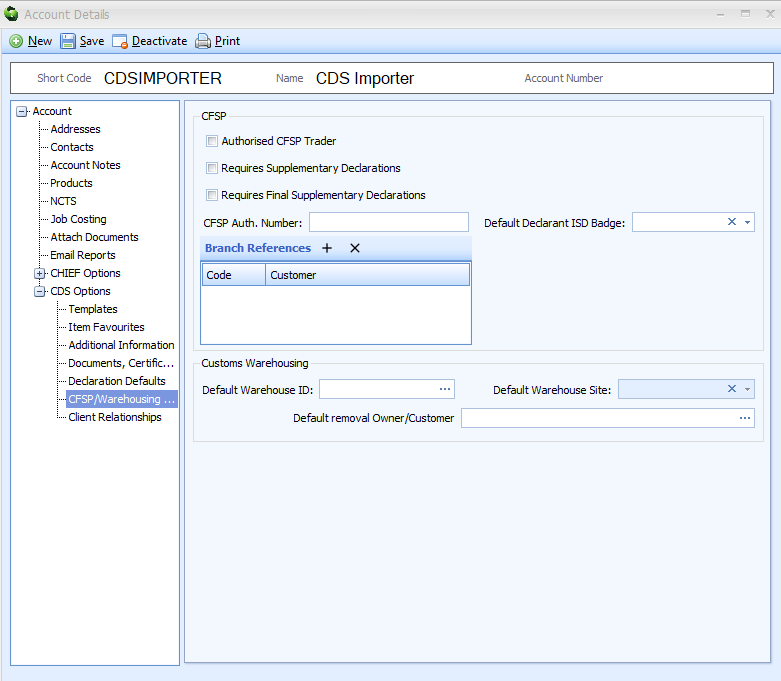
| Label | Mapping |
|---|---|
| Authorised CFSP Trader | Check this for each trader with a CFSP authority. |
| Requires Supplementary Declarations | Check this if supplementary declarations are required to be declared. |
| Requires Final Supplementary Declarations | Check this if the end of month FSD declaration needs to be submitted on behalf of the trader. |
| CFSP Auth. Number | Enter their CFSP authorisation number. This will automatically be added to any CFSP declaration as a C512 document. This is also declared within the Goods Location [30] of the FSD declaration (as required by the CDS system). |
| Default Declarant ISD Badge | Only applicable to the account which is set as the 'default declarant' for CDS declarations. Allows a specific badge code to be set for all supplementary declarations. This is useful if you have a badge with which can send declarations direct to CDS whereby all supplementary declarations could be sent direct rather then through a CSP badge. |
| Branch References | Please refer to the Branch References section above. |
Sequoia Changes
The main changes are around creating the Final Supplementary Declaration and the data declared.
The FSD is still accessed from the FSD (Final Supplementary Declaration) folder under the CFSP list (refer to Final Supplementary Declaration above). On clicking New, until CHIEF has been closed, you will see a prompt to choose between submitting a CHIEF FSD or a CDS FSD.
Note, CFSP declarations declared to CHIEF cannot be reported on a CDS FSD or vice versa, therefore it may be possible that you will be required to submit two FSD submissions each month until CHIEF is closed.
The Final Supplementary Declaration will be auto-populated as required for CDS. You should only need to set the badge code in order to submit the declaration, however if you do need to manually amend the supplementary declaration counts, these are declared as individual Additional Information statements at item level. Y and Z type declaration counts are declared as FINSY and FINSZ statements respectively. Any 'late' declarations are declared as a FINSL statement.
Please note, the created Final Supplementary Declaration will not be shown in the FSD (Final Supplementary Declaration) folder as the 'live lists' in Sequoia do not support the CDS declaration data structure. The Find Declaration function, described here, should be used if you need to retrieve any previously declared declarations. Set the search criteria to Declaration Type equals FSD, example below:

