CRM - Account maintenance
Overview
Sequoia's CRM (Customer Relationship Management) module can store information about the companies/accounts that you interact with, such as supplier, customer, client and invoicee information.
CRM can significantly reduce the time and manual effort involved in completing declarations, as Sequoia can complete parts of them automatically using this stored account information. This will take place when you specify this account as the declarant, importer (for imports) or exporter (for exports) on a declaration.
Information stored in CRM can also be used to help generate invoices and reports.
Create a New Account
Create an account for each supplier, customer, client and invoicee in Sequoia's CRM module.
There are three ways to create an account:
Either
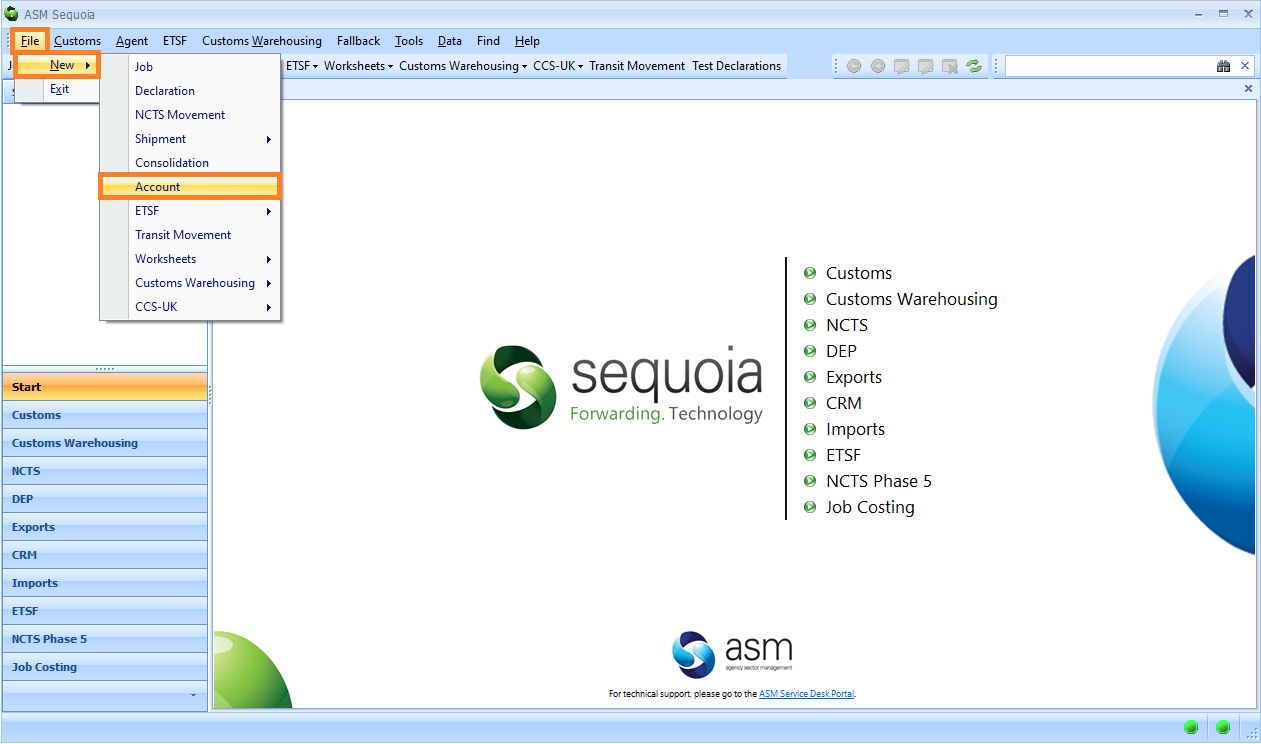
1) Click on File on the main Sequoia toolbar, followed by New and Account on the resulting drop-down menu.
or
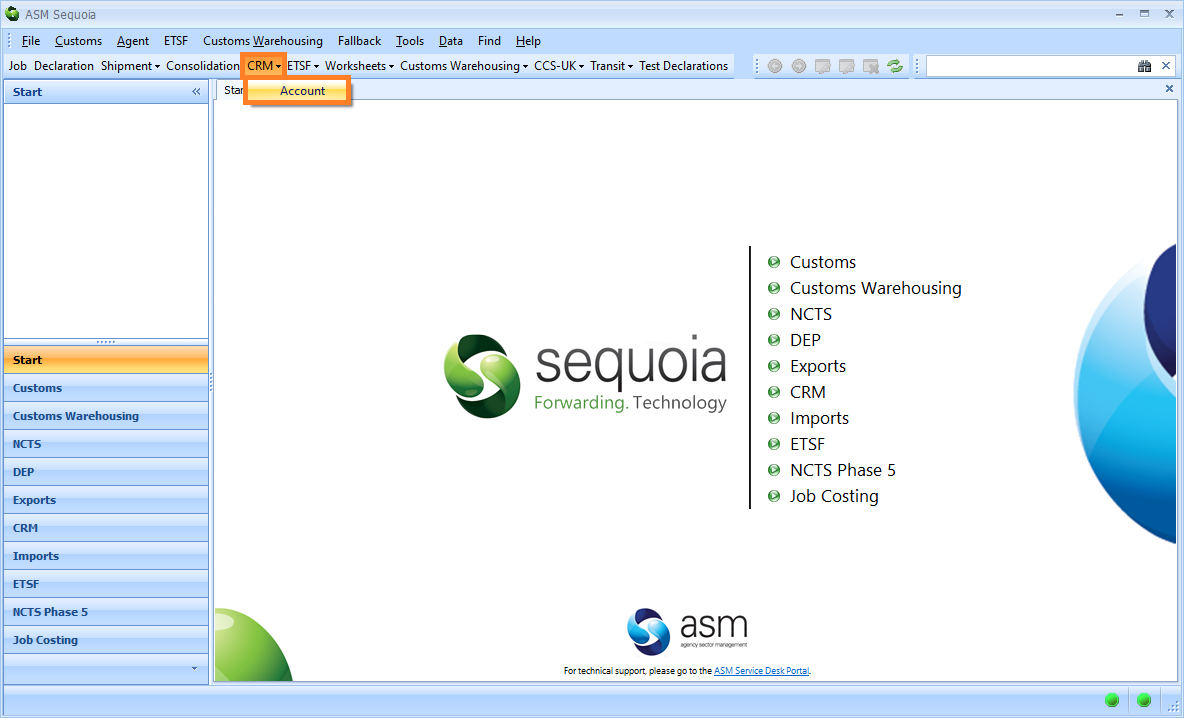
2) Click on CRM on the main Sequoia toolbar, followed by Account on the resulting drop-down menu.
or
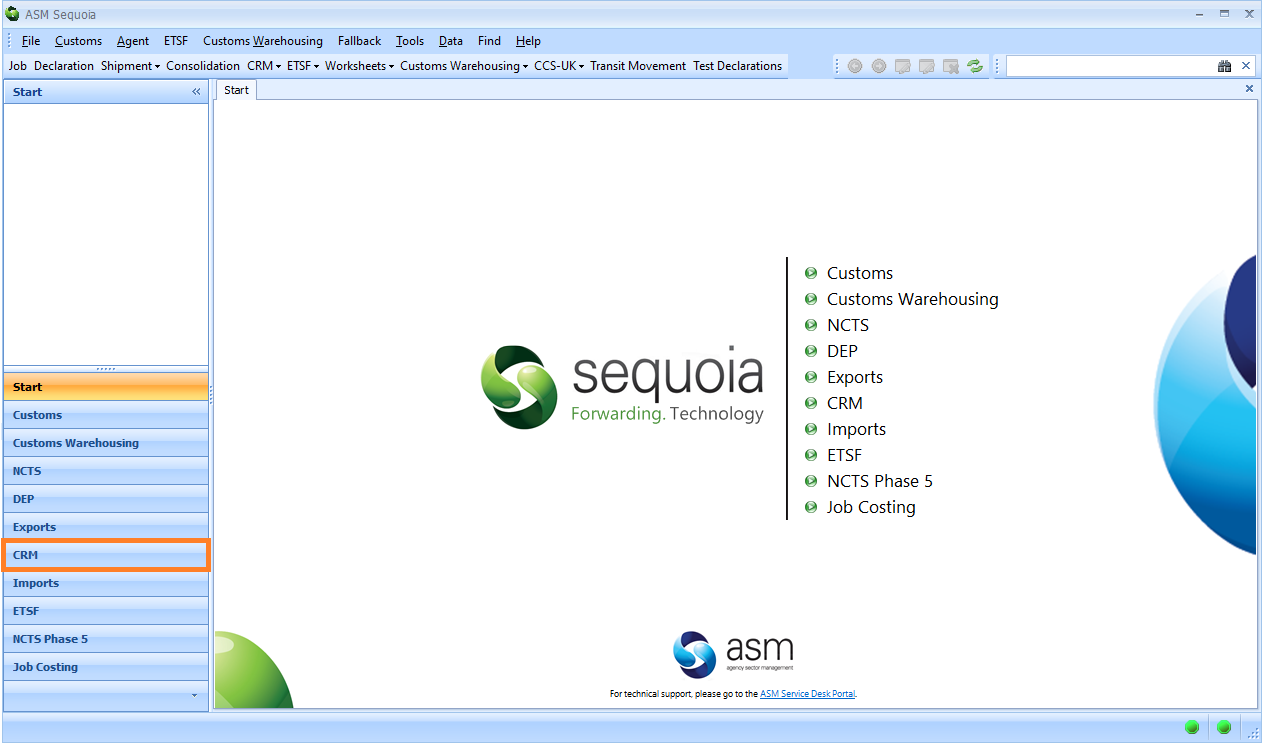
3) Click on the CRM module at the bottom left hand side of the screen.
Then, right-click in the list area and select New from the context menu.
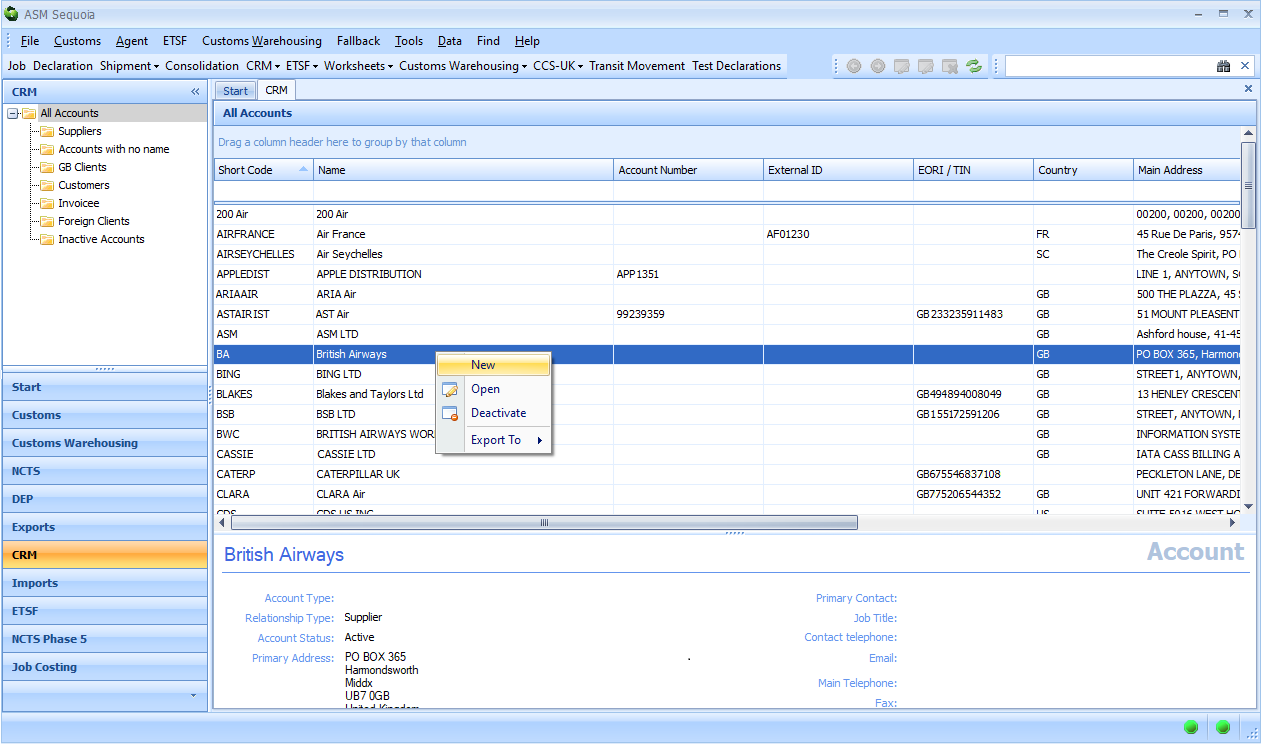
Each of the three steps above will cause the CRM Account Details editor to appear. This editor contains nodes (or menu items/pages) on the left hand side that can be clicked on to view and/or edit account information.

Enter the Account Details
On the Account Details editor, click on each node to enter your CRM account information. Each node is described below.
Account
The main Account node enables you to store key information related to this account. When this account is then specified as the declarant, importer (for imports) or exporter (for exports) on a declaration, Sequoia will automatically enter some of this information into that declaration. To add this information, click on the Account node and the Account editor will appear to the right of it.
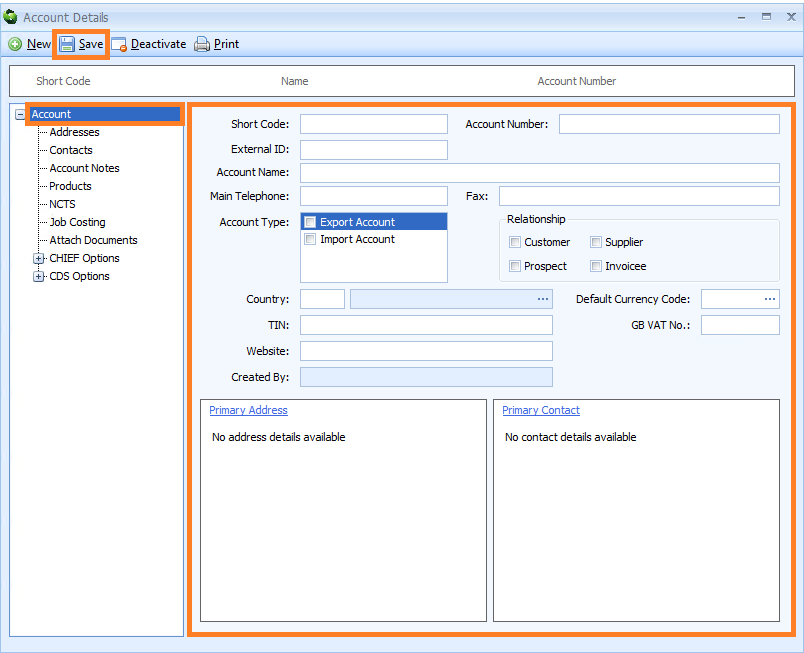
Enter the information described in the table below into the Account editor. PLEASE NOTE that it is mandatory to complete those boxes marked with an asterisk (*) - this means that they MUST be completed to create this account.
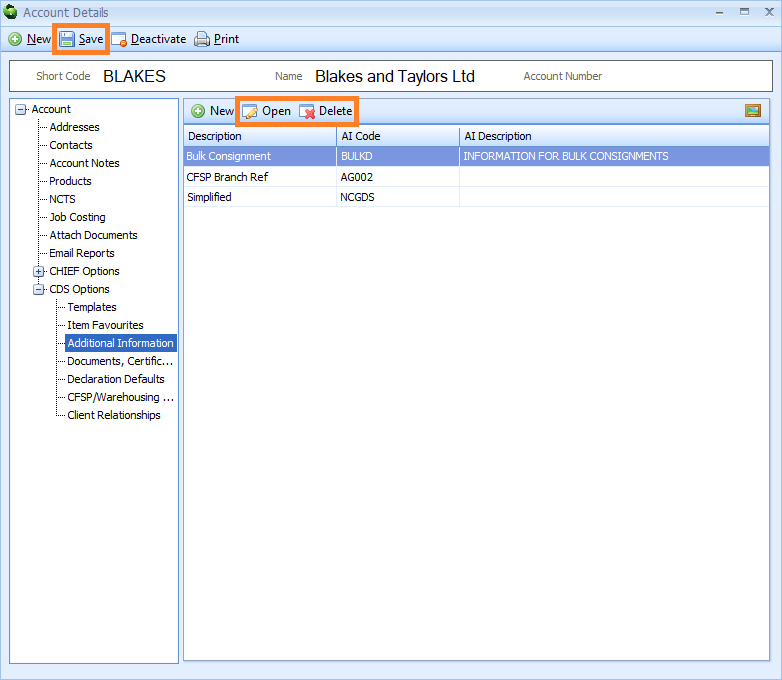
PLEASE NOTE that after you have entered this information, you MUST click on the Save button to save it (see image above). If you edit this information later, you MUST also click on the Save button to save any changes.
| Box | Information required |
|---|---|
| Short Code* | Create your own unique reference code for this account and enter it into this box. This should be in short code format, i.e. it should contain a maximum of 20 upper-case, alphanumeric characters, and must not contain any spaces |
| Account Number | Create an account number for this account and enter it into this box |
| External ID | A unique external ID created by the account holder that will be used as a reference number for integrating with a 3rd party system, for example, when your own in-house system is sending / receiving data through the Sequoia API service. A maximum of 20 characters are allowed |
| Account Name* | The account name. When this account is specified as the customer, consignor or consignee on a Job, Sequoia will automatically enter this account name into Box 8 (Importer Name) or Box 2 (Exporter Name) at header level on any new declarations created through that Job. In addition, when this account name is specified as the 'customer' on a Job Costing record, Sequoia will automatically enter any stored CRM Job Costing information into reports and invoices (see 'Job Costing' below) |
| Main Telephone | The main telephone number of this account |
| Fax | The fax number of this account |
| Account Type | Specify if this is an Export Account or an Import Account, or both by ticking the appropriate boxes |
| Relationship | Specify if this is a Customer, Supplier, Prospect or Invoicee account by ticking any or all of the appropriate boxes |
| Country | The UN/LOCODE of the country that this account is based in Select this information from a list by either typing a ? into this box, or by clicking on the ellipsis (the 3 dots) to the right of this box to display the Country Lookup Dialog box. Next, enter all or part of the UN/LOCODE into the search box, click on the binoculars icon to search for it, and then select it from the resulting list by double-clicking on it or by clicking on it once and pressing the return key |
| Default Currency Code | The default currency code used by this account Select this information from a list by either typing a ? into this box, or by clicking on the ellipsis (the 3 dots) to the right of this box to display the Currency Lookup Dialog box. Next, enter all or part of the currency code into the search box, click on the binoculars icon to search for it, and then select it from the resulting list by double-clicking on it or by clicking on it once and pressing the return key |
| TIN | The TIN (Trader Identity Number) of this account - this is usually the account's EORI number. When this account is specified as the consignor or consignee on a Job, Sequoia will automatically enter this TIN into Box 8 (Importer EORI Number) or or Box 2 (Exporter EORI Number) at header level in any new declarations created through that Job |
| GB VAT No. | The VAT number of this account. This will be used when this account is enabled for Postponed VAT Accounting (PVA) - see 'Declaration Defaults' below for more information |
| Website | The website address of this account |
| Created by | Sequoia will automatically enter the name of the person who created this Account Details record |
| Primary Address* | A CRM account record must have at least one address entered into it, and one address selected as the 'primary' or main address. Setting an address as the primary or main/default address means that when this account is specified as the customer, consignor or consignee on a Job, this address will be automatically entered into Box 8 (Importer Name) or Box 2 (Exporter Name) at header level in any new declarations created through that Job. Click in the 'Primary Address' box to type in the primary address. Click here to see the required address information |
| Primary Contact | The primary or main contact of this account |
Addresses
The Addresses node enables you to store addresses related to this account.
The first address that you enter into the Addresses node will be set as your primary or main/default address. This means that when this account is then specified as the declarant, importer (for imports) or exporter (for exports) on a declaration, this address will be automatically entered into Box 8 (Importer Address) or Box 2 (Exporter Address) at header level of that declaration. You can change which address is set as your primary address (see below).
Each address is stored as an Address record. To create an Address record, click on the Addresses node. Next, click on the New button on the Addresses toolbar to the right of the nodes.
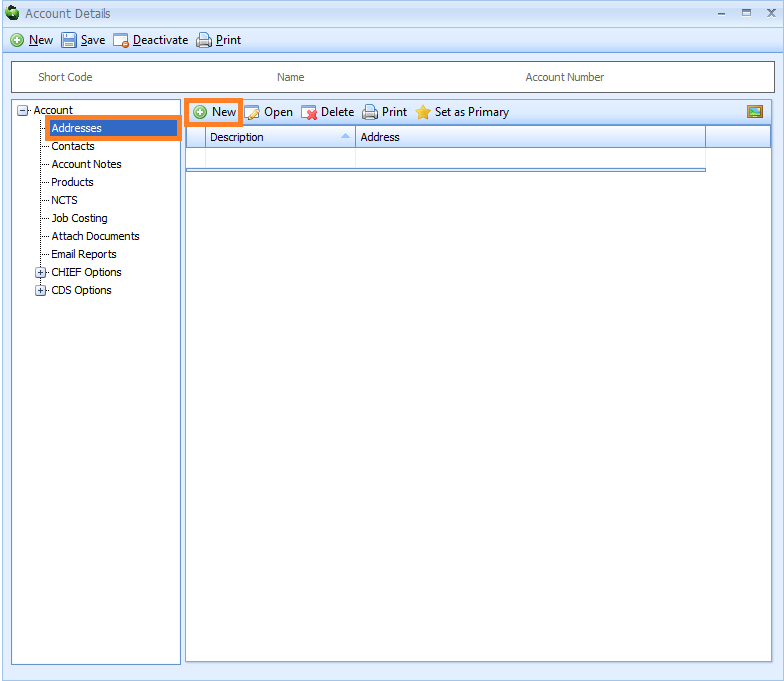
An Account Address editor will appear.

Enter the information described in the table below into the Account Address editor. PLEASE NOTE that it is mandatory to complete those boxes marked with an asterisk (*) - this means that they MUST be completed.
| Box | Information required |
|---|---|
| Description* | A description of the address e.g. the Yorkshire office, the London office |
| Address Type | Specify if this address is the air waybill print address or the collection, delivery, warehouse, customer, invoice, consignee, shipper, airline messaging or ocean document address by ticking any box that applies. This is optional and not required |
| Street* | The street |
| Town | The town |
| County | The county |
| Postcode | The postcode |
| Country | The country UN/LOCODE Select this information from a list by either typing a ? into this box, or by clicking on the ellipsis (the 3 dots) to the right of this box to display the Country Lookup Dialog box. Next, enter all or part of the UNLOCODE into the search box, click on the binoculars icon to search for it, and then select it from the resulting list by double-clicking on it or by clicking on it once and pressing the return key |
| Air Waybill Information | This Air Waybill Information section should only be completed if you need to add additional information required by Chinese customs. This information will be included on air waybills and in any FWB/FHL messages. To learn how to create an air waybill click here |
| Trader ID | A registered Chinese company will have a USCI (Unified Social Credit Code). Enter the USCI, as required by the Chinese customs authorities, in this box |
| Contact Name | The contact name at the Chinese company |
| The email address of the Chinese company | |
| Telephone | The telephone number of the Chinese company |
| Fax | The fax number of the Chinese company |
Click on the OK button to close the editor. You will be returned to the Addresses section of the Account Details editor, and a list of all your stored Address records will appear on the right hand side of the screen.
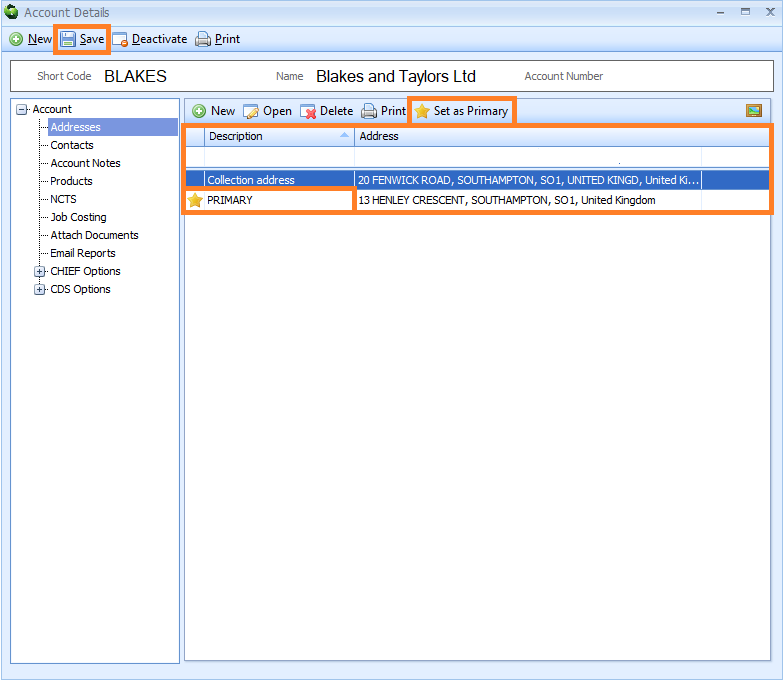
To set an address as your primary or main/default address, click on the corresponding Address record and then click on the Set as Primary button. A yellow star and the word 'PRIMARY' will then appear next to it.
PLEASE NOTE that you MUST click on the Save button to save this information.
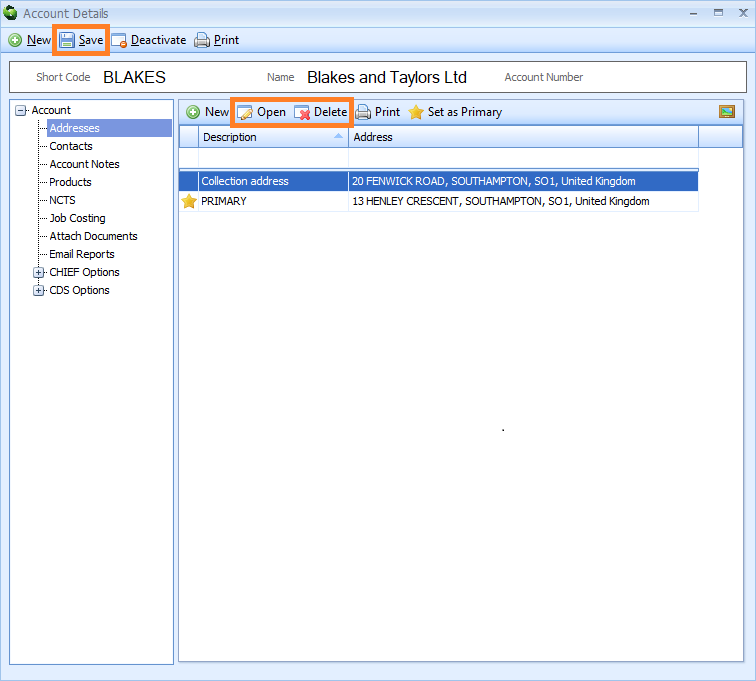
Edit an existing Address record by either double-clicking on it, or by clicking on it once, and then clicking on the Open button on the Addresses toolbar. The Account Address editor for that record will appear where you can make your changes.
Delete an existing Address record by clicking on it, and then clicking on the Delete button on the Addresses toolbar.
PLEASE NOTE that you MUST click on the Save button on the main toolbar of the Account Details editor to save any changes or deletions.
Contacts
The Contacts node enables you to store contacts related to this account for your reference.
The first contact that you enter into the Contacts node will be set as your primary or main/default contact. You can change which contact is set as your primary contact (see below).
Each contact is stored as a Contact record. To create a Contact record, click on the Contacts node. Next, click on the New button on the Contacts toolbar to the right of the nodes.
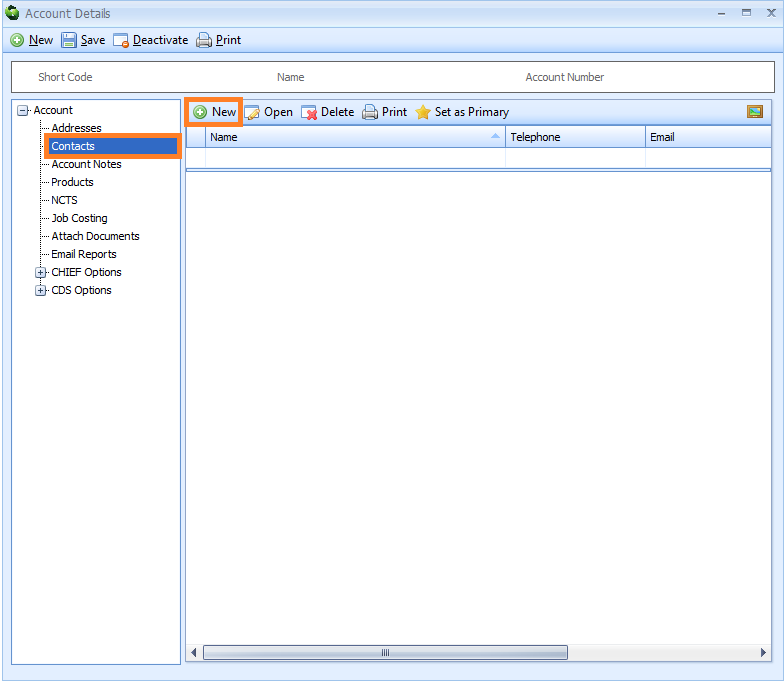
An Account Contact editor will appear. Enter the contact information into the boxes of the Account Contact editor. PLEASE NOTE that it is mandatory to complete the Last Name box - this means that it MUST be completed.

Click on the OK button to close the editor. You will be returned to the Contacts section of the Account Details editor, and a list of all your stored Contact records will appear on the right hand side of the screen. You can have several contacts in the same account.
To set a contact as your primary or main/default contact, click on the corresponding Contact record and then click on the Set as Primary button. A yellow star and will then appear next to it.
PLEASE NOTE that you MUST click on the Save button to save this information.
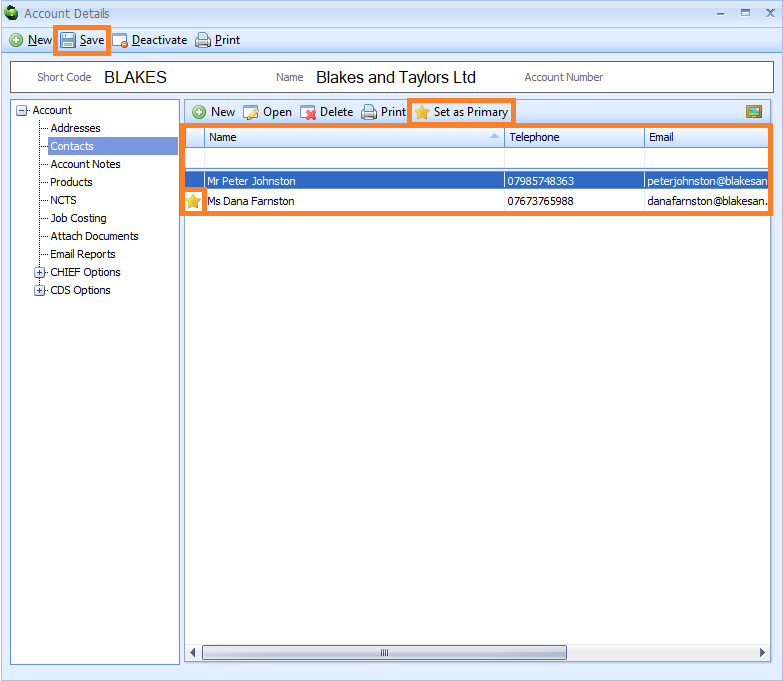
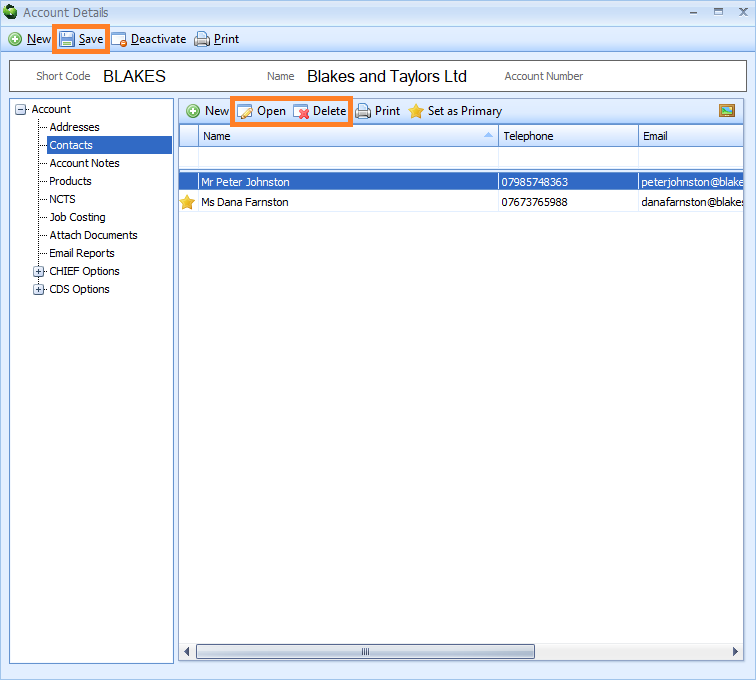
Edit an existing Contact record by either double-clicking on it, or by clicking on it once, and then clicking on the Open button on the Contacts toolbar. The Account Contact editor for that record will appear where you can make your changes.
Delete an existing Contact record by clicking on it, and then clicking on the Delete button on the Contacts toolbar.
PLEASE NOTE that you MUST click on the Save button on the main toolbar of the Account Details editor to save any changes or deletions.
Account Notes
The Account Notes node enables you to create and store reminder notes related to this account.
When you create a Job, declaration, shipment, consolidation or NCTS movement and link it to this account by adding the account name or EORI, you can set a reminder note to pop up on the screen. For example, you could set a note to pop up as a reminder to always use a specific commodity code whenever you create an import declaration linked to this account.
Each reminder note is stored as an Account Note record. To create an Account Note record, click on the Account Notes node. Next, click on the New button on the Account Notes toolbar to the right of the nodes.
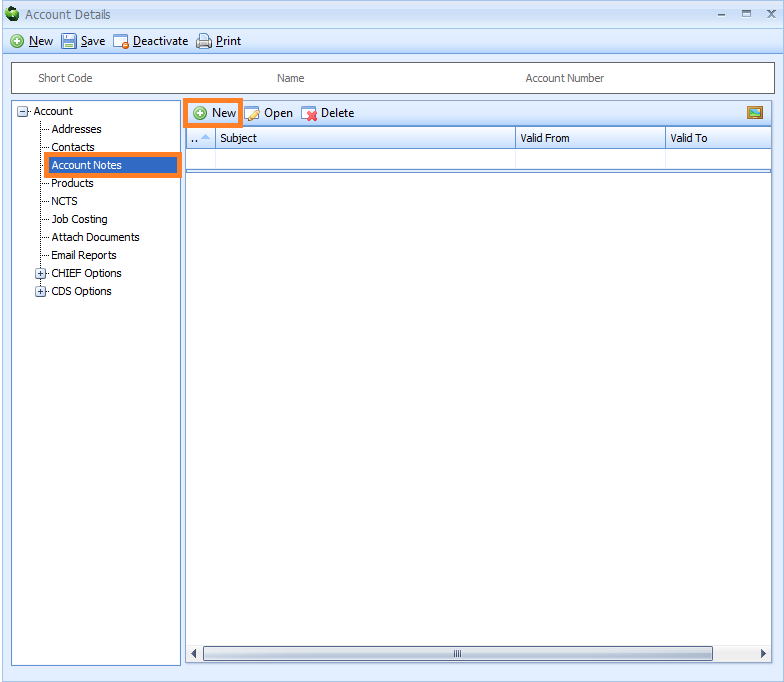
A Client Notes editor will appear.

Enter the information described in the table below into the Client Notes editor.
| Box | Information required |
|---|---|
| Alert When Used In | Specify when the reminder note should pop up on the screen by ticking the appropriate boxes. For example, tick the Jobs box and the note will pop up when any Job is created, or just tick the Oceans Import box below the Jobs box and the note will only pop up when an Ocean Import Job is created. More than one box can be ticked |
| Subject | Enter the subject of the note |
| Notes | Enter the content of the note |
| Active | Select the date that the note will be active from. Tick the box to activate it or untick it to deactivate it |
| Expires | Select the date that the note should no longer pop up from, i.e. when it expires. Tick the box to activate it or untick it to deactivate it |
| Alert Level | Select whether this note should appear as Critical, a Warning or as Information |
Click on the OK button to close the editor. You will be returned to the Account Notes section of the Account Details editor. You will see a list of all your stored Account Note records on the right hand side of the screen.
PLEASE NOTE that you MUST click on the Save button to save this information.
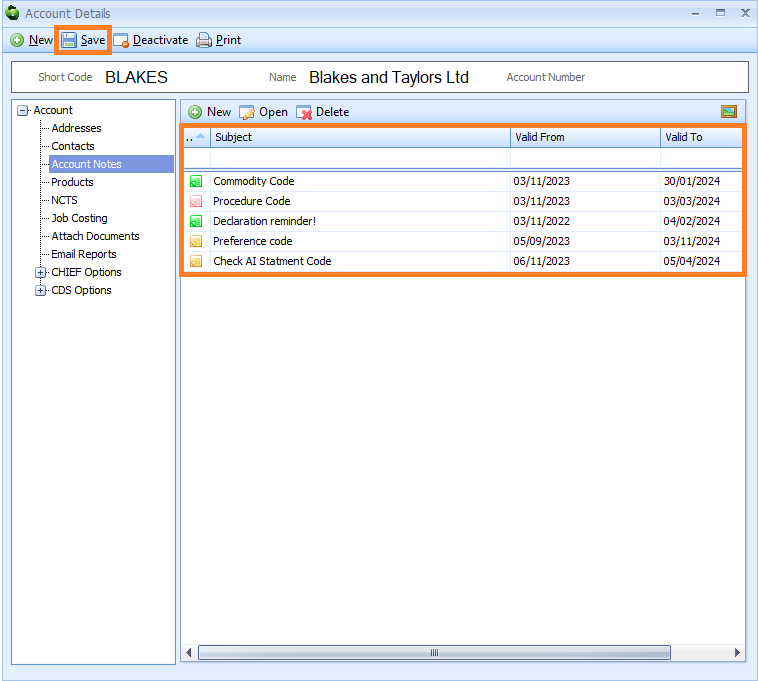
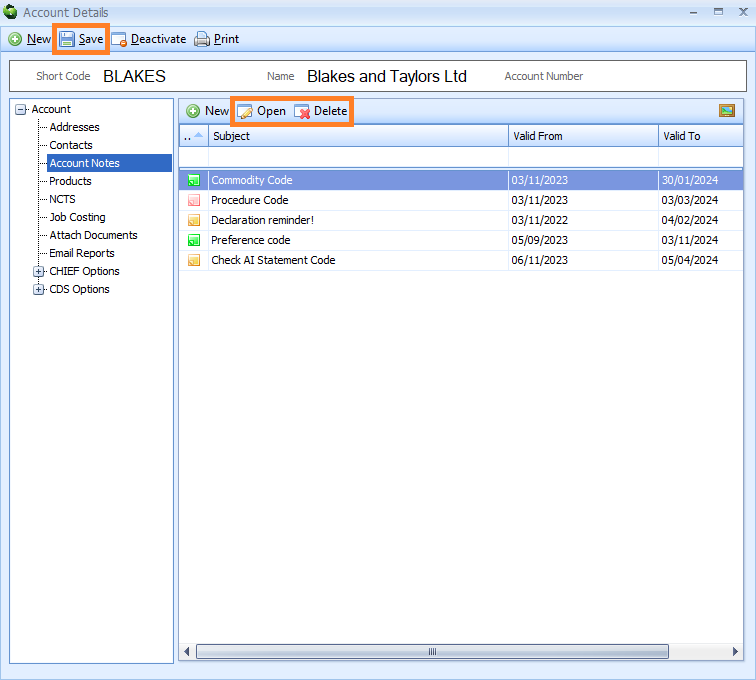
Edit an existing Account Note record by either double-clicking on it, or by clicking on it once, and then clicking on the Open button on the Account Notes toolbar. The Client Notes editor for that record will appear where you can make your changes.
Delete an existing Account Note record by clicking on it, and then clicking on the Delete button on the Account Notes toolbar.
PLEASE NOTE that you MUST click on the Save button on the main toolbar of the Account Details editor to save any changes or deletions.
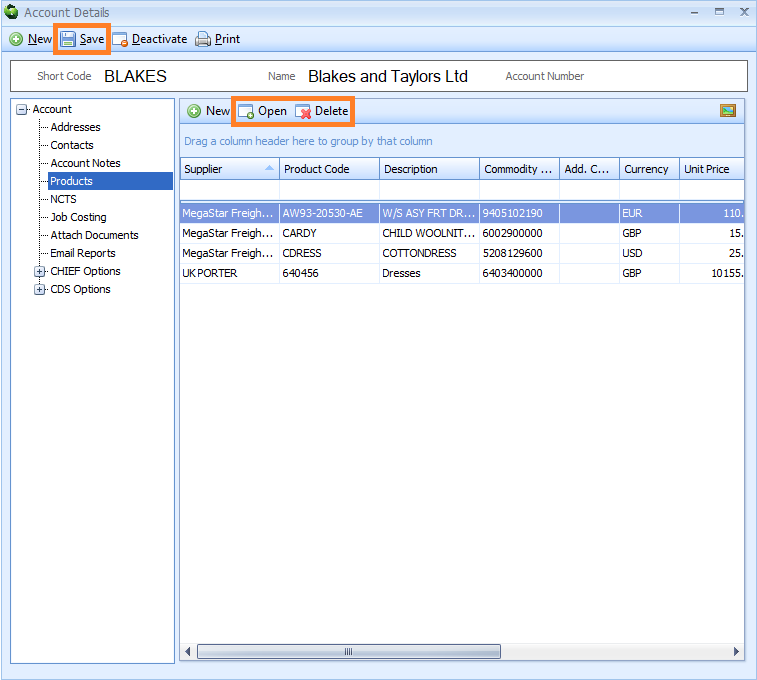
Products
Worksheets contain product data that can be imported into declarations or into customs warehousing stock items. The Products node enables you to store details of goods imported and/or exported by this account which can then be used to populate worksheets.
For example, a worksheet might have a specific product code and quantity entered into it. If there is a Product record in the account Products node that has the same product code (and also has the same supplier) as the worksheet, then all of the data in that account Products node will be imported at the same time as the worksheet data is imported. To learn more about worksheets, click here.
Each product is stored as a Product record. To create a Product record, click on the Products node. Next, click on the New button on the Products toolbar to the right of the nodes.
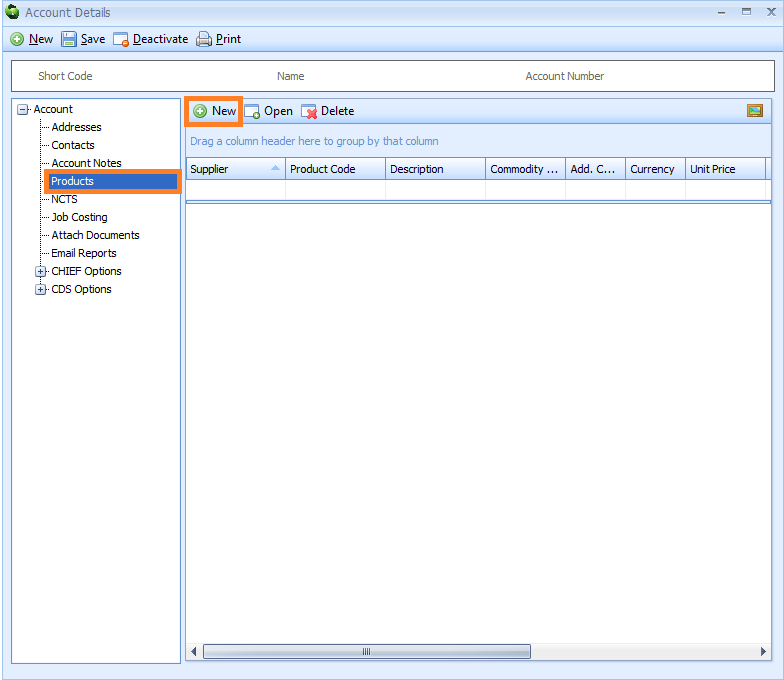
A Product Details editor will appear.

Enter the information described in the table below into the Product Details editor.
| Box | Information required |
|---|---|
| Customer | The customer name - this will be taken from the Account Name box in the Account node above and automatically entered into this box |
| Supplier | The supplier - i.e. who supplies the customer the product Select this information from a list by either typing a ? into this box or by clicking on the ellipsis (the 3 dots) to the right of this box to display the Account Lookup Dialog box. Next, enter all or part of the name or short code of the account into the search box, click on the binoculars icon to search for it and then select it from the resulting list by double-clicking on it |
| Product Code | The product code used to identify the product |
| Description | A description of the product |
| Commodity Code [33] | The commodity code of the product, as required in box 33 of declarations You can select this information from a list by either typing a ? into this box or by clicking on the ellipsis (the 3 dots) to the right of this box to display the Customs Tariff editor. Select the appropriate commodity code and then click on the OK button to enter it into this box |
| Currency | The currency in which the value of the product is normally presented Select this information from a list by either typing a ? into this box, or by clicking on the ellipsis (the 3 dots) to the right of this box to display the Currency Lookup Dialog box. Next, enter all or part of the currency code into the search box, click on the binoculars icon to search for it, and then select it from the resulting list by double-clicking on it or by clicking on it once and pressing the return key |
| Item Value | The value of one item of the product |
| Net Mass [38] | The net mass of the product, as required in box 38 of declarations |
| Gross Mass [35] | The gross mass of the product, as required in box 35 of declarations |
| VAT Rate | Click on the down arrow on the right hand side of the box and select the VAT rate of the product from the drop-down list, depending on the commodity code |
| Valuation Method [43] | Click on the down arrow on the right hand side of the box and select the valuation method of the product from the drop-down list, as required in box 43 of declarations |
| Valuation Adjustment [45] | Click on the down arrow on the right hand side of the box and select the valuation adjustment of the product from the drop-down list, as required in box 45 of declarations |
| Percent | The valuation adjustment percentage to be applied |
| Active Record | Tick this box if this product is live and active. Leave this box unticked to deactivate it and the product will no longer be considered when importing worksheet data |
Click on the OK button to close the editor. You will be returned to the Products section of the Account Details editor. You will see a list of all your stored Product records on the right hand side of the screen.
PLEASE NOTE that you MUST click on the Save button to save this information.
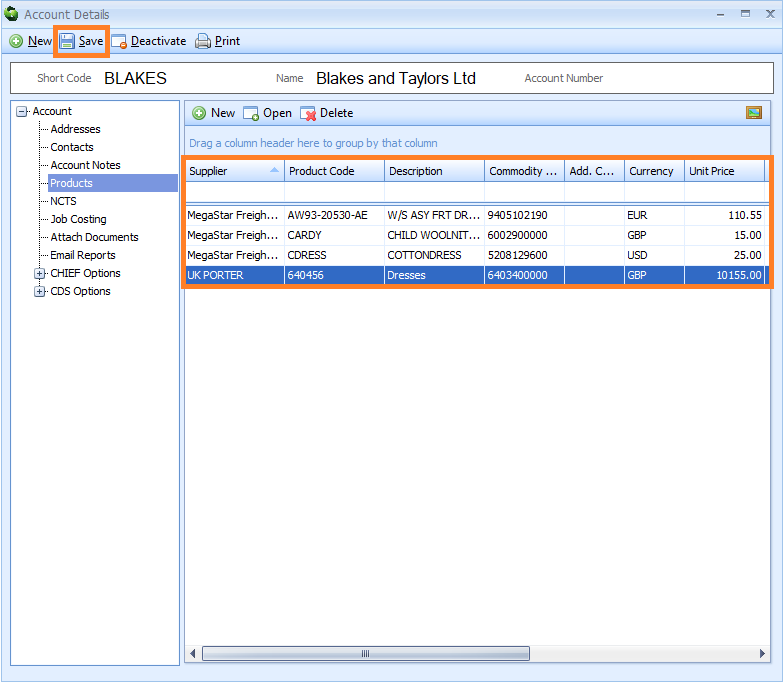
Edit an existing Product record by either double-clicking on it, or by clicking on it once, and then clicking on the Open button on the Products toolbar. The Product Details editor for that record will appear where you can make your changes.
Delete an existing Product record by clicking on it, and then clicking on the Delete button on the Products toolbar.
PLEASE NOTE that you MUST click on the Save button on the main toolbar of the Account Details editor to save any changes or deletions.
NCTS
The NCTS node enables you to instruct Sequoia to automatically enter this account's NCTS TIN information, name and address into Box 50 (Principal) on all new NCTS declarations. PLEASE NOTE that only one account can be set as the Principal on all new NCTS declarations.
To add this information, click on the NCTS node. The NCTS editor will appear to the right of the nodes.
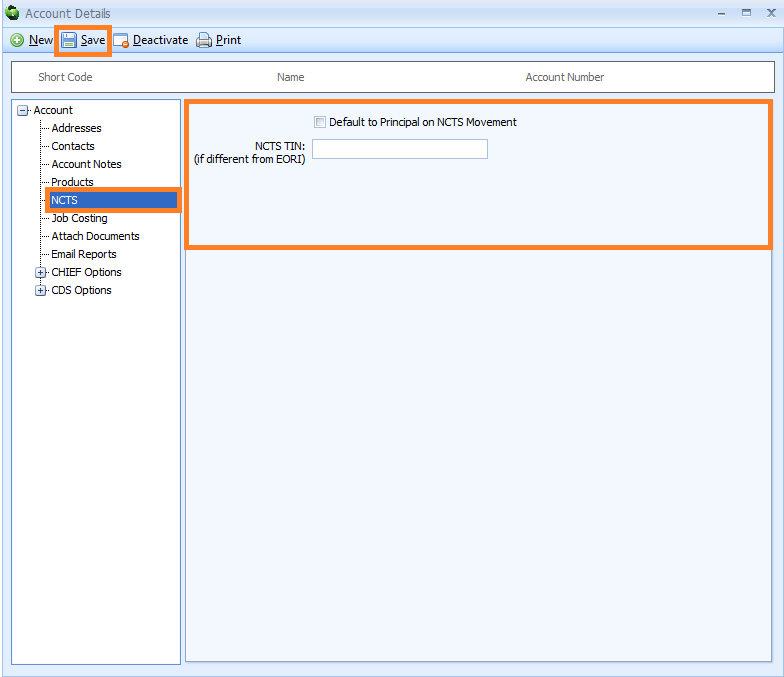
Enter the information described in the table below into the NCTS editor. PLEASE NOTE that after you have entered this information, you MUST click on the Save button to save it (see image above). If you edit this information later, you MUST also click on the Save button to save any changes.
| Box | Information required |
|---|---|
| Default to Principal on NCTS Movement | Tick this box to automatically enter this account's NCTS TIN information, name and address into Box 50 (Principal) on all new NCTS declarations |
| NCTS TIN (if different to EORI): | Enter this account's NCTS TIN (if it is different from the EORI) |
Job Costing
You will only see this node if you have activated the Job Costing module. The Job Costing module is available to you free of charge, however, in order to use it, you will need to contact the ASM service desk and ask them to enter a licence key to activate it. Click here to contact the ASM service desk.
The Sequoia Job Costing module allows you to record costs and sales, generate invoices and credit notes, manage supplier purchase invoices, transfer data to your accounting system and produce accurate, real-time profit and loss reports (click here for more information).
The Job Costing node enables you to store information that can be automatically added into a Job Costing record in the Job Costing module. When this account name is specified in a Job Costing record, Sequoia will automatically enter this stored information into reports and invoices.
To add this information, click on the Job Costing node. The Job Costing editor will appear to the right of the nodes.
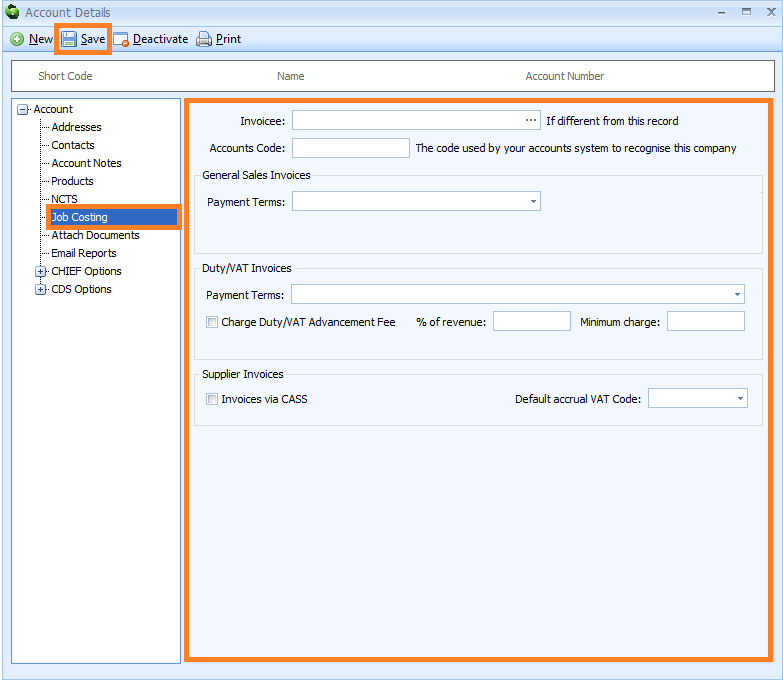
Enter the information described in the table below into into the Job Costing editor. PLEASE NOTE that after you have entered this information, you MUST click on the Save button to save it (see image above). If you edit this information later, you MUST also click on the Save button to save any changes.
| Box | Information required |
|---|---|
| Invoicee | The customer specified on a Job record will be automatically entered into sales invoices as the 'invoicee'. However, when this account is specified as the customer on a Job and a different invoicee needs to be automatically entered into sales invoices, enter that invoicee's account information into this box Select this information from a list by either typing a ? into this box, or by clicking on the ellipsis (the 3 dots) to the right of this box to display the Invoicee Account Lookup Dialog box. Next, enter all or part of the shortcode, EORI or name of the invoicee into the search box, click on the binoculars icon to search for the invoicee, and then select it from the resulting list by double-clicking on it or by clicking on it once and pressing the return key |
| Accounts Code | If Sequoia has been set up to transfer sales amounts into your accounting system, then the code used by your accounting system to recognise this account must be entered into this box |
| General Sales Invoices | |
| Payment Terms | Select the payment terms that will be automatically entered into any general sales invoices belonging to this account. For example, 'immediate payment due', 'payment due in 30 days', 'payment due in 60 days'. Click on the down arrow to the right of the box and select the appropriate payment terms from the drop-down list. To create a payment term and add it to this list, follow the 'Creating Payment Terms' instructions here |
| Duty/VAT Invoices | |
| Payment Terms | Select the payment terms that will be automatically entered into any duty/VAT sales invoices belonging to this account. For example, 'immediate payment due', 'payment due in 30 days', 'payment due in 60 days'. Click on the down arrow to the right of the box and select the appropriate payment terms from the drop-down list. To create a payment term and add it to this list, follow the 'Creating Payment Terms' instructions here |
| Charge Duty/VAT Advancement Fee | Tick this box and Sequoia will automatically add a fee for advancing import duty and/or VAT to duty/VAT invoices |
| % of revenue | Enter the percentage of the import duty and/or VAT calculated as the advancement fee (see line above) |
| Minimum charge | Enter a minimum charge into this box. If the percentage of the import duty and/or VAT calculated as the advancement fee is less than this minimum charge, then this minimum charge will be applied to duty/VAT invoices |
| Supplier Invoices | |
| Invoices via CASS | Tick this box and when this account is entered as the 'supplier' on a charge line, then the purchase invoice will be generated by the IATA CASS payment system See 'IATA CASS Invoices' instructions here |
| Default accrual VAT Code | Click on the down arrow to the right of this box and select the appropriate default accrual VAT code from the drop-down list. Going forward, when creating charge lines that use this code, the VAT code of the accrual (cost) will be automatically entered (see Creating VAT Codes and Maintaining VAT Rates). What is entered into this box will override any default VAT code already specified in the charge code record (click here for information on charge codes) |
See Adding Accounting Information to CRM Records for information on what data is stored and how it is used.
Attach Documents
The Attach Documents node enables you to store copies of documents related to this account.
Click on the Attach Documents node. To add a document, click on Add on the Documents toolbar to the right of the nodes.
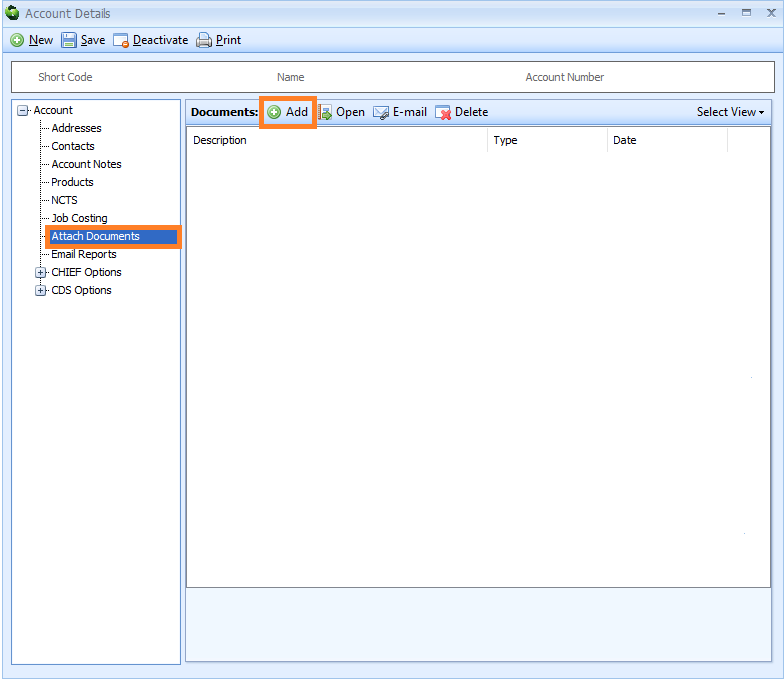
The standard file explorer on your computer will appear and you can search for the document that you wish to attach. Double-click on the document to add it to the Attach Documents node.
You will be returned to the Attach Documents section of the Account Details editor and a list of all your stored documents will appear on the right hand side of the screen.
PLEASE NOTE that you MUST click on the Save button to save this information.
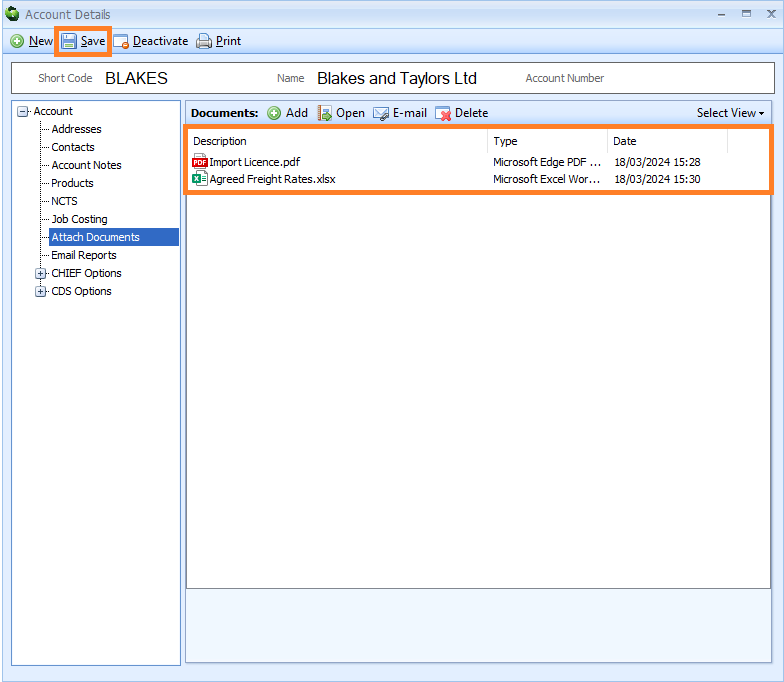
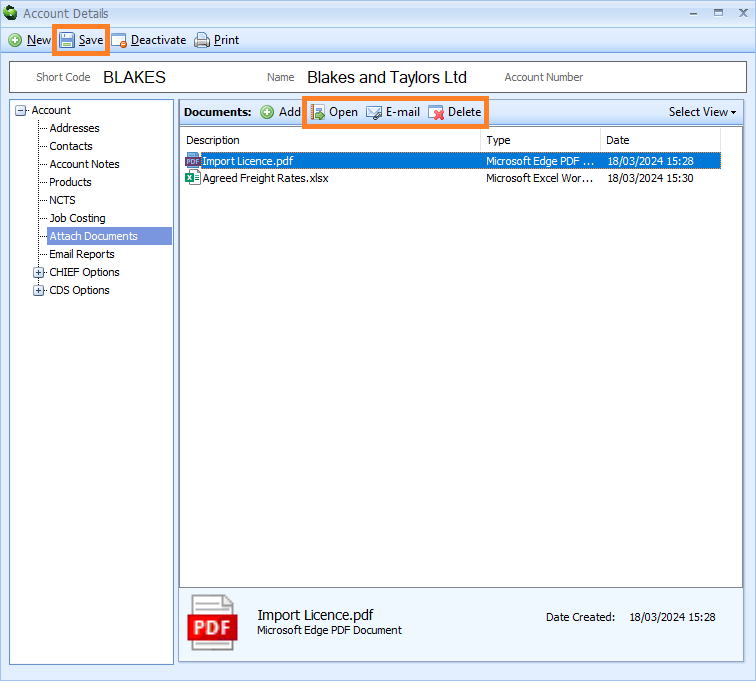
Open an existing document by either double-clicking on it, or clicking on it once and then clicking on Open in the Documents toolbar.
Delete an existing document by clicking on it and then clicking on Delete in the Documents toolbar.
Email an existing document by clicking on it and then clicking on Email in the Documents toolbar.
PLEASE NOTE that you MUST click on the Save button on the main toolbar of the Account Details editor to save any changes or deletions.
PLEASE NOTE that you cannot edit your documents here. If you need to edit a document, you will need to do so elsewhere and then re-add it to the Attach Documents node.
Email Reports
Declaration reports are created at various stages of the declaration process, for example, when a declaration is accepted by customs, when goods are permitted to progress or when goods are released etc. You can set up Sequoia to automatically email these declaration reports to your customers when they are created.
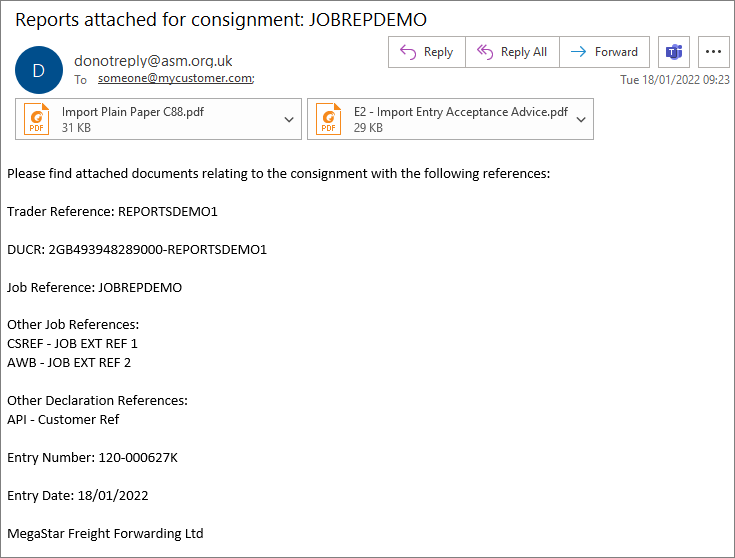
The reports will be sent as attachments to an email and the body of the email will contain key relevant information related to the consignment such as the DUCR, Job reference or any external references, etc. An example email is shown below.
In the Email Reports node, you can set up Sequoia to automatically send out these declaration reports to specific email addresses when this account is entered as:
a) the customer on a Job that a declaration is linked to
b) the consignee [box 08] on an import declaration
c) the consignor [box 02] on an export declaration
Each email report is stored as an Email Report record. To create an Email Report record and set up an email report, click on the Email Reports node. Next, click on the New button on the Email Reports toolbar to the right of the nodes.
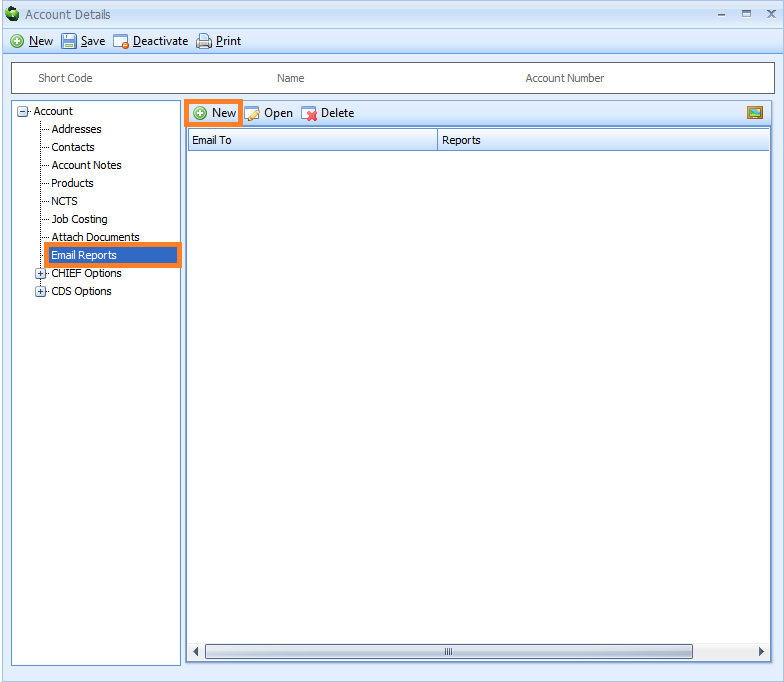
The Email Reports editor will appear.
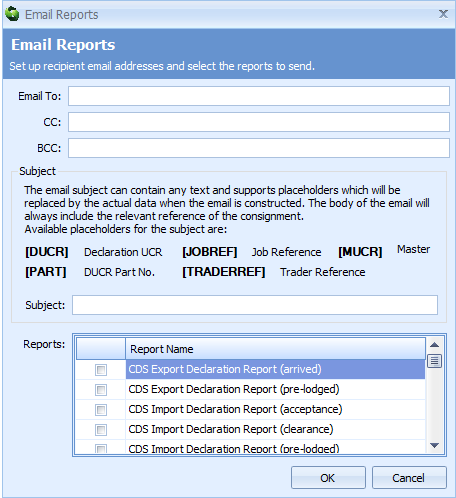
Enter the information described in the table below into the Email Reports editor.
| Box | Information required |
|---|---|
| Email To | REQUIRED. The email address(es) that the report(s) will be sent to. If there is more than one email address, separate each one with a semi-colon (;) |
| CC | If you would like to copy people into this email, enter the CC email address(es) that the report(s) will be sent to. If there is more than one email address, separate each one with a semi-colon (;) |
| BCC | If you would like to blind copy people into this email, enter the BCC email address(es) that the report(s) will be sent to. If there is more than one email address, separate each one with a semi-colon (;) |
| Subject | OPTIONAL. The email subject text. If this box is left blank, 'Copy Documentation For Consignment: [DUCR]' will be automatically entered into the email subject. The email subject can contain text and 'placeholders'. 'Placeholders' are words that will be replaced with specific corresponding data when the email is created. Available placeholders are: - [DUCR] - this will be replaced by the Declaration UCR - [JOBREF] - this will be replaced by the Job Reference - [MUCR] - this will be replaced by the Master UCR - [PART] - this will be replaced by the DUCR Part Number - [TRADERREF] - this will be replaced by the Trader Reference found in box 07 of the declaration For example, if the email subject is set as 'Reports attached for consignment: [JOBREF]', then an email would be sent with the subject: 'Reports attached for consignment: AI-22010001' for declaration reports associated with Job Reference "AI-22010001". The main body of the email will always include the relevant consignment reference |
| Reports | REQUIRED. Tick the boxes next to the reports that you wish to send to the above email addresses when they are created. Please note that if you tick both the C88 and E2 report boxes for import declarations, then the email will only be generated once BOTH of these reports have been produced. Likewise, if you tick both the ESS and X2 report boxes for export declarations, then the email will only be generated once BOTH of these reports have been produced |
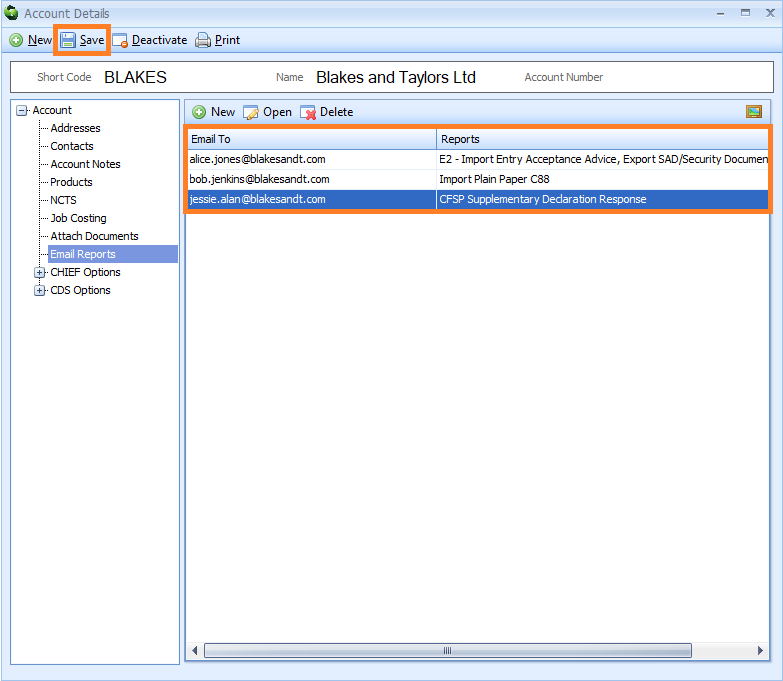
Click on the OK button to close the editor. You will be returned to the Email Reports section of the Account Details editor. You will see a list of all your stored Email Report records on the right hand side of the screen.
PLEASE NOTE that you MUST click on the Save button to save this information.
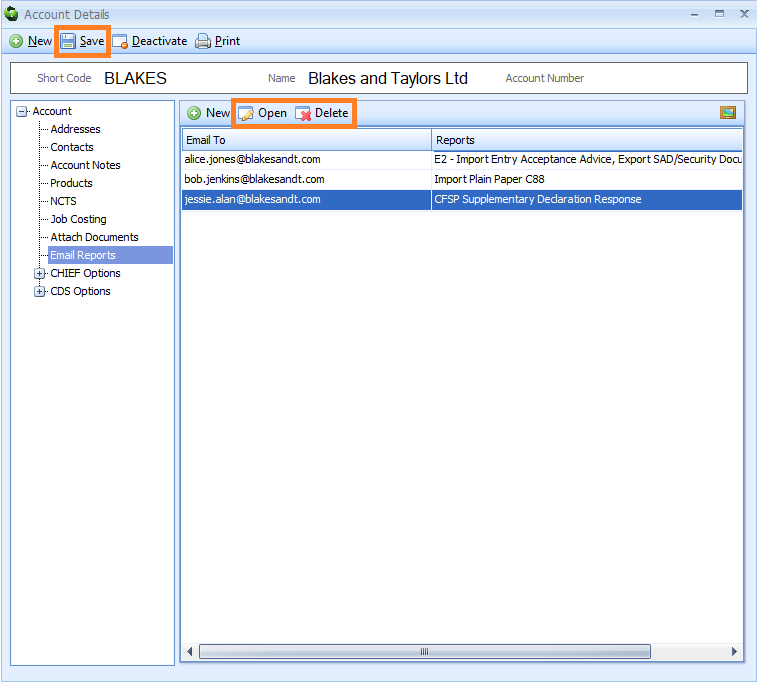
Edit an existing Email Report record by either double-clicking on it, or by clicking on it once, and then clicking on the Open button on the Email Reports toolbar. The Email Reports editor for that record will appear where you can make your changes.
Delete an existing Email Report record by clicking on it, and then clicking on the Delete button on the Email Reports toolbar.
PLEASE NOTE that you MUST click on the Save button on the main toolbar of the Account Details editor to save any changes or deletions.
PLEASE NOTE: To send these emails, you must specify your email sender address in the Sequoia server, where you can also add any email signatures. Learn how to do this here. You must also enter your SMTP server details into the Sequoia server. Learn how to do that here.
CHIEF Options
The CHIEF Options node enables you to store CHIEF declaration information related to this account. When this account is specified as the declarant, importer (for imports) or exporter (for exports) on a CHIEF declaration, these options will be automatically entered into that declaration.
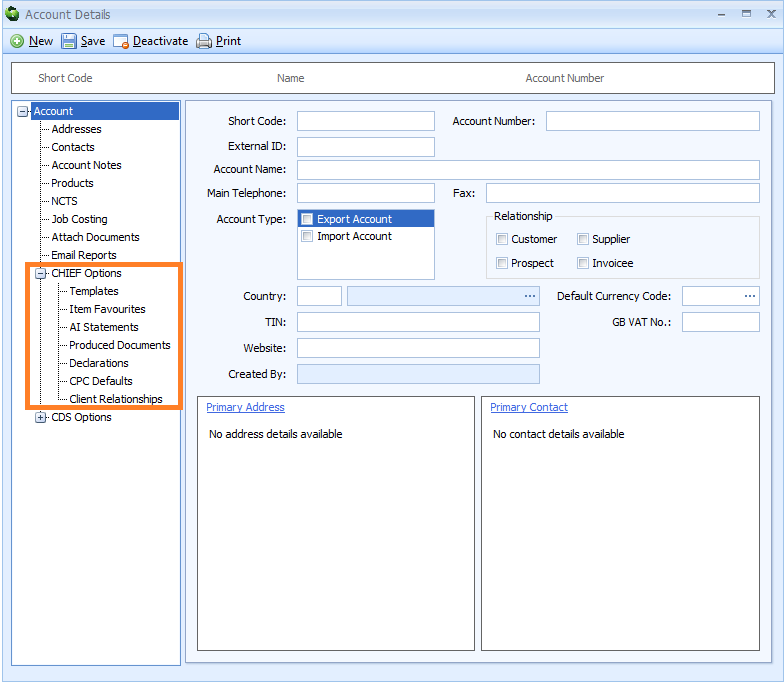
Click on the small plus icon  to the left of the CHIEF Options node to view all the CHIEF Options nodes.
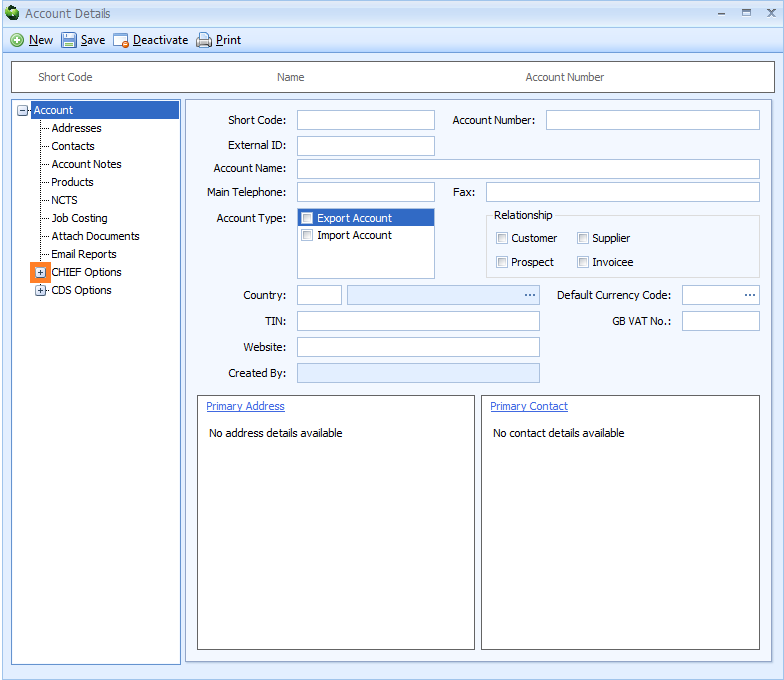
The CHIEF Options nodes will appear
Templates (CHIEF)
The Templates node enables you to store declaration templates related to this account. A template is a document that contains some pre-added data. Any declaration, or part of a declaration, can be saved as a template. This declaration template can then be used as a base when creating future declarations, so that you do not have to create them from scratch.
You could create a template if you use the same customer, shipping or goods on your declarations, for example, or if you have created a particularly tricky declaration that took a long time to get right and you want to save it and use it again. Templates greatly reduce repetitive data entry and data entry errors, saving you time and increasing your productivity. For more information about templates, click here.
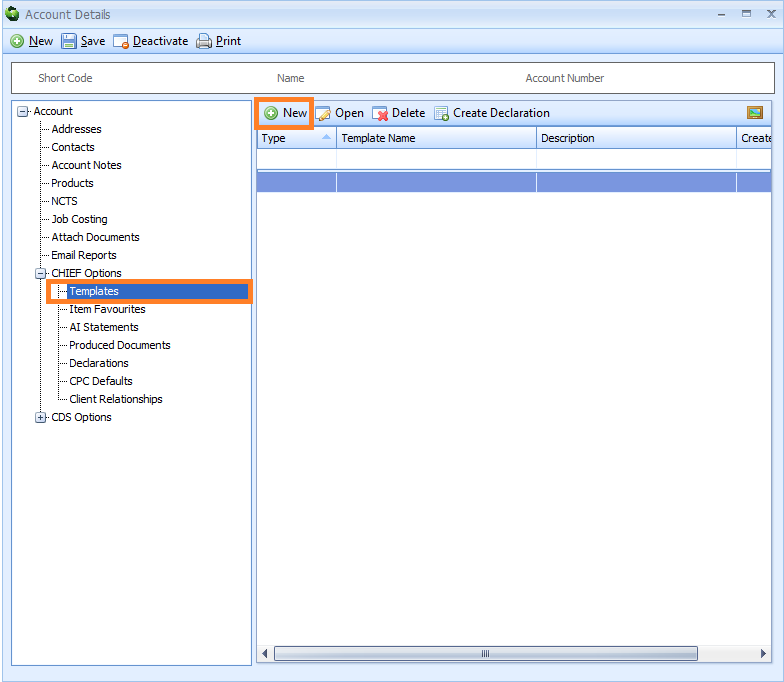
To add a new template, click on the Templates node. Next, click on the New button on the Templates toolbar to the right of the nodes.
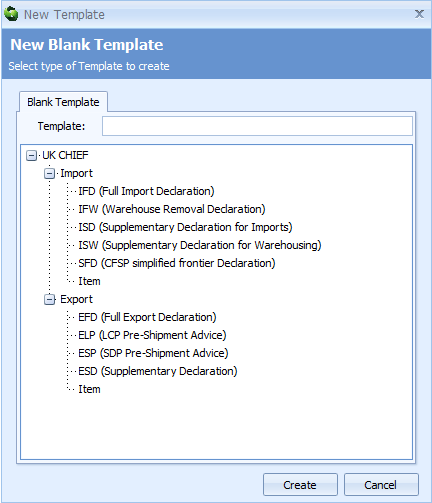
A New Template dialog box will appear. Double-click on the type of declaration template that you wish to create, or click on it once and then click on the Create button.
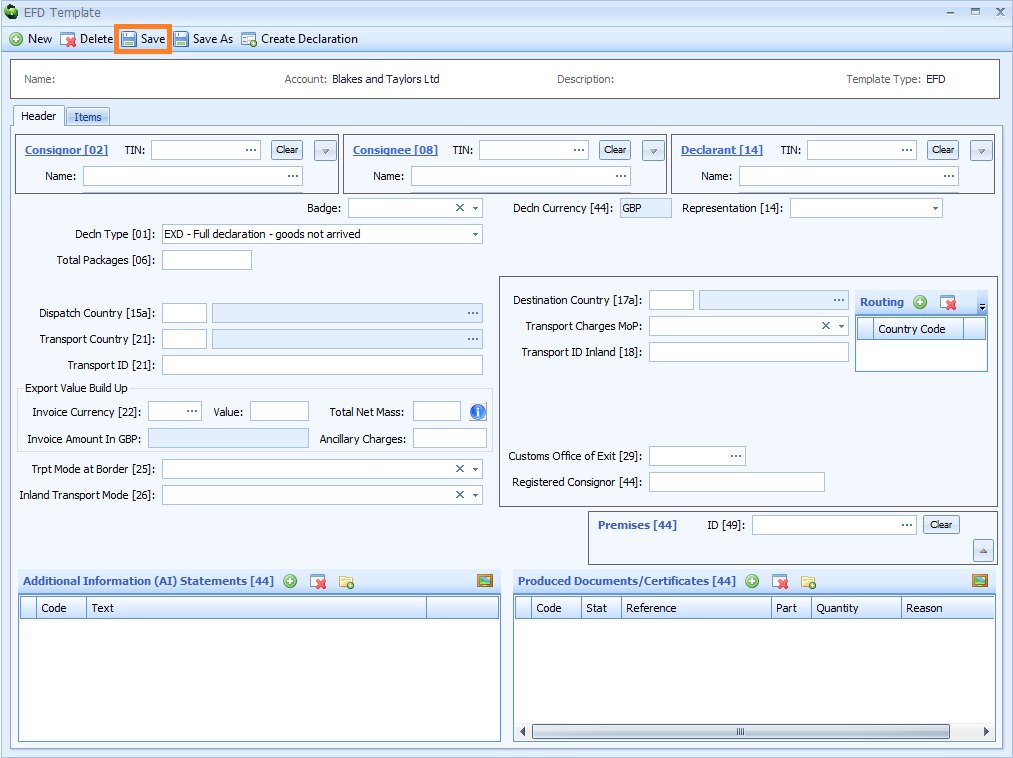
A declaration template editor will appear. Enter the template declaration information into the boxes, and then click on the Save button.
A Save Template editor will appear.
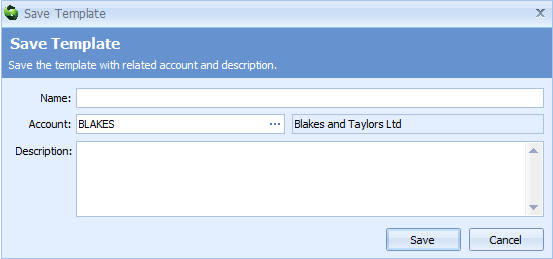
Enter the information described in the table below into the Save Template editor and click on the Save button to close the editor.
| Box | Information required |
|---|---|
| Name | Create and enter a name for the declaration template |
| Account | The account that this declaration is linked to Select this information from a list by either typing a ? into this box or by clicking on the ellipsis (the 3 dots) to the right of this box to display the Account Lookup Dialog box. Next, enter all or part of the name or short code of the account into the search box, click on the binoculars icon to search for it and then select it from the resulting list by double-clicking on it |
| Description | A description of the decaration template |
You will be returned to the Templates section of the Account Details editor. You will see a list of all your stored declaration templates on the right hand side of the screen.
PLEASE NOTE that you MUST click on the Save button to save this information.
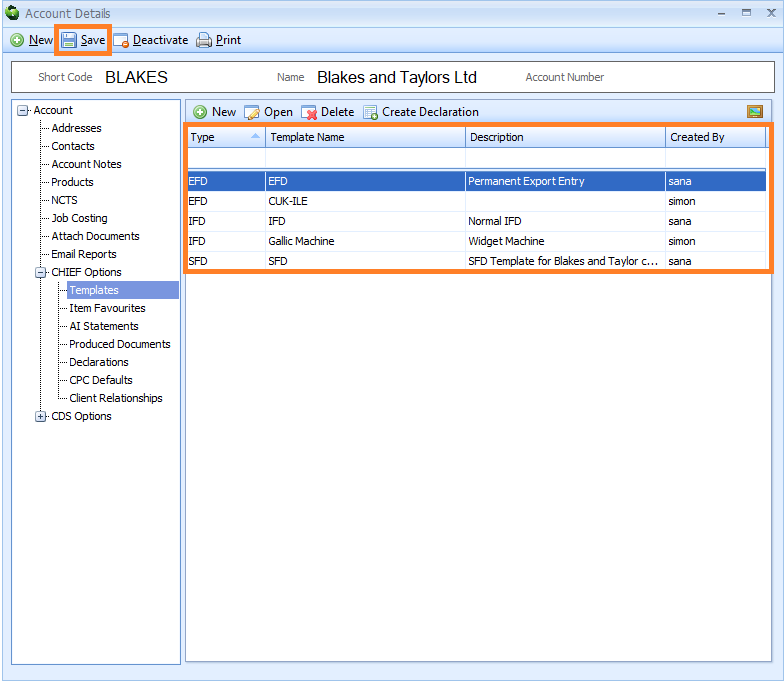
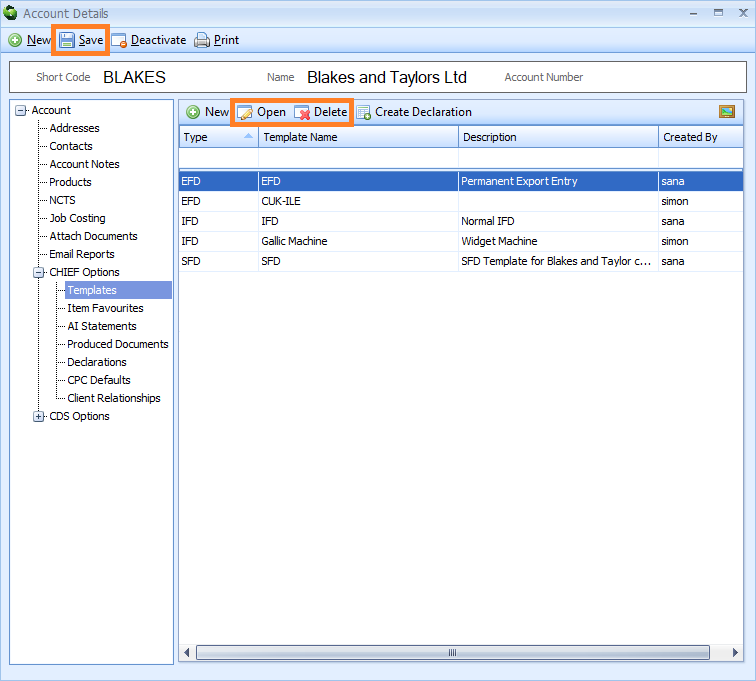
Edit an existing template by either double-clicking on it, or by clicking on it once, and then clicking on the Open button on the Templates toolbar. The declaration template editor will appear where you can make your changes. You must click on the Save button on the declaration template editor to save these changes.
Delete an existing template by clicking on it, and then clicking on the Delete button on the Templates toolbar.
PLEASE NOTE that you MUST click on the Save button on the main toolbar of the Account Details editor to save any changes or deletions.
Item Favourites (CHIEF)
The Item Favourites node enables you to store commonly used declaration items information related to this account in Item Favourite records. This information includes commodity codes, goods descriptions, procedure codes, preference codes and origin and destination details. When completing declarations, you can select these items from an 'item favourites' list to enter them automatically, saving you the time and effort of entering them manually.
On acceptance of a declaration, Sequoia can be set to automatically capture any 'item favourites' on that declaration into an Item Favourite record (click here to learn how). You can access these Item Favourite records here to edit or delete them. You can also create an Item Favourite record here too.
To create an Item Favourite record, click on the Item Favourites node. Next, click on the New button on the Item Favourites toolbar to the right of the nodes.
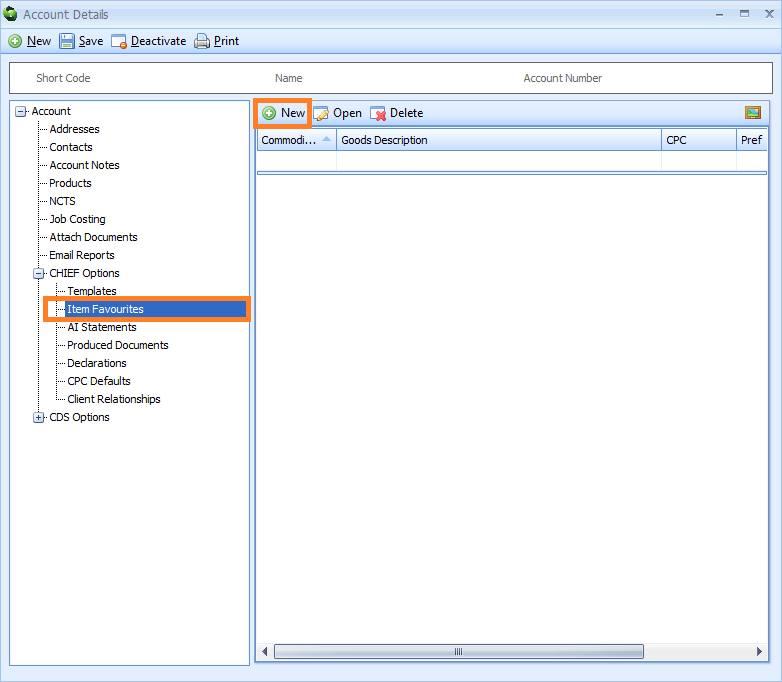
An Item Favourites editor will appear.
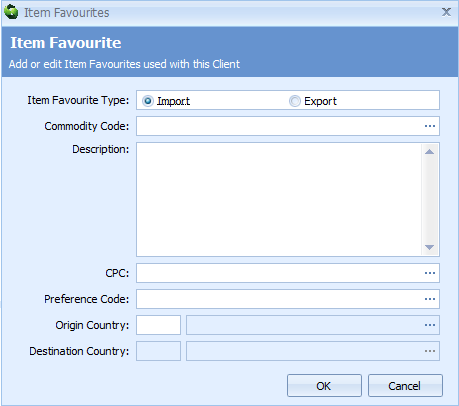
Enter the information described in the table below into the Item Favourites editor and click on the OK button to close the editor.
| Box | Information required |
|---|---|
| Item Favourite Type | Select Import or Export as the type of item favourite |
| Commodity Code | The commodity code of the item favourite You can select this information from a list by either typing a ? into this box or by clicking on the ellipsis (the 3 dots) to the right of this box to display the Customs Tariff editor. Select the appropriate commodity code and then click on the OK button to enter it into this box |
| Description | A description of the item favourite |
| CPC | The CPC code of the item favourite |
| Preference Code | The preference code of the item related to any preferential tariff You can select this information from a list by either typing a ? into this box or by clicking on the ellipsis (the 3 dots) to the right of this box to display the Preference Code Lookup Dialog box. Next, enter the preference code or part of it into the search box, click on the binoculars icon to search for it and then select it from the resulting list by double-clicking on it |
| Origin Country | The origin country of the item favourite You can select this information from a list by either typing a ? into this box or by clicking on the ellipsis (the 3 dots) to the right of this box to display the Origin Country Lookup Dialog box. Next, enter the country or part of it into the search box, click on the binoculars icon to search for it and then select it from the resulting list by double-clicking on it |
| Destination Country | The destination country of the item favourite |
You will be returned to the Item Favourites section of the Account Details editor. You will see a list of all your stored Item Favourites records on the right hand side of the screen.
PLEASE NOTE that you MUST click on the Save button to save this information.
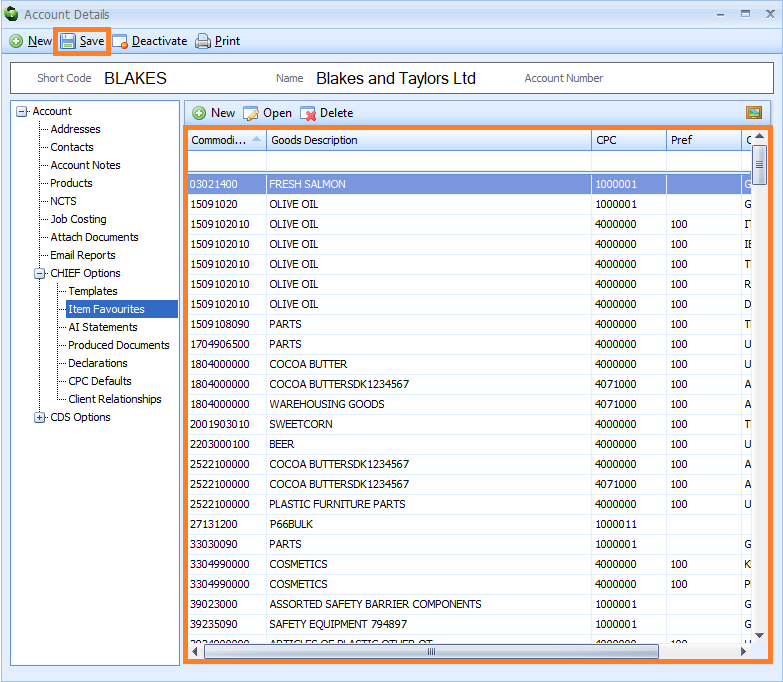
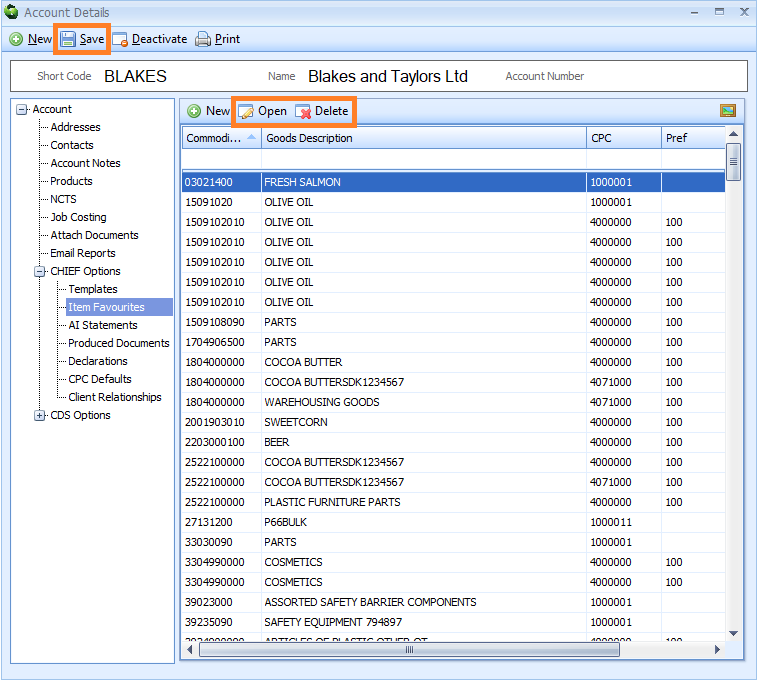
Edit an existing Item Favourites record by either double-clicking on it, or by clicking on it once, and then clicking on the Open button on the Item Favourites toolbar. The Item Favourite editor for that record will appear where you can make your changes.
Delete an existing Item Favourite record by clicking on it, and then clicking on the Delete button on the Item Favourites toolbar.
PLEASE NOTE that you MUST click on the Save button on the main toolbar of the Account Details editor to save any changes or deletions.
AI Statements (CHIEF)
The AI Statements node enables you to store AI Statement information related to this account. When this account is then specified as the declarant, importer (for imports) or exporter (for exports) on a CHIEF declaration, Sequoia will enter this information into Box 44 [Additional Information] of that declaration.
Each AI Statement is stored as an AI Statement record. To create an AI Statement record, click on the AI Statements node. Next, click on the New button on the AI Statements toolbar to the right of the nodes.
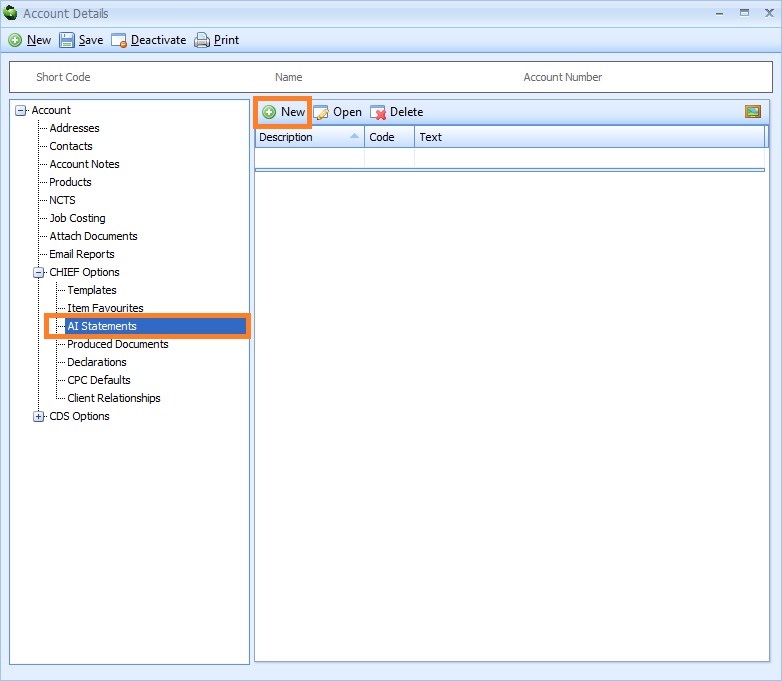
An AI Statement editor will appear.
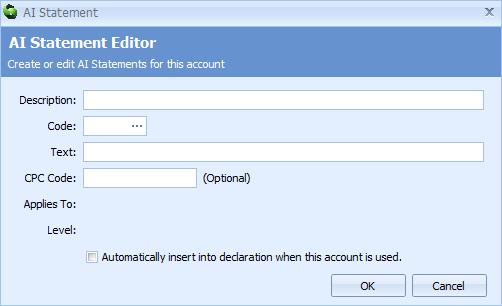
Enter the information described in the table below into the AI Statement editor and click on the OK button to close the editor.
| Box | Information required |
|---|---|
| Description | A description of the AI Statement code. This can be something you create or it can be taken from HMRC's description associated with that code found here |
| Code | The AI Statement code Select this information from a list by either typing a ? into this box or by clicking on the ellipsis (the 3 dots) to the right of this box to display the AI Statement Code Dialog box. Next, enter the code or part of the code into the search box, click on the binoculars icon to search for it and then select it from the resulting list by double-clicking on it |
| Text | Any text relating to the AI Statement code |
| CPC Code | Any CPC code related to this AI Statement code. This is optional |
| Applies to | This box will automatically display if this code applies to exports or imports or both |
| Level | This box will automatically display if this code can be used at header or item level or both on the declaration |
| Automatically insert into declaration when this account is used | Tick this box to allow Sequoia to enter this AI Statement record information into Box 44 (Additional Information) of a declaration when this account is specified as the declarant, importer (for imports) or exporter (for exports) on that declaration. If you tick this box and do not enter a CPC (Customs Procedure Code) into the Procedure Code [37] box above, then the information in this AI Statement record will be automatically added into a declaration when it is created. However, if you tick this box and enter a CPC code into the Procedure Code [37] box above, then the information in this AI Statement record will only be automatically added into a declaration when you enter that same CPC code into an item of that declaration |
You will be returned to the AI Statements section of the Account Details editor. You will see a list of all your stored AI Statement records on the right hand side of the screen.
PLEASE NOTE that you MUST click on the Save button to save this information.
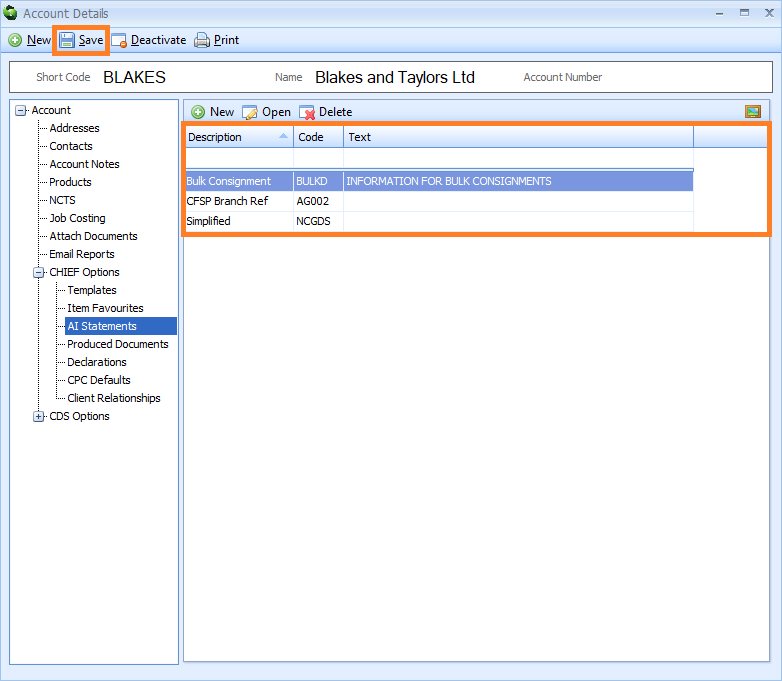
Edit an existing AI Statement record by either double-clicking on it, or by clicking on it once, and then clicking on the Open button on the AI Statements toolbar. The AI Statement editor for that record will appear where you can make your changes.
Delete an existing AI Statement record by clicking on it, and then clicking on the Delete button on the AI Statements toolbar.
PLEASE NOTE that you MUST click on the Save button on the main toolbar of the Account Details editor to save any changes or deletions.
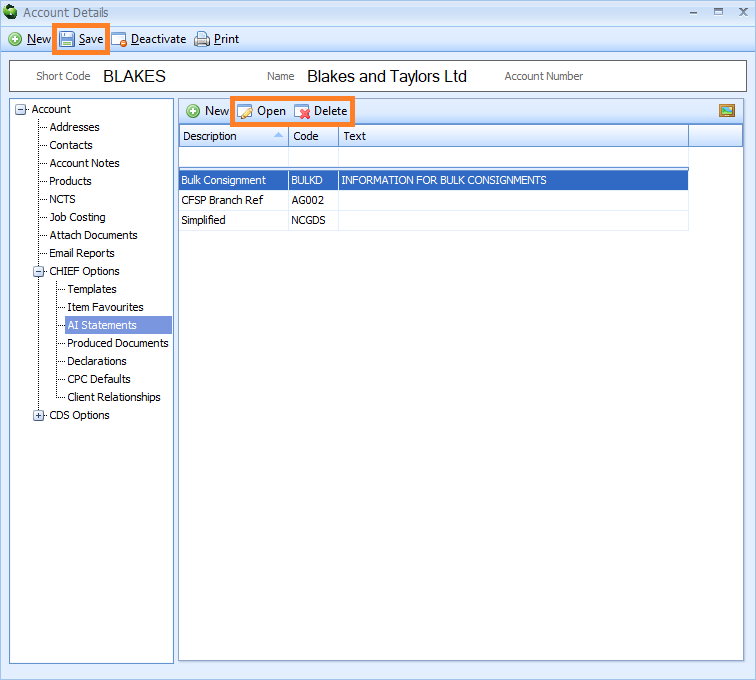
Produced Documents (CHIEF)
The Produced Documents node enables you to store copies of declaration documents related to this account. When this account is then specified as the declarant, importer (for imports) or exporter (for exports) on a CHIEF declaration, Sequoia will enter this information into Box 44 (Produced Document/Certificates) of that declaration.
Each document is stored as a Produced Documents record. To create a Produced Documents record, click on the Produced Documents node. Next, click on the New button on the Produced Documents toolbar to the right of the nodes.
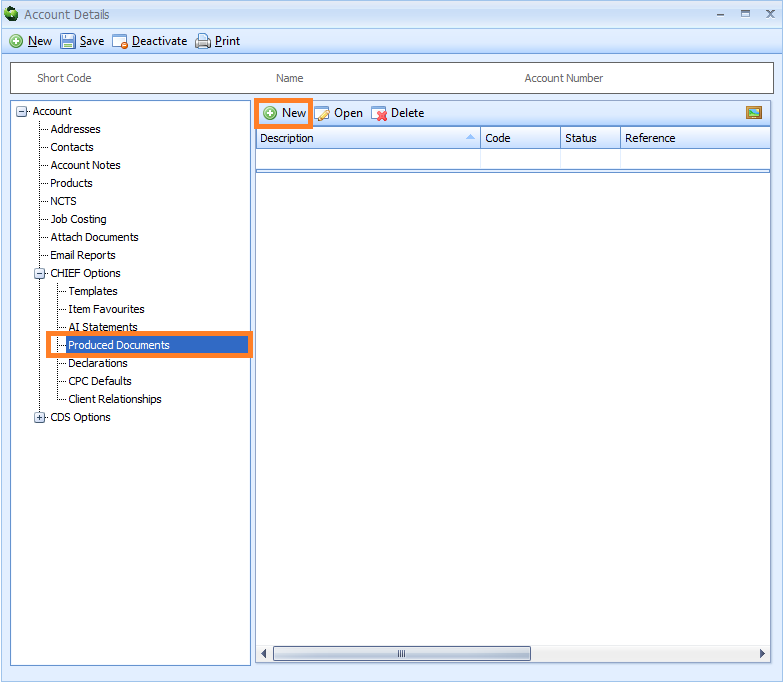
A Produced Document/Certificates editor will appear.
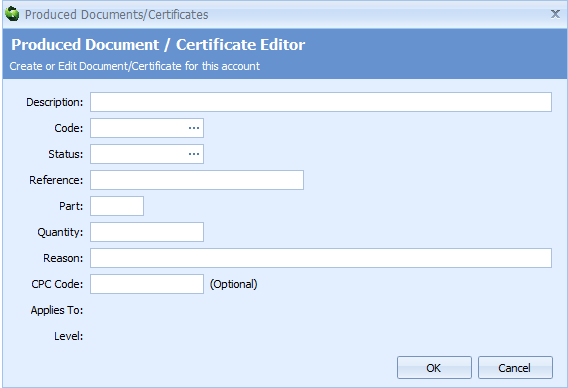
Enter the information described in the table below into the Produced Document/Certificates editor. Click on the OK button to close the editor.
| Box | Information required |
|---|---|
| Description | Enter a meaningful description for this document. This will not used in the declaration, however it is useful for identifying this document in a list |
| Code | The produced document code You can select this information from a list by either typing a ? into this box or by clicking on the ellipsis (the 3 dots) to the right of this box to display the Document Codes Lookup Dialog box. Next, enter the code or part of it into the search box, click on the binoculars icon to search for it and then select it from the resulting list by double-clicking on it |
| Status | The document status You can select this information from a list by either typing a ? into this box or by clicking on the ellipsis (the 3 dots) to the right of this box to display the Document Status Codes Lookup Dialog box. Next, enter the document status code or part of it into the search box, click on the binoculars icon to search for it and then select it from the resulting list by double-clicking on it |
| Reference | The document reference |
| Part | The document 'part' |
| Quantity | The quantity associated with this document |
| Validity Date | The validity date |
| Issuing Authority | The issuing authority |
| Reason | The document reason |
| CPC code | The CPC code to which this document applies |
| Applies to | This box will automatically display if this document code applies to imports, exports or both |
| Level | This box will automatically display if this document code can be used at header or item level or both |
You will be returned to the Produced Documents section of the Account Details editor. You will see a list of all your Produced Documents records on the right hand side of the screen.
PLEASE NOTE: You MUST click on the Save button to save this information.
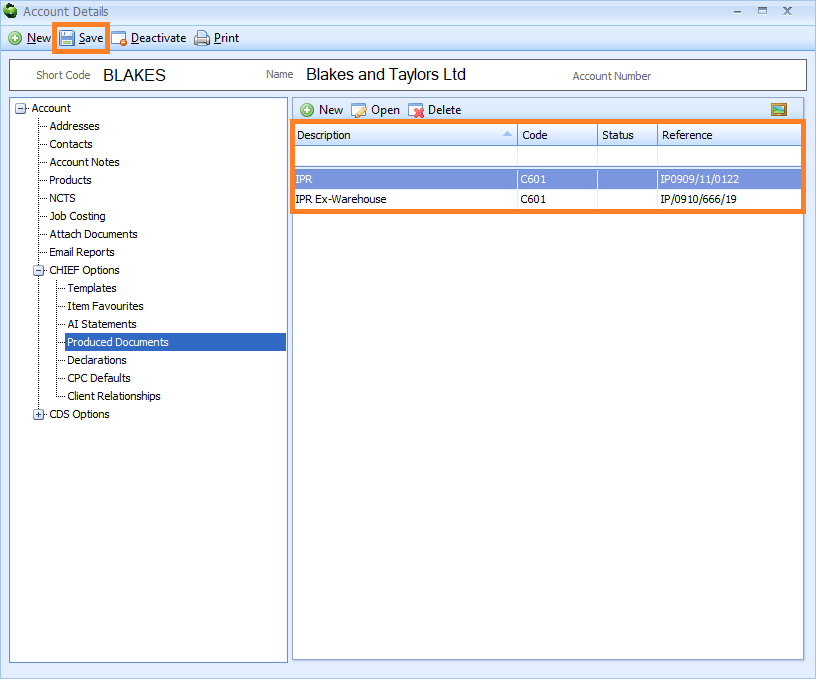
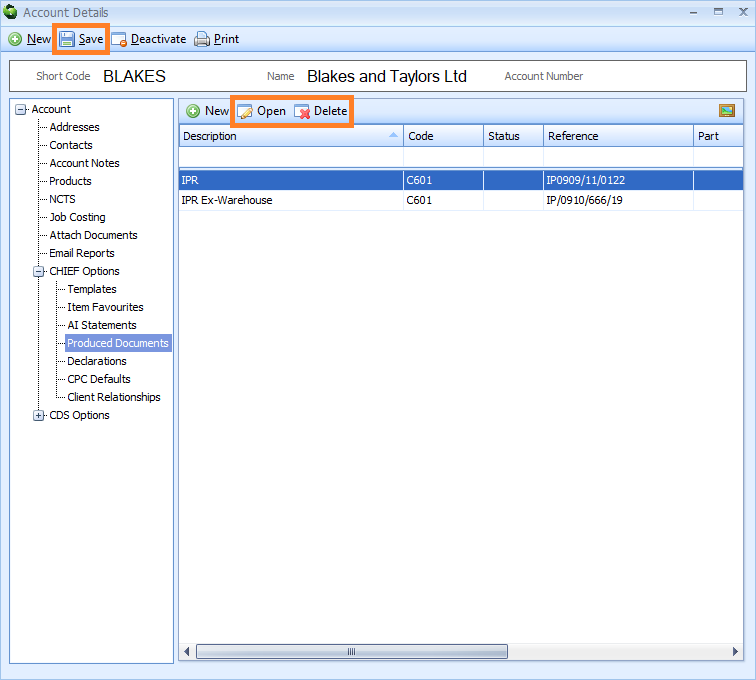
Edit an existing Produced Document record by either double-clicking on it, or by clicking on it once, and then clicking on the Open button on the Produced Documents toolbar. The Produced Document/Certificate editor for that record will appear where you can make your changes.
Delete an existing Produced Document record by clicking on it, and then clicking on the Delete button on the Produced Documents toolbar.
PLEASE NOTE that you MUST click on the Save button on the main toolbar of the Account Details editor to save any changes or deletions.
Declarations (CHIEF)
The Declarations node enables you to store CHIEF declaration information related to this account. There are two tabs in the Declarations node - a Declaration Defaults tab and a CFSP/Warehousing Defaults tab.
When this account is specified as the declarant, importer (for imports) or exporter (for exports) on a declaration, Sequoia will automatically enter what is in the Declaration Defaults tab into that declaration.
The CFSP/Warehousing Defaults tab enables you to store CFSP and customs warehousing information related to this account. If you are using Sequoia's enhanced CFSP module, the CFSP information will be automatically added to final supplementary declarations at the end of the month. When this account is specified as the declarant, importer (for imports) or exporter (for exports) on a customs warehousing declaration, Sequoia will automatically enter the customs warehousing information into that declaration.
To add the Declaration Defaults information, click on the Declarations node. The Declaration Defaults tab will automatically appear to the right of the nodes.
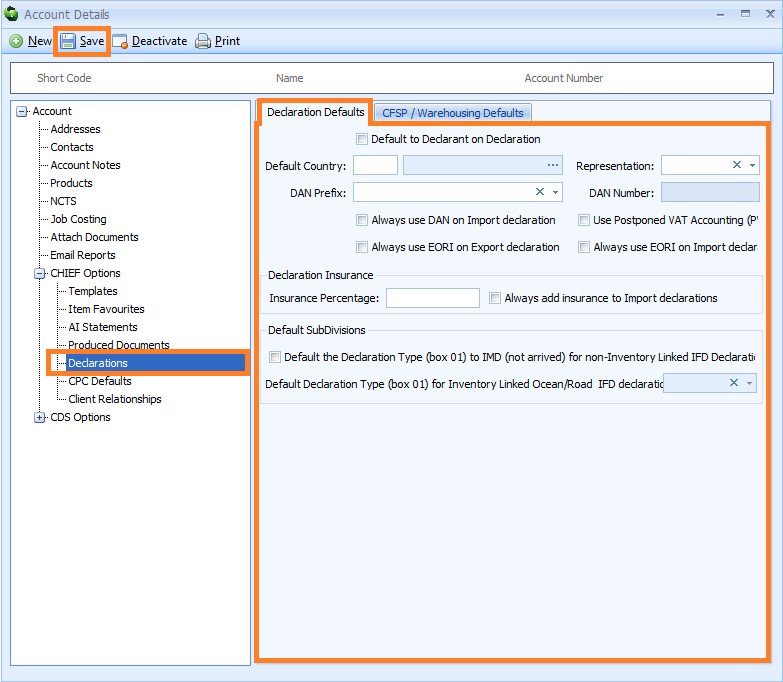
Enter the information described in the table below into the Declaration Defaults tab. PLEASE NOTE that after you have entered this information, you MUST click on the Save button to save it (see image above). If you edit this information later, you MUST also click on the Save button to save any changes.
| Box | Information required |
|---|---|
| Declaration Defaults | |
| Default to Declarant on Declaration | Tick this box and this account will appear automatically as the declarant in box 14 of all new CHIEF declarations. PLEASE NOTE: only one CRM account record can be set as the default declarant |
| Default Country | This box is no longer in use |
| Representation | If this account is the importer (for import declarations) or the exporter (for export declarations), what is entered into this box will be automatically entered into box 14 as the Representative Status on all new declarations. Type the code directly into this box or click on the down arrow to the right of the box and select either D - Direct Representation or I - Indirect Representation from the drop-down list. 'Direct Representation' means that the representative acts in the name and of behalf of the other person. 'Indirect Representation' means that the representative acts in their own name, but on behalf of another person |
| DAN Prefix | Click on the down arrow on the right hand side of the box and select the appropriate Deferment Account Number (DAN) prefix |
| DAN Number | If this account has a Deferment Account Number (DAN) and it is entered into this box, and the Always use deferment on Import Declaration checkbox below is also ticked, then the deferment number will be automatically added into box 48 in all new import declarations |
| Always use DAN on Import declaration | Tick this box to always use the Deferment Account Number (DAN) on import declarations |
| Use Postponed VAT Accounting (PVA) | Tick this box to always use Postponed VAT Accounting (PVA) on declarations |
| Always use EORI on Export declaration | Tick this box to always use this account's EORI number on export declarations |
| Always use EORI on Import declaration | Tick this box to always use this account's EORI number on import declarations |
| Declaration Insurance | Set up declaration insurance defaults for this account in this section of the Declaration Defaults node. When the value of any insurance has to be added to the invoice amount to arrive at the customs value of the goods, Additions and Deductions must be declared in box 45 of the declaration. If that insurance is calculated as a percentage of the value of the goods, then Sequoia can automatically calculate the correct amount and enter it into box 45 in all new declarations |
| Insurance Percentage | Enter the insurance percentage in the box |
| Always add insurance to Import declaration | If this box is ticked and an insurance percentage has been added into the adjacent box, Sequoia will automatically calculate the correct amount and complete box 45 of all new import declarations when the account is the importer and the invoice total in box 22 is entered The addition will have a code of AKSee the list of additions and deductions codes for more details |
| Default Subdivisions | In this section of the Declaration Defaults node, set how Box 1 - Declaration type will be automatically completed on all new declarations when this account is the importer for import declarations |
| Default the Declaration Type (box 01) to IMD (not arrived) for non-Inventory Linked IFD Declarations | When this account is specified as the importer and this box is ticked, IMD will be automatically entered into Box 1 (Declaration Type) of all new non-inventory linked IFD full import declarations |
| Default Declaration Type (box 01) for Inventory Linked Ocean/Road IFD Declarations | When this account is specified as the importer, what is entered into this box will be automatically entered into Box 1 (Declaration type) of all new inventory-linked ocean import declarations and all new road full import declarations (IFD). Type the code directly into this box or click on the down arrow to the right of the box and select it from the drop-down list |
To add the CFSP/Warehousing Defaults information, click on the CFSP/Warehousing Defaults tab on the Declarations node.
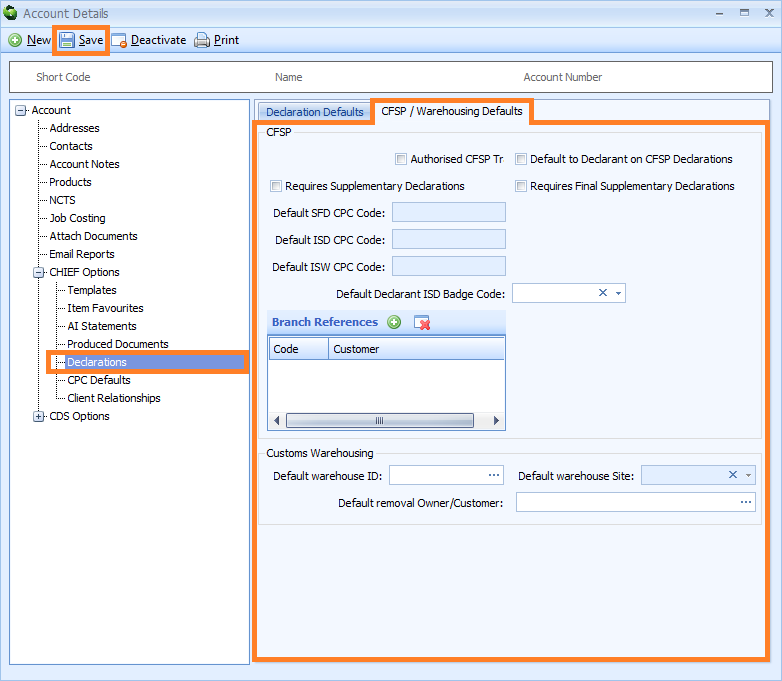
Enter the information described in the table below into the CFSP/Warehousing Defaults tab. PLEASE NOTE that after you have entered this information, you MUST click on the Save button to save it (see image above). If you edit this information later, you MUST also click on the Save button to save any changes.
| Box | Information required |
|---|---|
| CFSP | Set up CFSP (SCDP) defaults for this account in this section |
| Authorised CFSP Trader | Tick this box if this account is authorised for CFSP (SCDP) |
| Default to Declarant on CFSP Declarations | Tick this box to make this account the default declarant on CFSP declarations |
| Requires Supplementary Declarations | Tick this box if this account requires you to complete supplementary declarations on their behalf |
| Requires Final Supplementary Declarations | Tick this box if this account requires you to complete final supplementary declarations on their behalf |
| Default SFD CPC Code | The default SFD CPC Code |
| Default ISD CPC Code | The default ISD CPC Code |
| Default ISW CPC Code | The default ISW CPC Code |
| Default Declarant ISD Badge | The badge code that will be automatically selected for supplementary declarations created for this account. Click on the small down arrow to the right of this box and select the appropriate badge from the drop down list |
| Branch References | If this acccount uses branch references to allow multiple final supplementary declarations, enter those details here by clicking on the + button. Click here for more information |
| Customs Warehousing | Set up Customs Warehousing defaults for this account in this section |
| Default Warehouse ID | Specify the default Warehouse ID (authorisation) under which you warehouse goods for this account Select this information from a list by either typing a ? into this box or by clicking on the ellipsis (the 3 dots) to the right of this box to display the Premises box. Next, enter the premises code or part of it into the search box, click on the binoculars icon to search for it and then select it from the resulting list by double-clicking on it |
| Text | Any text relating to the AI Statement code |
| Default Warehouse Site | If you have more than one site configured for customs warehousing for this authorisation, then you can specify a default one to use when creating declarations for goods being placed into warehousing |
| Default removal Owner/Customer | If goods removed from the warehouse are normally removed to a certain customer and you want them to be automatically entered into declarations as the consignee, enter their Shortcode or Account Name here. You can select this information from a list by either typing a ? into this box or by clicking on the ellipsis (the 3 dots) to the right of this box to display the Default Warehouse Removal Account Lookup Dialog box. Next, enter their information or part of it into the search box, click on the binoculars icon to search for it and then select it from the resulting list by double-clicking on it |
CPC Defaults (CHIEF)
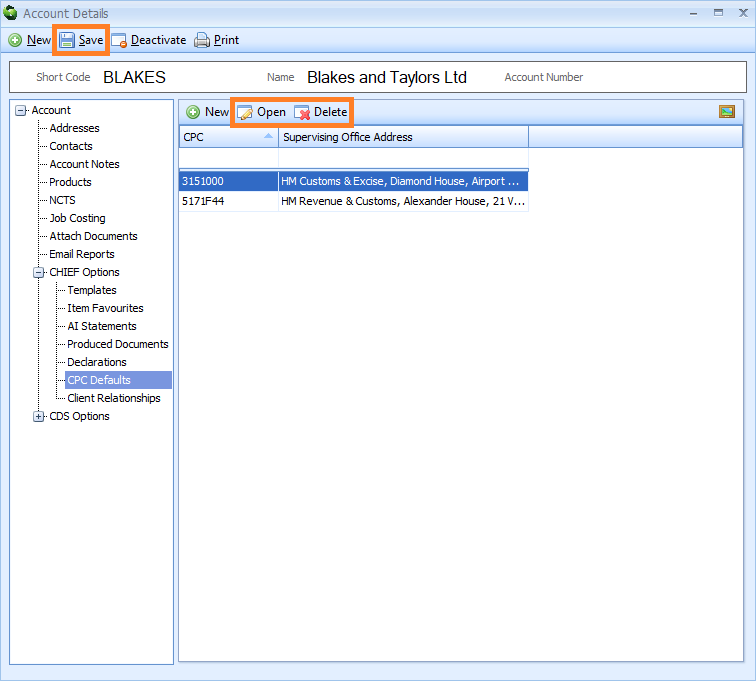
The CPC Defaults node enables you to store HMRC supervising office information used when specifying CPC codes related to this account. When this account is specified as the declarant, importer (for imports) or exporter (for exports) on a declaration, this information will be automatically entered into Box 44 of that declaration.
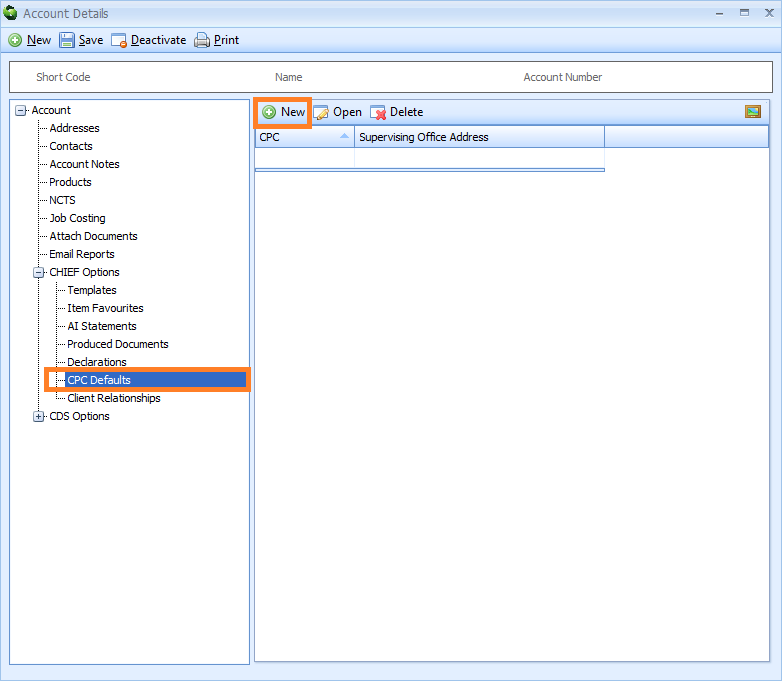
Each CPC code and it's corresponding HMRC supervising office is stored as a CPC Default record. To create a CPC Default record, click on the CPC Defaults node. Next, click on the New button on the CPC Defaults toolbar to the right of the nodes.
A CPC/HMRC Supervising Office Default editor will appear.
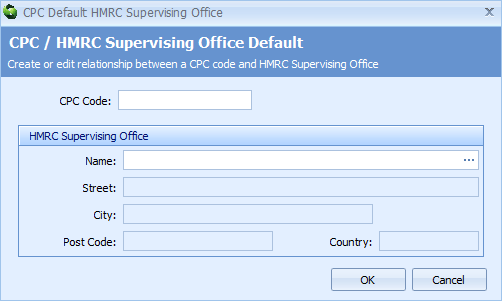
Enter the information described in the table below into the CPC/HMRC Supervising Office Default editor. Click on the OK button to close the editor.
| Box | Information required |
|---|---|
| CPC Code | The CPC code |
| HMRC Supervising Office | |
| Name | The name of the HMRC Supervising Office associated with the above CPC code You can select this information from a list by either typing a ? into this box or by clicking on the ellipsis (the 3 dots) to the right of this box to display the HMRC Supervising Office Lookup Dialog box. Next, enter the supervising office information or part of it into the search box, click on the binoculars icon to search for it and then select it from the resulting list by double-clicking on it |
| Street | The street of the HMRC Supervising Office associated with the above CPC code |
| City | The city of the HMRC Supervising Office associated with the above CPC code |
| Postcode | The postcode of the HMRC Supervising Office associated with the above CPC code |
| Country | The country of the HMRC Supervising Office associated with the above CPC code |
You will be returned to the CPC Defaults section of the Account Details editor. You will see a list of all your stored CPC Default records on the right hand side of the screen.
PLEASE NOTE that you MUST click on the Save button to save this information.
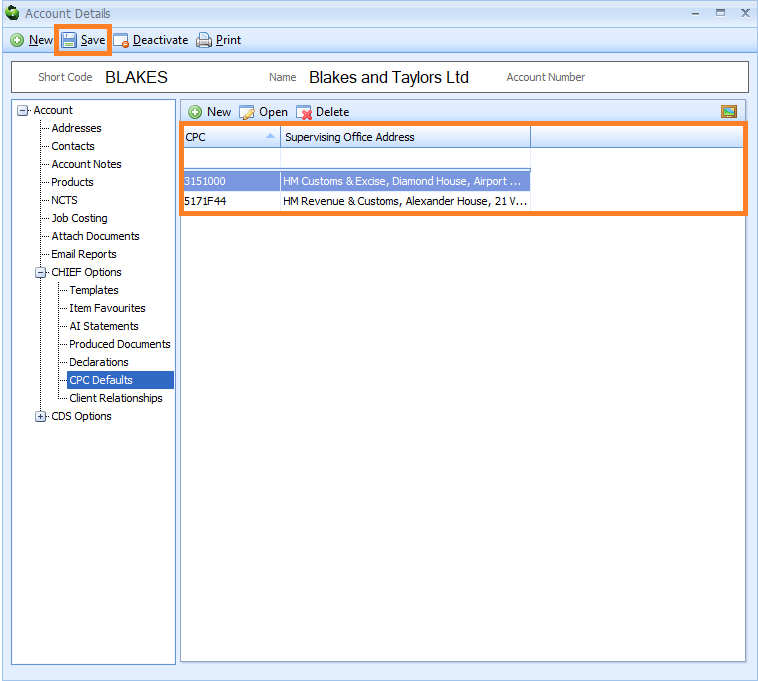
Edit an existing CPC Default record by either double-clicking on it, or by clicking on it once, and then clicking on the Open button on the CPC Defaults toolbar. The CPC/HMRC Supervising Office Default editor for that record will appear where you can make your changes.
Delete an existing CPC Default record by clicking on it, and then clicking on the Delete button on the CPC Defaults toolbar.
PLEASE NOTE that you MUST click on the Save button on the main toolbar of the Account Details editor to save any changes or deletions.
Client Relationships (CHIEF)
The relationship between the customer, consignor and consignee in any Job or declaration you create will be automatically stored in a Client Relationship record, alongside additional information related to that relationship. Going forward, when you enter a customer into a Job or declaration, all Client Relationship records related to that customer will appear in a drop-down list. You can then select one of those Client Relationship records, and all the information stored in it will be automatically entered into that Job or declaration.
You can also create a Client Relationship record, or edit an existing one, in the Client Relationships node.
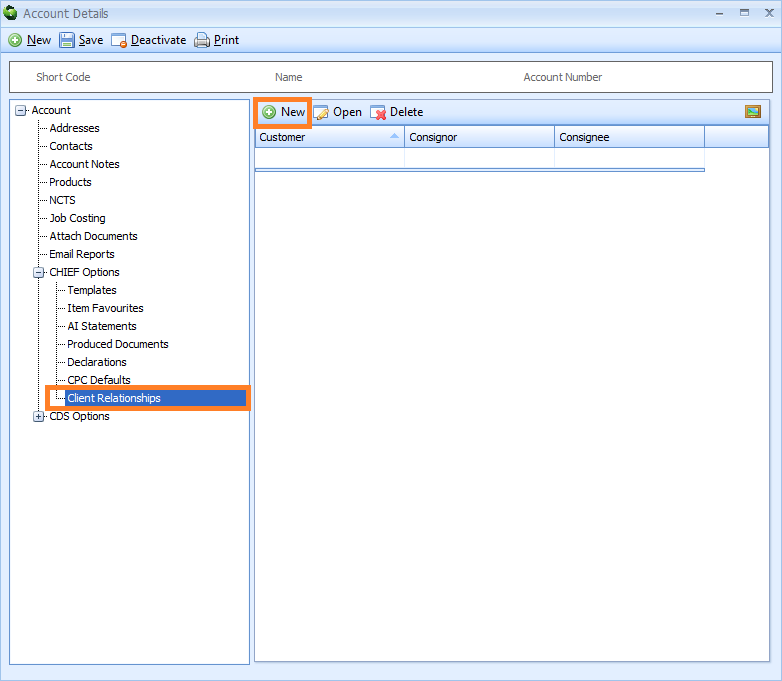
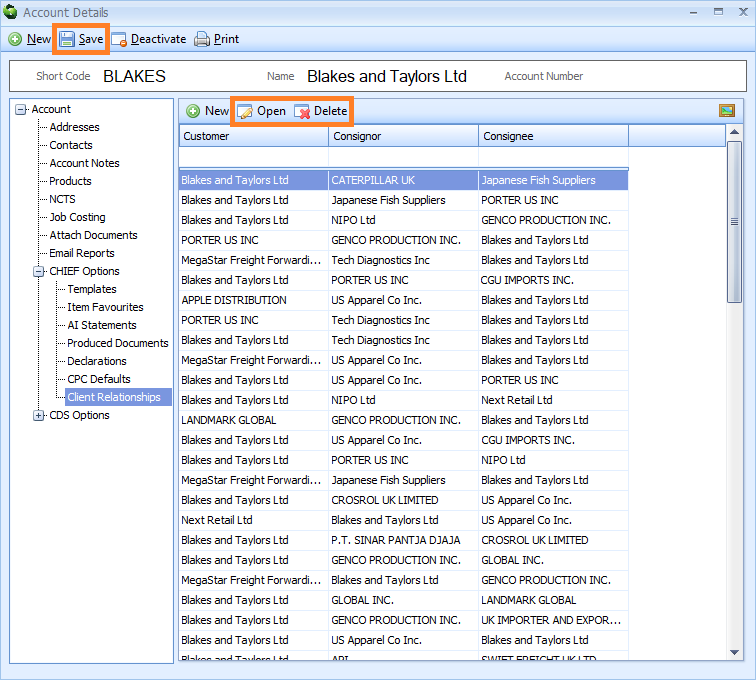
To create a Client Relationship record, click on the Client Relationships node. Next, click on the New button on the Client Relationships toolbar to the right of the nodes.
A Client Relationships editor will appear.
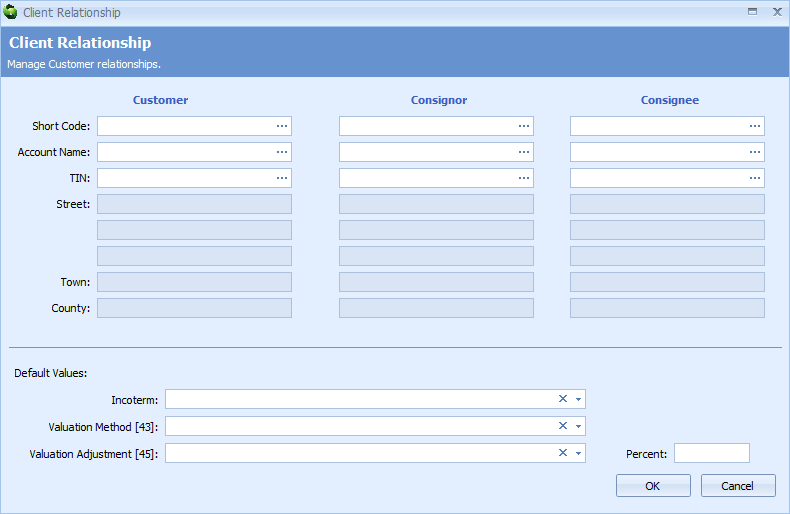
Enter the information described in the table below into the Client Relationships editor. Click on the OK button to close the editor.
| Box | Information required |
|---|---|
| Customer/Consignor/Consignee | The customer/consignor/consignee. PLEASE NOTE that it is mandatory to complete the Customer box, which means that it MUST be completed. Select this information from a list by either typing a ? into this box or by clicking on the ellipsis (the 3 dots) to display the Account Lookup Dialog box. Next, enter the information or part of it into the search box, click on the binoculars icon to search for it and then select it from the resulting list by double-clicking on it. Once you have selected the customer, click on the down arrow to view details, or click on the x to remove them |
| Short Code | The short code of the customer/consignor/consignee Select this information from a list by either typing a ? into this box or by clicking on the ellipsis (the 3 dots) to the right of this box to display the Account Lookup Dialog box. Next, enter the information or part of it into the search box, click on the binoculars icon to search for it and then select it from the resulting list by double-clicking on it |
| Account Name | The account name of the customer/consignor/consignee Select this information from a list by either typing a ? into this box or by clicking on the ellipsis (the 3 dots) to the right of this box to display the Account Lookup Dialog box. Next, enter the information or part of it into the search box, click on the binoculars icon to search for it and then select it from the resulting list by double-clicking on it |
| TIN | The TIN of the customer/consignor/consignee Select this information from a list by either typing a ? into this box or by clicking on the ellipsis (the 3 dots) to the right of this box to display the Account Lookup Dialog box. Next, enter the information or part of it into the search box, click on the binoculars icon to search for it and then select it from the resulting list by double-clicking on it |
| Street | The street of the customer/consignor/consignee |
| Town | The town of the customer/consignor/consignee |
| Country | The country of the customer/consignor/consignee |
| Default Values | |
| Incoterm | The Incoterm applicable to the shipment of goods. Click on the small down arrow to the right of this box to select the INCOTERM from a drop down list |
| Valuation Method [43] | The Valuation Method code as required in box 43 the declaration. This box is no longer in use. |
| Valuation Adjustment [45] | The Valuation Indicators code as required in box 45 of the declaration. This box is no longer in use. |
| Percent | The Valuation Adjustment percentage applied to the code in box 45 of the declaration. This box is no longer in use. |
You will be returned to the Client Relationships section of the Account Details editor. You will see a list of all your stored Client Relationship records on the right hand side of the screen.
PLEASE NOTE that you MUST click on the Save button to save this information.
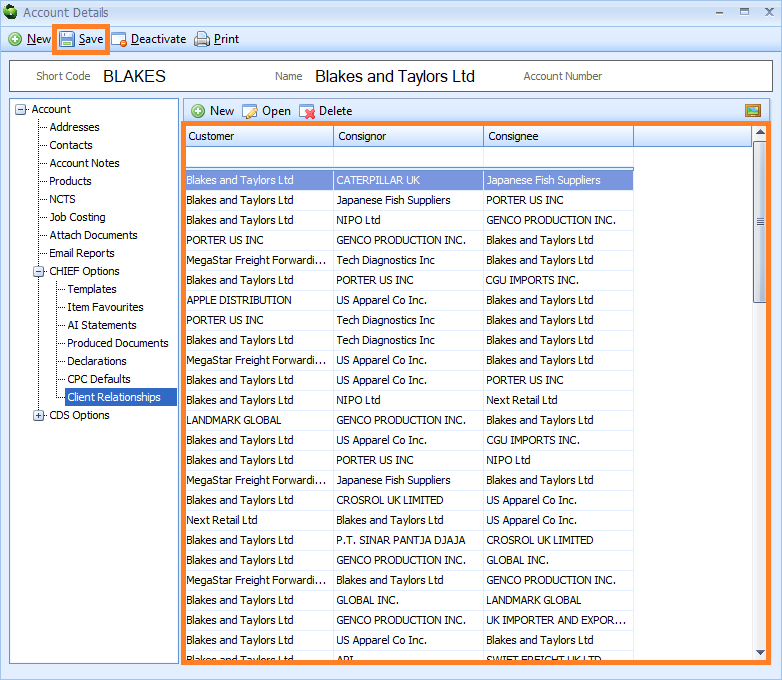
Edit an existing Client Relationship record by either double-clicking on it, or by clicking on it once, and then clicking on the Open button on the Client Relationships toolbar. The Client Relationship editor for that record will appear where you can make your changes.
Delete an existing Client Relationship record by clicking on it, and then clicking on the Delete button on the Client Relationships toolbar.
PLEASE NOTE that you MUST click on the Save button on the main toolbar of the Account Details editor to save any changes or deletions.
CDS Options
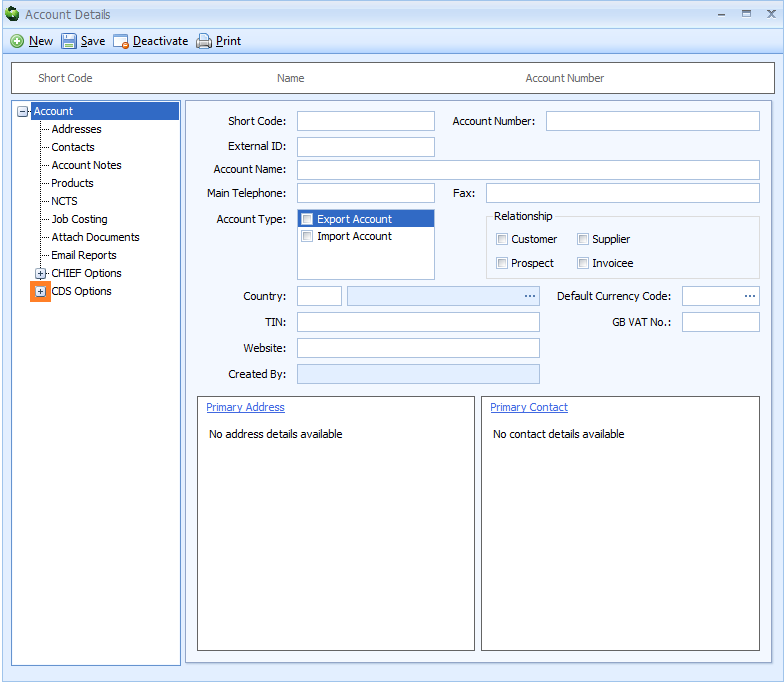
The CDS Options node enables you to store CDS declaration information related to this account. When this account is specified as the declarant, importer (for imports) or exporter (for exports) on a declaration, these options will be automatically entered into that declaration.
Click on the small cross  to the left of CDS Options node to expand it and view all the CDS Options nodes.
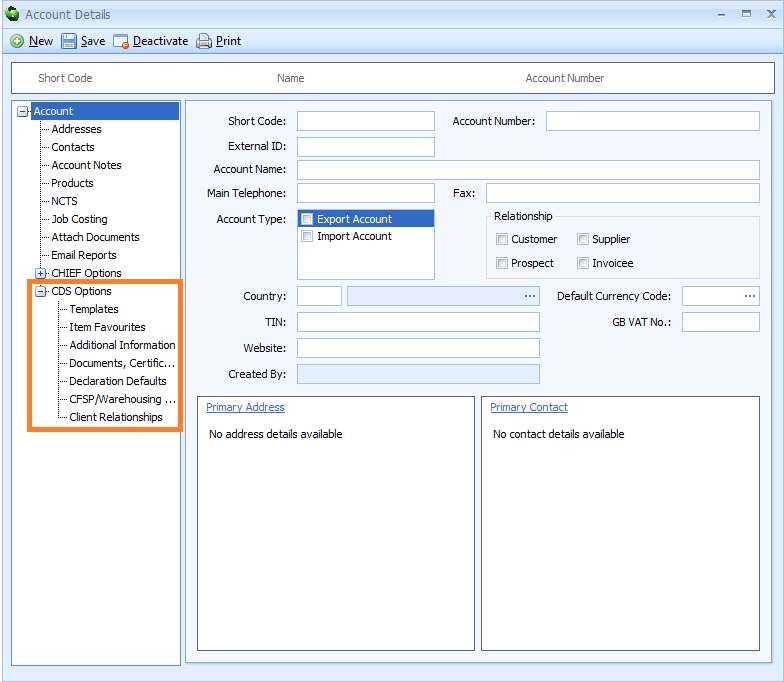
The CDS Options nodes will appear.
See Information from CRM records for information on what data is stored and how it is used.
Templates (CDS)
The Templates node enables you to store declaration templates related to this account.
A template is a document that contains some pre-added data. Any declaration, or part of a declaration, can be saved as a template. This declaration template can then be used as a base when creating future declarations, so that you do not have to create them from scratch.
You could create a template if you use the same customer shipping or goods on your declarations, for example, or if you have created a particularly tricky declaration that took a long time to get right and you want to save it and use it again. Templates greatly reduce repetitive data entry and data entry errors, saving you time and increasing your productivity. For more information about templates, click here.
To add a new template, click on the Templates node. Next, click on the New button on the Templates toolbar to the right of the nodes.
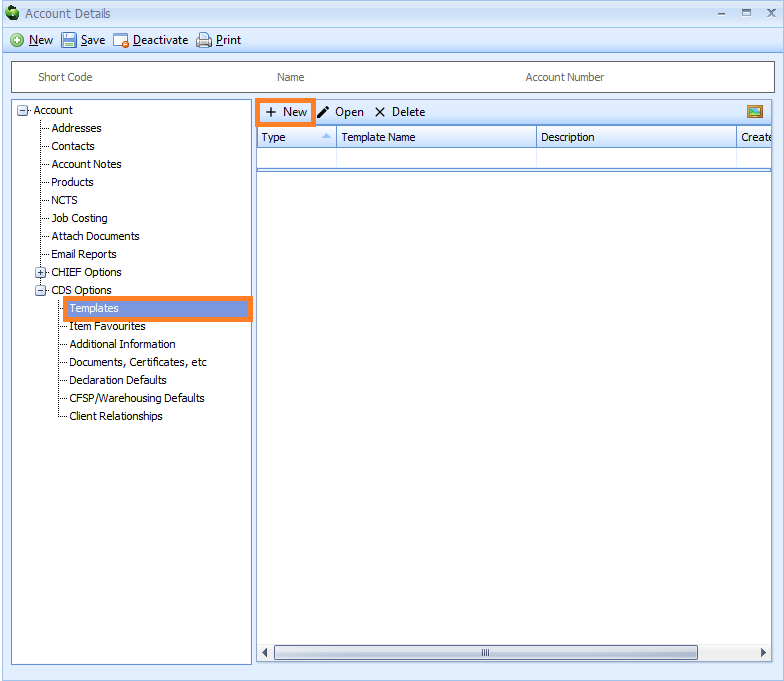
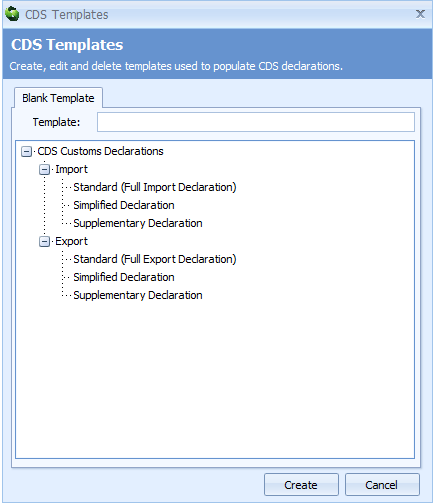
A CDS Templates dialog box will appear. Double-click on the type of declaration template that you wish to create, or click on it once and then click on the Create button.
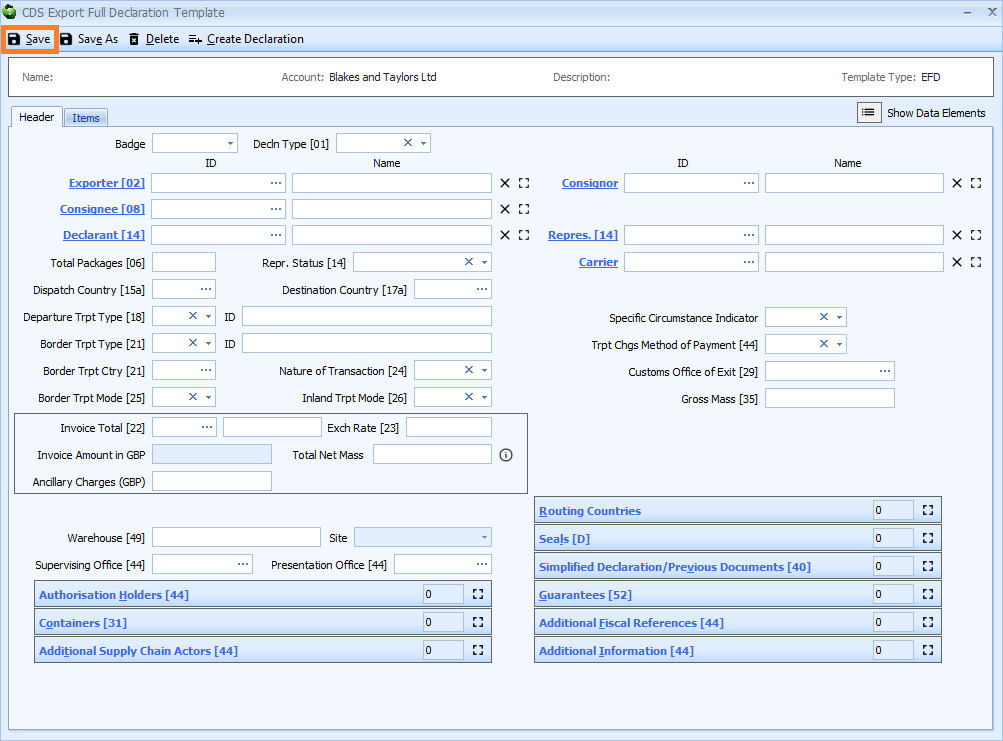
A declaration template editor will appear where you can add as much declaration information as you want. Then, click on the Save button to save the template and close the editor. The example below shows a CDS Export Full Declaration Template editor.
For full instructions on how to complete an export declaration click here. For full instructions on how to complete an import declaration click here.
A Save Template editor will appear.
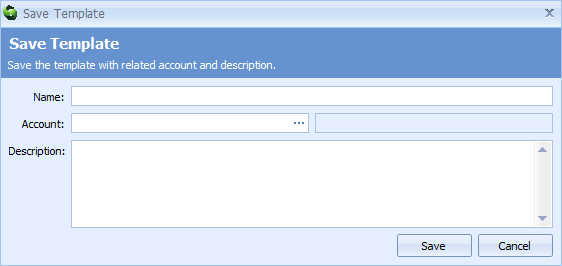
Enter the information described in the table below into the Save Template editor. Click on the Save button to close the editor.
| Box | Information required |
|---|---|
| Name | Create and enter a name for the declaration template |
| Account | The account that this declaration is linked to Select this information from a list by either typing a ? into this box or by clicking on the ellipsis (the 3 dots) to the right of this box to display the Account Lookup Dialog box. Next, enter the name or short code of the account, or part of the account name or short code into the search box, click on the binoculars icon to search for it and then select it from the resulting list by double-clicking on it |
| Description | A description of the decaration template |
You will be returned to the Templates section of the Account Details editor. You will see a list of all your stored declaration templates on the right hand side of the screen.
PLEASE NOTE that you MUST click on the Save button to save this information.
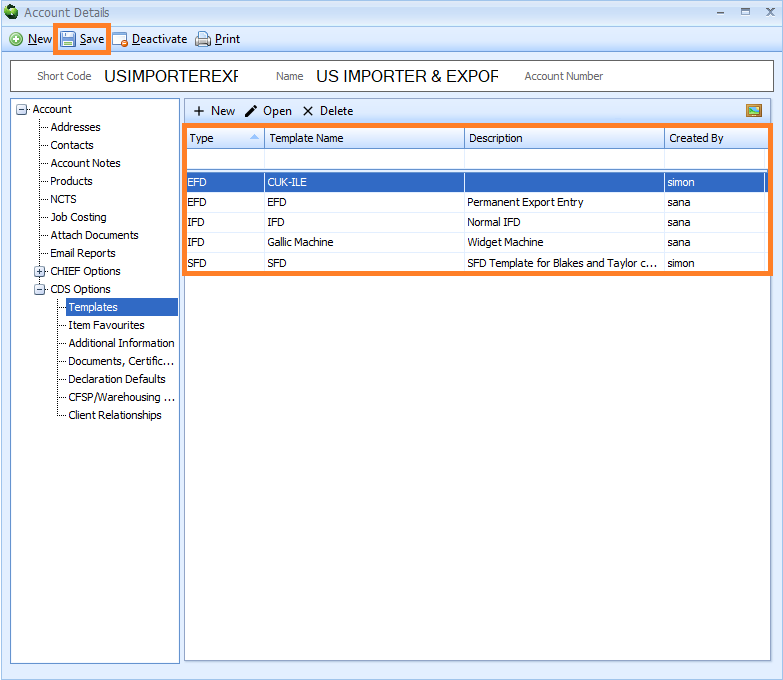
Edit an existing template by either double-clicking on it, or by clicking on it once, and then clicking on the Open button on the Templates toolbar. The declaration template editor will appear where you can make your changes. You must click on the Save button on the declaration template editor to save these changes.
Delete an existing template by clicking on it, and then clicking on the Delete button on the Templates toolbar.
PLEASE NOTE that you MUST click on the Save button on the main toolbar of the Account Details editor to save any changes or deletions.
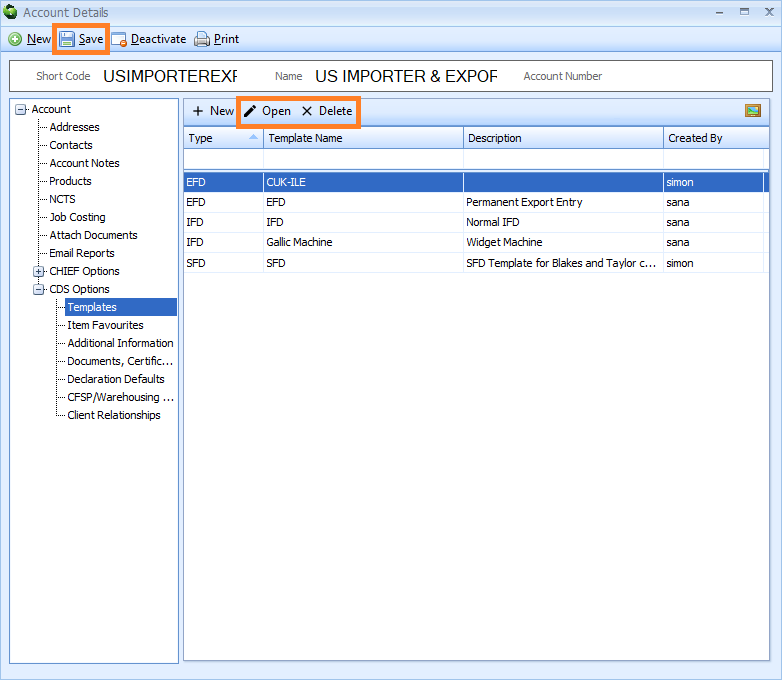
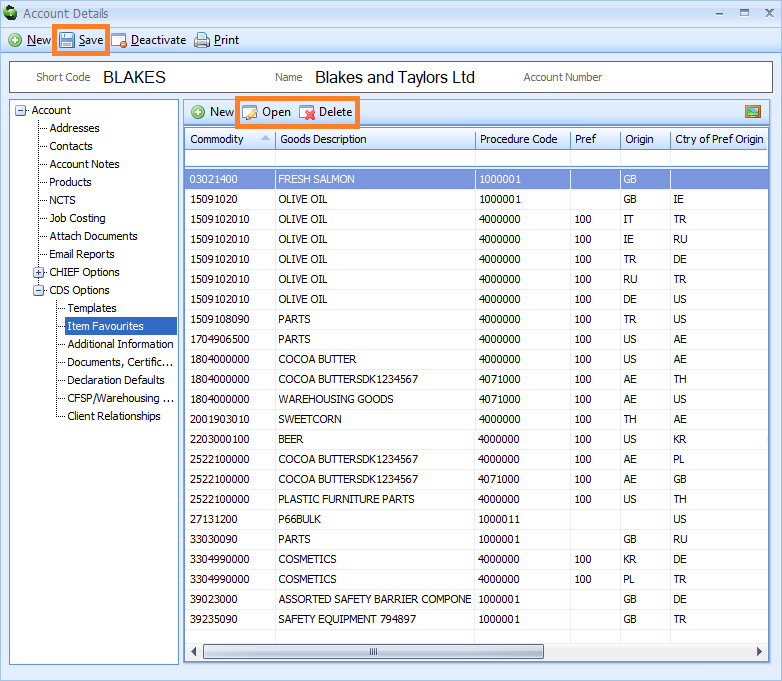
Item Favourites (CDS)
The Item Favourites node enables you to store commonly used declaration items information related to this account in Item Favourite records. This information includes commodity codes, goods descriptions, procedure codes, preference codes and origin and destination details. When completing declarations, you can select these items from an 'item favourites' list to enter them automatically, saving you the time and effort of entering them manually.
On acceptance of a declaration, Sequoia can be set to automatically capture any 'item favourites' on that declaration into an Item Favourite record (click here to learn how). You can access these Item Favourite records here to edit or delete them. You can also create an Item Favourite record here too.
To create an Item Favourite record, click on the Item Favourites node. Next, click on the New button on the Item Favourites toolbar to the right of the nodes.
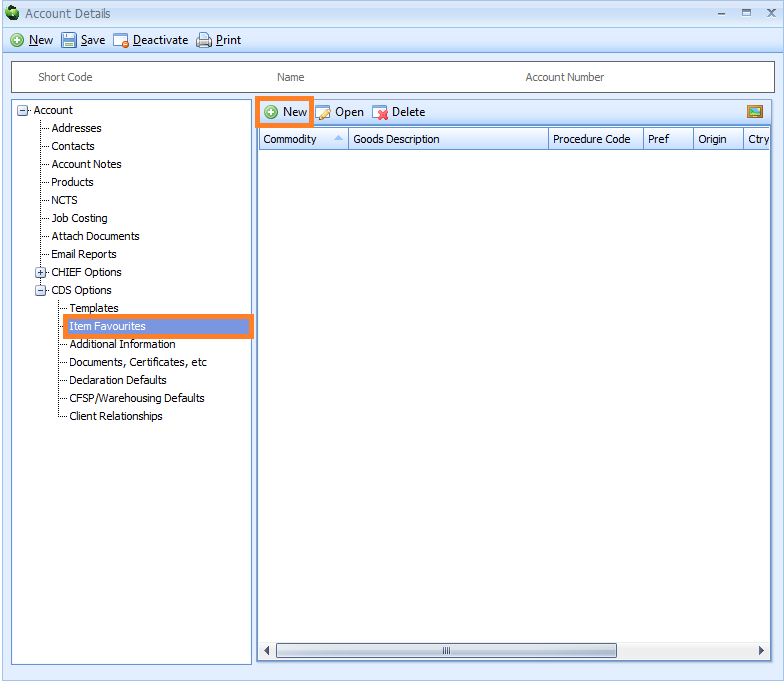
An Item Favourites editor will appear.
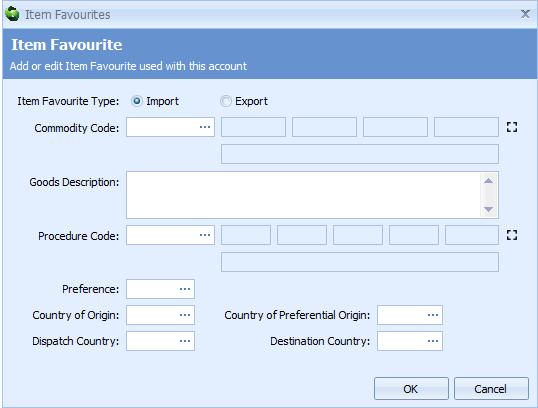
Enter the information described in the table below into the Items Favourite editor. Click on the OK button to close the editor.
| Box | Information required |
|---|---|
| Item Favourite Type | Select whether this is an Import or Export item |
| Commodity Code | The item commodity code Select this information from a list by either typing a ? into this box or by clicking on the ellipsis (the 3 dots) to the right of this box to display the Customs Tariff box. Next, enter the code or part of the code into the search box, click on the Go To to search for it and then select it from the resulting list by double-clicking on it, or clicking on it once and clicking on the OK button. Only 4 Commodity Code Additional boxes are visible to right of the Commodity Code box, as space for 4 additional commodity codes should be enough in most circumstances. They will be disabled until you have completed the main Commodity Code box, after which the first additional Commodity Code Additional box will be enabled. When this first one is completed, the second one will be enabled, and so on. In the unlikely event that you need to enter more than 4 additional commodity codes, you can click on the expand icon (  ) to the right of the boxes to display a Commodity Additional Codes [33] pop up, into which you can add more by clicking on the + icon, and then typing them into the grid. Once completed, close the pop up by clicking on the close expand button ( ) to the right of the boxes to display a Commodity Additional Codes [33] pop up, into which you can add more by clicking on the + icon, and then typing them into the grid. Once completed, close the pop up by clicking on the close expand button (  ) ) |
| Goods Description | The item goods description |
| Procedure Code | The item procedure code Select this information from a list by either typing a ? into this box or by clicking on the ellipsis (the 3 dots) to the right of this box to display the Procedure Code Lookup Dialog box. Next, enter the code or part of the code into the search box, click on the binoculars icon to search for it and then select it from the resulting list by double-clicking on it. Only 5 Additional Procedure boxes are visible to right of the Procedure Code box, as space for 5 additional procedure codes should be enough in most circumstances. They will be disabled until you have completed the main Procedure Code box, after which the first additional Additional Procedure box will be enabled. When this first one is completed, the second one will be enabled, and so on. In the unlikely event that you need to enter more than 5 additional procedure codes, you can click on the expand icon (  ) to the right of the boxes to display an Additional Procedure [37] pop up, into which you can add more by clicking on the + icon, and then typing them into the grid. Once completed, close the pop up by clicking on the close expand button ( ) to the right of the boxes to display an Additional Procedure [37] pop up, into which you can add more by clicking on the + icon, and then typing them into the grid. Once completed, close the pop up by clicking on the close expand button (  ) ) |
| Preference | The item preference code Select this information from a list by either typing a ? into this box or by clicking on the ellipsis (the 3 dots) to the right of this box to display the Preference Code Lookup Dialog box. Next, enter the code or part of the code into the search box, click on the binoculars icon to search for it and then select it from the resulting list by double-clicking on it |
| Country of Origin | The item country of origin Select this information from a list by either typing a ? into this box or by clicking on the ellipsis (the 3 dots) to the right of this box to display the Country Lookup Dialog box. Next, enter the code or part of the code into the search box, click on the binoculars icon to search for it and then select it from the resulting list by double-clicking on it |
| Country of Preferential Origin | If you are using an item preference code, indicating that you are claiming preferential treatment based on the origin of the goods, then you must declare the country of preferential origin or preferential country groups in this box Select this information from a list by either typing a ? into this box or by clicking on the ellipsis (the 3 dots) to the right of this box to display the Country Lookup Dialog box. Next, enter the code or part of the code into the search box, click on the binoculars icon to search for it and then select it from the resulting list by double-clicking on it |
| Dispatch Country | The country from which the item has been dispatched Select this information from a list by either typing a ? into this box or by clicking on the ellipsis (the 3 dots) to the right of this box to display the Country Lookup Dialog box. Next, enter the code or part of the code into the search box, click on the binoculars icon to search for it and then select it from the resulting list by double-clicking on it |
| Destination Country | The country to which the item is being sent Select this information from a list by either typing a ? into this box or by clicking on the ellipsis (the 3 dots) to the right of this box to display the Country Lookup Dialog box. Next, enter the code or part of the code into the search box, click on the binoculars icon to search for it and then select it from the resulting list by double-clicking on it |
You will be returned to the Item Favourites section of the Account Details editor. You will see a list of all your stored Item Favourites records on the right hand side of the screen.
PLEASE NOTE that you MUST click on the Save button to save this information.
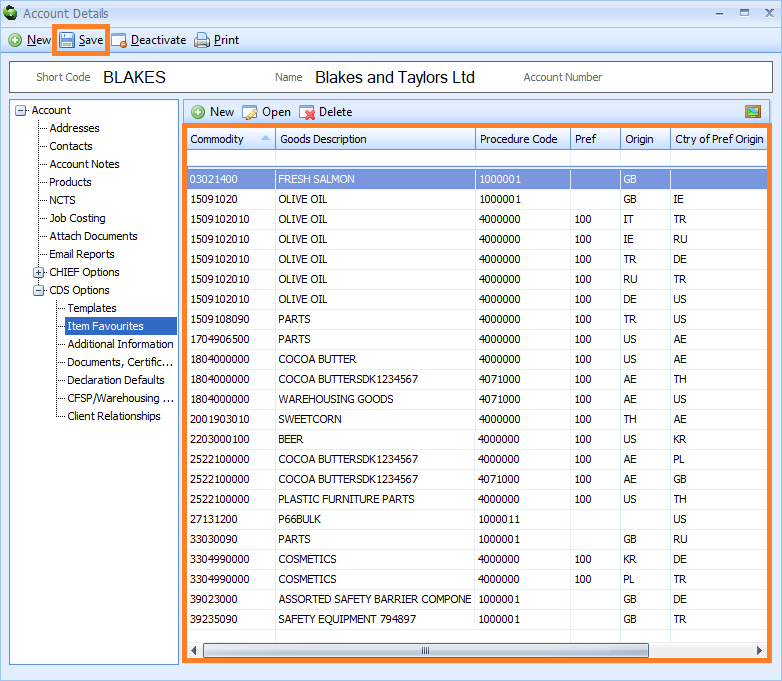
Edit an existing Item Favourite record by either double-clicking on it, or by clicking on it once, and then clicking on the Open button on the Item Favourites toolbar. The Item Favourites editor for that record will appear where you can make your changes.
Delete an existing Item Favourite record by clicking on it, and then clicking on the Delete button on the Item Favourites toolbar.
PLEASE NOTE that you MUST click on the Save button on the main toolbar of the Account Details editor to save any changes or deletions.
Additional Information (CDS)
The Additional Information node enables you to store AI Statement information related to this account. When this account is then specified as the declarant, importer (for imports) or exporter (for exports) on a declaration, Sequoia will enter this information into Box 44 [Additional Information] of that declaration.
Each AI Statement is stored as an Additional Information record. To create an Additional Information record, click on the Additional Information node. Next, click on the New button on the AI Statements toolbar to the right of the nodes.
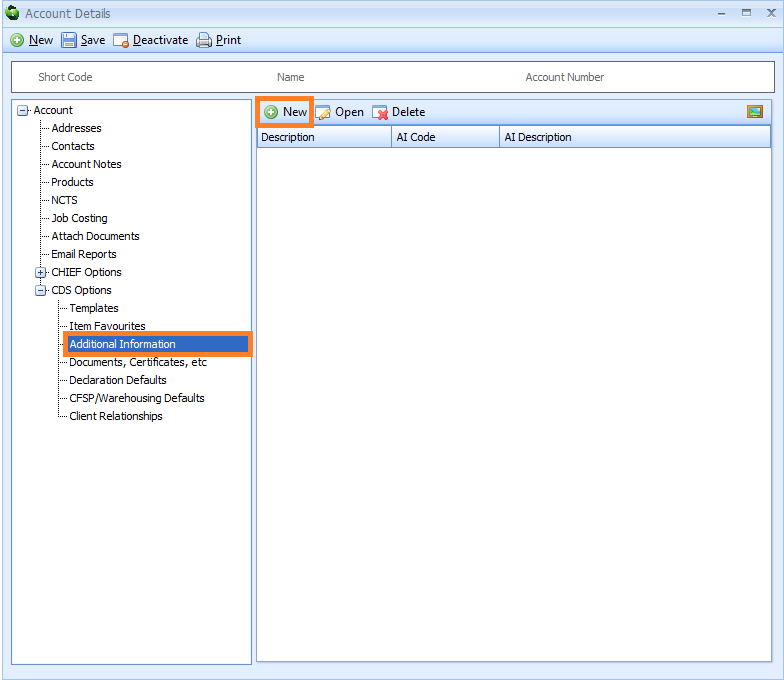
An Additional Information editor will appear.
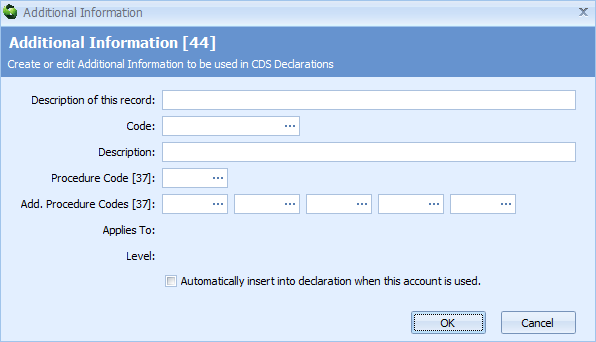
Enter the information described in the table below into the Additional Information editor. Click on the OK button to close the editor.
| Box | Information required |
|---|---|
| Description of this record | Create a description of this record so that you can identify it in a list |
| Code | The AI Statement code Select this information from a list by either typing a ? into this box or by clicking on the ellipsis (the 3 dots) to the right of this box to display the AI Statment Code Dialog box. Next, enter the code or part of the code into the search box, click on the binoculars icon to search for it and then select it from the resulting list by double-clicking on it |
| Description | A description of the AI Statement code. This can be something you create or it can be taken from HMRC's description associated with that code found here |
| Procedure Code [37] | The CPC (Customs Procedure Code) related to this AI Statement code. This is optional |
| Add. Procedure Codes [37] | Any additional procedure codes |
| Applies to | Sequoia will automatically display if this code applies to exports or imports or both |
| Level | Sequoia will automatically display if this code can be used at header or item level or both on the declaration |
| Automatically insert into declaration when this account is used | Tick this box to allow Sequoia to enter this Additional Information record information into Box 44 [Additional Information] of a declaration when this account is specified as the declarant, importer (for imports) or exporter (for exports) on that declaration. If you tick this box and do not enter a CPC (Customs Procedure Code) into the Procedure Code [37] box above, then the information in this Additional Information record will be automatically added into a declaration when it is created. However, if you tick this box and enter a CPC code into the Procedure Code [37] box above, then the information in this Additional Information record will only be automatically added into a declaration when you enter that same CPC code into an item of that declaration |
You will be returned to the Additional Information section of the Account Details editor. You will see a list of all your stored Additional Information records on the right hand side of the screen.
PLEASE NOTE that you MUST click on the Save button to save this information.
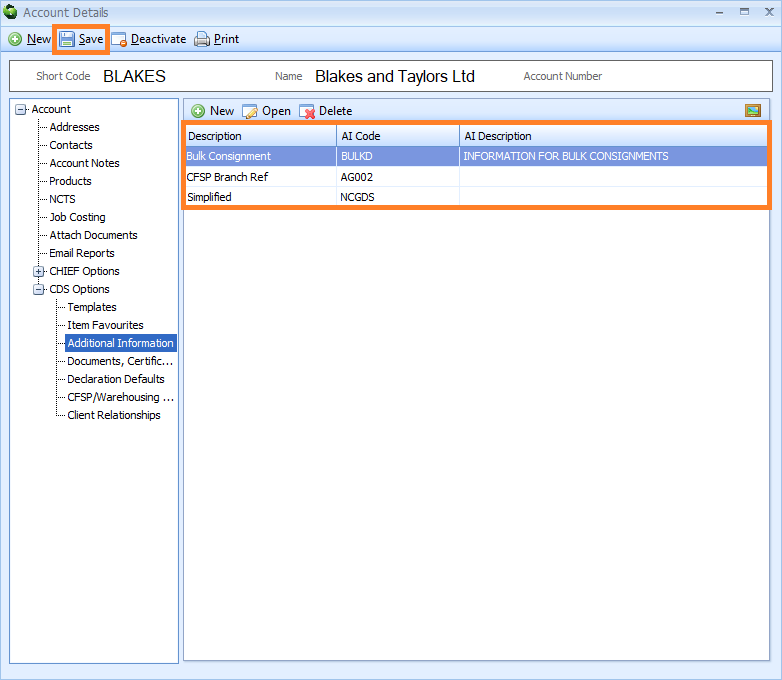
Edit an existing Additional Information record by either double-clicking on it, or by clicking on it once, and then clicking on the Open button on the Additional Information toolbar. The Additional Information editor for that record will appear where you can make your changes.
Delete an existing Additional Information record by clicking on it, and then clicking on the Delete button on the Additional Information toolbar.
PLEASE NOTE that you MUST click on the Save button on the main toolbar of the Account Details editor to save any changes or deletions.
Documents, Certificates, etc (CDS)
The Documents, Certificates, etc node enables you to store copies of CDS declaration documents related to this account. When this account is then specified as the declarant, importer (for imports) or exporter (for exports) on a declaration, Sequoia will enter this information into Box 44 [Documents, Certificates, Authorisations and Additional References] of that declaration.
Each document is stored as a Documents, Certificates, etc record. To create a Documents, Certificates, etc record, click on the Documents, Certificates, etc node. Next, click on the New button on the Documents, Certificates, etc toolbar to the right of the nodes.
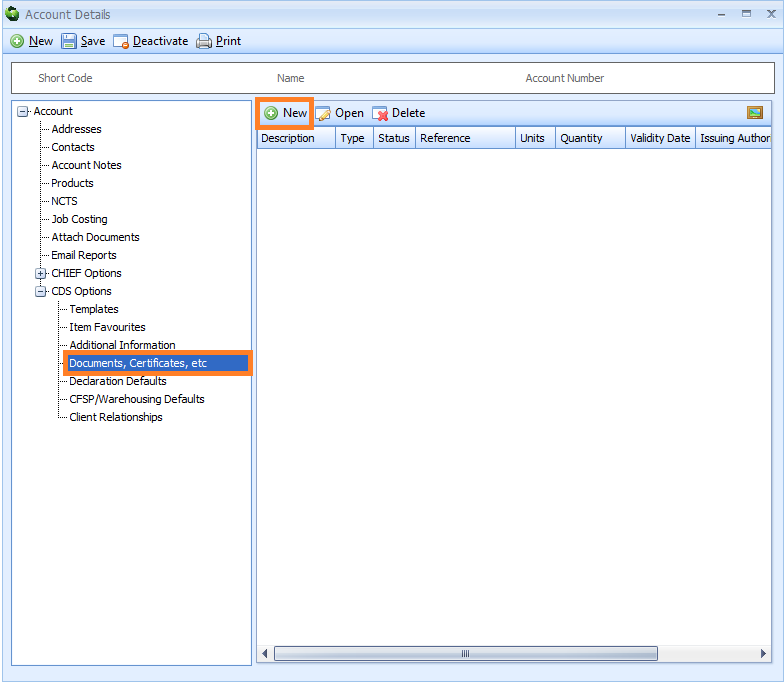
A Documents, Certificates, Authorisations and Additional References editor will appear.
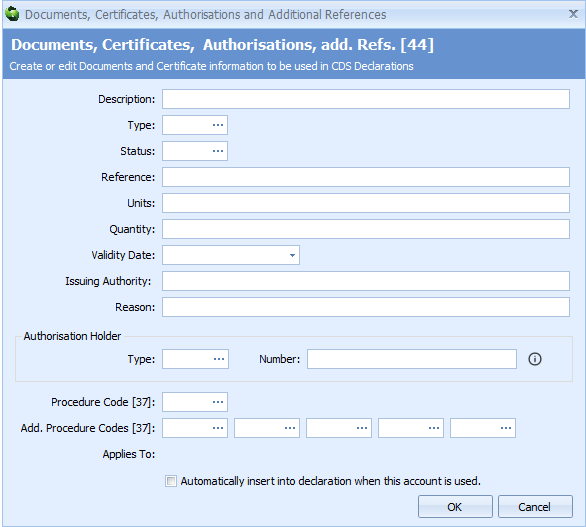
Enter the information described in the table below into the Documents, Certificates, Authorisations and Additional References editor. Click on the OK button to close the editor.
| Box | Information required |
|---|---|
| Description | Enter a meaningful description for this document. This will not used in the declaration but is useful to identify this document in a list |
| Type | Select the type of document code from a list by either typing a ? into this box or by clicking on the ellipsis (the 3 dots) to the right of this box to display the Document Type Lookup Dialog box. Next, enter the document code or part of the document code into the search box, click on the binoculars icon to search for it and then select it from the resulting list by double-clicking on it |
| Status | Enter the document status. Not all document type codes require you to declare the status. You should refer to the list of document and other reference codes for information on the requirements. Select the document status from a list by either typing a ? into this box or by clicking on the ellipsis (the 3 dots) to the right of this box to display the Document Status Lookup Dialog box. Next, enter the code or part of the code into the search box, click on the binoculars icon to search for it and then select it from the resulting list by double-clicking on it box 44 |
| Reference | Enter the document reference. You should refer to appendix 5a and 5b - the list of document and other reference codes for information on which reference, if any, is required for a specific document type box 44 |
| Units | Units are only required if you are also declaring the quantity (see below). This is only required where a specific quantity and measurement type has to be decremented against a specific document (e.g. a licence has been issued for a total quantity of liquids in litres). Where this is the case, enter the appropriate code for the commodity's/document's measurement unit type using the list provided in appendix 20 - List of measurement unit codes |
| Quantity | Enter the quantity being attributed to the specific document. The quantity can be up to 16 digits of which up to 6 digits may be after the decimal point i.e. if you have 4 decimal places, you can only have up to 12 digits before the decimal point. If you have no decimal places, you can have up to 16 digits before the decimal point. If you are declaring the quantity then you will also need to declare the units (see above) box 44 |
| Validity Date | Enter the date of validity, if required. You can type the date directly into the box in the format 'dd/mm/yyy' (e.g. 02/02/2024), or click the For Licences and non-preference certificates: - The date to be declared is the expiry date for the licence or certificate. Where the Document Code for the licence or certificate is listed in Appendix 5C - Document and other reference codes: Licence types, a date of validity must always be declared. For Preferential proofs of origin (e.g. EUR1, GSP, Invoice Declarations, Statements of Origin): - The date to be declared is the date of issue. This is conditional on the specific document codes completion notes - box 44 |
| Issuing Authority | Where required by the guidance notes for the document type, enter a free text description of the Issuing Authority. This should be specific enough to identify the governing body responsible for issuing the licence or certificate. box 44 |
| Reason | Where specified in the guidance notes for the document type, enter a free text description of the reason box 44 |
| Authorisation Holder | If the document requires declaration of the Authorisation Holder in box 44, add the appropriate Authorisation Type. For example, an IP document would generally require the IPO Authorisation type to be declared. |
| Type | A 3 or 4 character code is required for each Authorisation Holder declared. A list of authorisation type codes can also be found in appendix 6 - Authorisation Type codes. Select the type of document code from a list by either typing a ? into this box or by clicking on the ellipsis (the 3 dots) to the right of this box to display the Authorisation Holder Type Lookup Dialog box. Next, enter the document code or part of the document code into the search box, click on the binoculars icon to search for it and then select it from the resulting list by double-clicking on it |
| Number | If the authorisation holder's EORI number for this document differs from this CRM account, please specify the holder's EORI number |
| Procedure Code [37] | If the document applies only to a specific procedure code, enter the code here. Select the type of document code from a list by either typing a ? into this box or by clicking on the ellipsis (the 3 dots) to the right of this box to display the Procedure Code Lookup Dialog box. Next, enter the document code or part of the document code into the search box, click on the binoculars icon to search for it and then select it from the resulting list by double-clicking on it CPC |
| Add. Procedure Codes [37] | Enter any additional procedure codes. See box 37 - Additional Procedure Code for more details |
| Applies to | Sequoia will automatically display if this code applies to exports or imports or both |
| Automatically insert into declaration when this account is used | Tick this box to allow Sequoia to enter this Documents, Certificates, etc record information into Box 44 [Documents, Certificates, Authorisations and Additional References] of a declaration when this account is specified as the declarant, importer (for imports) or exporter (for exports) on that declaration. If you tick this box and do not enter a CPC (Customs Procedure Code) into the Procedure Code [37] box above, then the information in this Documents, Certificates, etc record will be automatically added into a declaration when it is created. However, if you tick this box and enter a CPC code into the Procedure Code [37] box above, then the information in this Documents, Certificates, etc record will only be automatically added into a declaration when you enter that same CPC code into an item of that declaration |
You will be returned to the Documents, Certificates, etc section of the Account Details editor. You will see a list of all your stored Documents, Certificates, etc records on the right hand side of the screen.
PLEASE NOTE that you MUST click on the Save button to save this information.
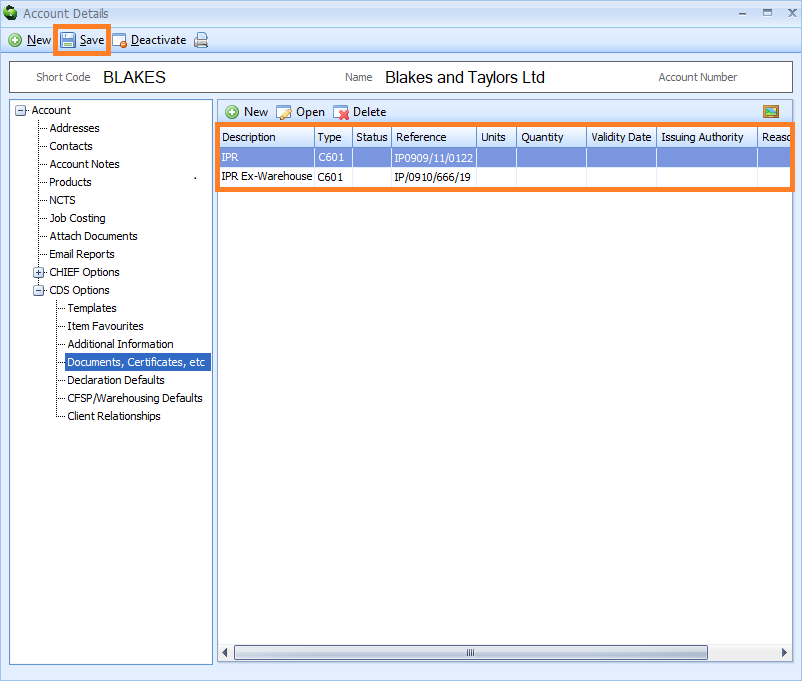
Edit an existing Documents, Certificates, etc record by either double-clicking on it, or by clicking on it once, and then clicking on the Open button on the Documents, Certificates, etc toolbar. The Documents, Certificates, Authorisations and Additional References editor for that record will appear where you can make your changes.
Delete an existing Documents, Certificates, etc record by clicking on it, and then clicking on the Delete button on the Documents, Certificates, etc toolbar.
PLEASE NOTE that you MUST click on the Save button on the main toolbar of the Account Details editor to save any changes or deletions.
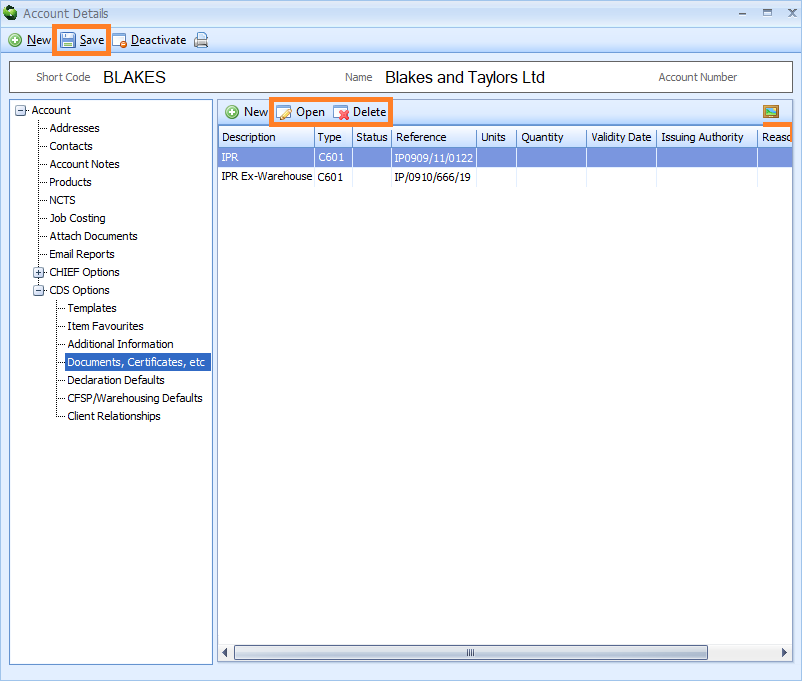
Declaration Defaults (CDS)
The Declaration Defaults node enables you to store CDS default declaration information related to this account. When this account is then specified as the declarant, importer (for imports) or exporter (for exports) on a declaration, this information will be automatically entered into any new declarations created through that Job.
To add this information, click on the Declaration Defaults node. The Declaration Defaults editor will appear to the right of the nodes.
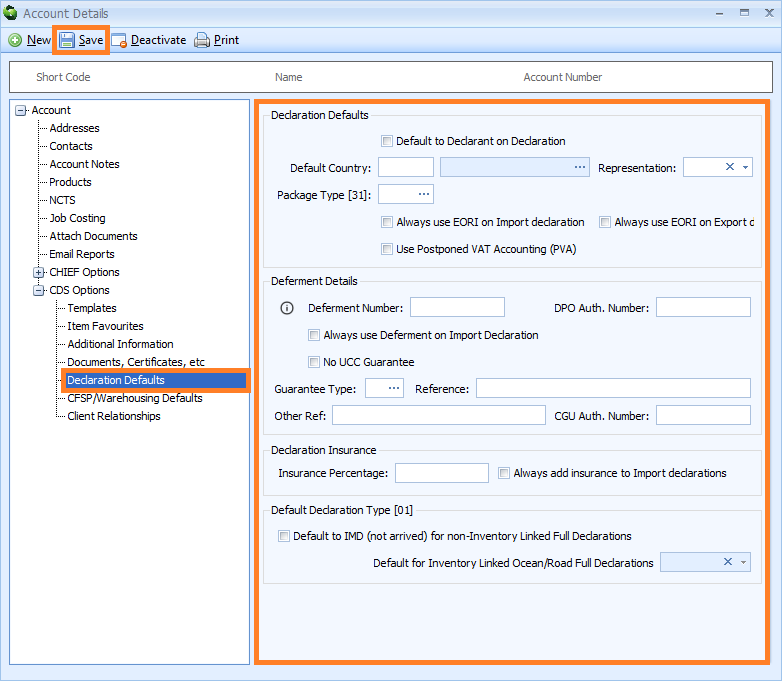
Enter the information described in the table below into the Declaration Defaults editor. PLEASE NOTE that after you have entered this information, you MUST click on the Save button to save it (see image above). If you edit this information later, you MUST also click on the Save button to save any changes.
| Box | Information required |
|---|---|
| Declaration Defaults | Set up declaration defaults for this account in this section of the Declaration Defaults node |
| Default to Declarant on Declaration | Tick this box and this account will appear automatically as the declarant in box 14 of all new declarations. PLEASE NOTE: only one CRM account record can be set as the default declarant |
| Default Country | This box is no longer in use |
| Representation | What is entered into this box will be automatically entered into box 14 as the Representative Status on all new declarations, if this account is specified as the importer on an import declaration or the exporter on an export declaration. Type the code directly into this box or click on the down-arrow to the right of the box and select either 2 - Direct Representation or 3 - Indirect Representation from the drop-down list. 'Direct Representation' means that the representative acts in the name and of behalf of the other person. 'Indirect Representation' means that the representative acts in their own name, but on behalf of another person |
| Package Type [31] | Every declaration requires packages to be declared in box 31 at item level. Enter the Package Type information into this box and a packages declaration will be automatically entered into all new declarations at item level, including this package type information. Select the package type information from a list by either typing a ? into this box or by clicking on the ellipsis (the 3 dots) to the right of this box to display the Package Type Lookup Dialog box. Next, enter the package type code or part of the code into the search box, click on the binoculars icon to search for it and then select it from the resulting list by double-clicking on it |
| Always use EORI on Import declaration | Tick this box to always use an EORI number on import declarations. If this account is the importer for an import declaration, then their EORI number will be used as part of the DUCR. Otherwise the declarant's EORI number will be used |
| Always use EORI on Export declaration | Tick this box to always use an EORI number on export declarations. If this account is the exporter for an export declaration, then their EORI number will be used as part of the DUCR. Otherwise the declarant's EORI number will be used |
| Use Postponed VAT Accounting (PVA) | Tick this box to always use Postponed VAT Accounting (PVA) on declarations. When this account is declared as the importer on a import declaration and this box is ticked, an Additional Fiscal Reference will be added to that declaration as follows: Role: FR1, Identifier: The VAT number of the importer, prefixed with 'GB' |
| Deferment Details | Set up deferment defaults for this account in this section of the Declaration Defaults node |
| Deferment Number | If this account has a deferment number and it is entered into this box, and the Always use deferment on Import Declaration checkbox below is also ticked, the deferment number will be automatically added into box 48 in all new import declarations |
| DPO Auth. Number | If a deferment number is declared (in box 48) to pay customs duty, an Authorisation Holder in box 44 must also be declared at header level to confirm the party authorised for that deferment account. An 'Authorisation Holder' will be automatically added to the declaration when a deferment number is entered which includes a code - DPO - and the EORI number of the holder of the authorisation. That EORI number will normally default to the TIN stored in the CRM accountrecord.However, if the EORI number is not the same as the TIN for the CRM record, then the correct EORI number can be entered into this box to appear as the Authorisation Holder |
| Always Use Deferment on Import Declaration | If this box is ticked and a deferment number is entered above, it will be automatically entered into box 48 - first deferment of all new import declarations |
| No UCC Guarantee | If the account does not have a UCC guarantee then tick this box |
| Guarantee Type | If a deferment number is declared in box 48 to pay customs duty, or if declarations are made to special procedures (such as customs warehousing or inward processing), the Guarantee in box 52, under which that authorisation is granted, must also be declared. If the guarantee is authorised under the UCC, enter the code for the type of guarantee. Type the code directly into this box or click on the down-arrow to the right of the box and select it from the drop-down list |
| Reference | If the guarantee is authorised under the UCC, enter the guarantee reference number into this box. The type and reference will then be automatically entered into box 52 of all new declarations when the deferment number is used |
| Other Ref | Enter the guarantee other reference number |
| CGU Auth. Number | If a guarantee is declared (in box 52), an Authorisation Holder in box 44 must also be declared at header level to confirm the party authorised for the guarantee. An 'Authorisation Holder' will be automatically added to the declaration when a guarantee is included. That 'Authorisation Holder' includes a code - CGU - and the EORI number of the holder of the authorisation.That EORI number will normally default to the TIN stored in the CRM account record. However, if the EORI number is not the same as the TIN for the CRM account record, enter the correct EORI number to appear as the Authorisation Holder in this box |
| Declaration Insurance | Set up declaration insurance defaults for this account in this section of the Declaration Defaults node. When the value of any insurance has to be added to the invoice amount to arrive at the customs value of the goods, Additions and Deductions must be declared in box 45 of the declaration. If that insurance is calculated as a percentage of the value of the goods, then Sequoia can automatically calculate the correct amount and enter it into box 45 in all new declarations |
| Insurance Percentage | Enter the insurance percentage |
| Always add insurance to Import decalarations | If this box is ticked and an insurance percentage has been added into the adjacent box, Sequoia will automatically calculate the correct amount and complete box 45 of all new import declarations when the account is the importer and the invoice total in box 22 is entered. The addition will have a code of AK.See the list of additions and deductions codes for more details |
| Default Declaration Type [01] | In this section of the Declaration Defaults node, set how Box 1 - Declaration type will be automatically completed on all new declarations when this account is the importer for import declarations |
| Default to IMD (not arrived) for non-Inventory Linked Full Declarations | When this account is specified as the importer and this box is ticked, IMD will be automatically entered into Box 1 - Declaration type of all new non-inventory linked IFD full import declarations |
| Default for Inventory Linked Ocean/Road Full Declarations | When this account is specified as the importer, what is entered into this box will be automatically entered into Box 1 - Declaration type of all new inventory-linked ocean import declarations and all new road full import declarations (IFD). Type the code directly into this box or click on the down-arrow to the right of the box and select it from the drop-down list |
CFSP/Warehousing Defaults (CDS)
The CFSP/Warehousing Defaults node enables you to store CFSP and customs warehousing information related to this account. If you are using Sequoia's enhanced CFSP module, the CFSP information will be automatically added to final supplementary declarations at the end of the month. When this account is specified as the declarant, importer (for imports) or exporter (for exports) on a customs warehousing declaration, Sequoia will automatically enter the customs warehousing information into that declaration.
To add this information, click on the CFSP/Warehousing Defaults node. The CFSP/Warehousing Defaults editor will appear to the right of the nodes.
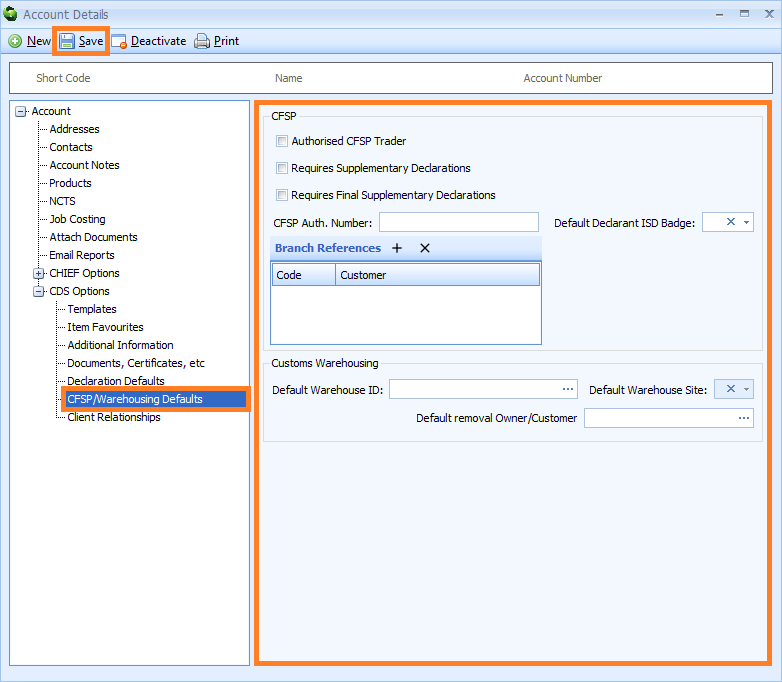
Enter the information into the CFSP/Warehousing Defaults editor. PLEASE NOTE that after you have entered this information, you MUST click on the Save button to save it (see image above). If you edit this information later, you MUST also click on the Save button to save any changes.
| Box | Information required |
|---|---|
| CFSP | Set up CFSP defaults for this account in this section of the CFSP/Warehousing Defaults node |
| Authorised CFSP Trader | Tick this box if this account is authorised for CFSP (SCDP) |
| Requires Supplementary Declarations | Tick this box if this account requires you to complete supplementary declarations on their behalf |
| Requires Final Supplementary Declarations | Tick this box if this account requires you to complete final supplementary declarations on their behalf |
| CFSP Auth. Number | The CFSP authorisation number. This will be automatically added to appropriate declarations |
| Default Declarant ISD Badge | The badge code that will be automatically selected for supplementary declarations created for this account. Click on the small down arrow to the right of this box to select the badge from a drop down list |
| Branch References | If this acccount uses branch references to allow multiple final supplementary declarations, enter those details here by clicking on the + button. Click here for more information |
| Customs Warehousing | Set up Customs Warehousing defaults for this account in this section of the CFSP/Warehousing Defaults node |
| Default Warehouse ID | Specify the Warehouse ID (authorisation) under which you warehouse goods for this trader. You can select this information from a list by either typing a ? into this box or by clicking on the ellipsis (the 3 dots) to the right of this box to display the Warehouse Premises Lookup Dialog box. Next, enter the Warehouse ID or part of it into the search box, click on the binoculars icon to search for it and then select it from the resulting list by double-clicking on it |
| Default Warehouse Site | If you have more than one site configured for customs warehousing for this authorisation, then you can specify a default one to use when creating declarations for goods being placed into warehousing |
| Default removal Owner/Customer | If goods removed from the warehouse are normally removed to a certain customer and you want them to be automatically entered into declarations as the importer, enter their Shortcode or Account Name here. You can select this information from a list by either typing a ? into this box or by clicking on the ellipsis (the 3 dots) to the right of this box to display the Default Warehouse Removal Account Lookup Dialog box. Next, enter their information or part of it into the search box, click on the binoculars icon to search for it and then select it from the resulting list by double-clicking on it |
Client Relationships (CDS)
The relationship between the customer, consignor and consignee in any Job or declaration you create will be automatically stored in a Client Relationship record, alongside additional information related to that relationship. Going forward, when you enter a customer into a Job or declaration, all Client Relationship records related to that customer will appear in a drop-down list. You can then select one of those Client Relationship records, and all the information stored in it will be automatically entered into that Job or declaration.
You can also create a Client Relationship record, or edit an existing one, in the Client Relationships node.
To create a Client Relationship record, click on the Client Relationships node. Next, click on the New button on the Client Relationships toolbar to the right of the nodes.
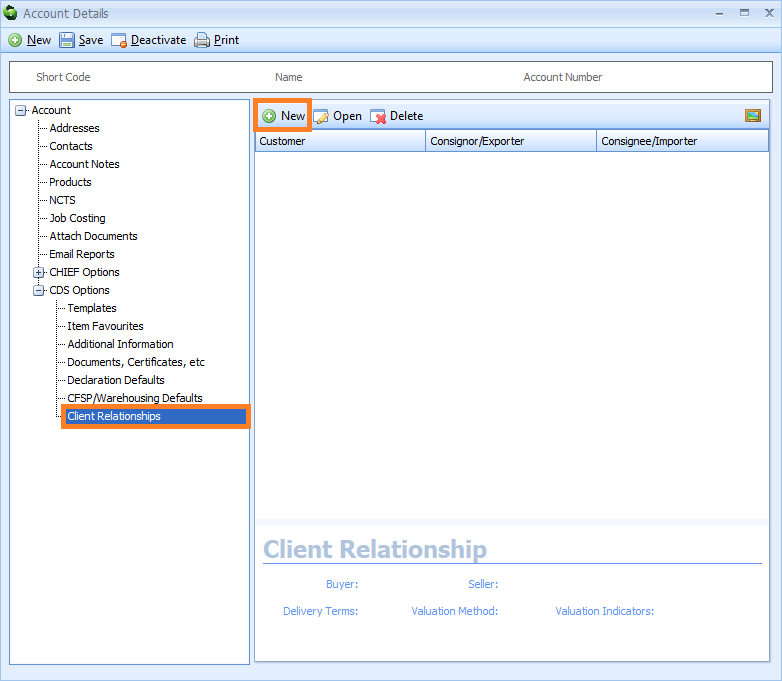
A Client Relationship editor will appear.
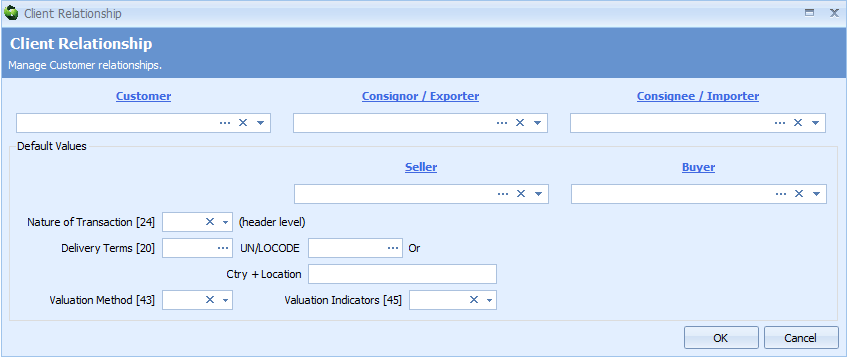
Enter the information described in the table below into the Client Relationship editor. Click on the OK button to close the editor.
| Box | Information required |
|---|---|
| Customer | The customer. PLEASE NOTE that it is mandatory to complete this box, which means that it MUST be completed. Select this information from a list by either typing a ? into this box or by clicking on the ellipsis (the 3 dots) to display the Account Lookup Dialog box. Next, enter the information or part of it into the search box, click on the binoculars icon to search for it and then select it from the resulting list by double-clicking on it. Once you have selected the customer, click on the down arrow to view details, or click on the x to remove them |
| Consignor/Exporter | The consignor/exporter Select this information from a list by either typing a ? into this box or by clicking on the ellipsis (the 3 dots) to display the Account Lookup Dialog box. Next, enter the information or part of it into the search box, click on the binoculars icon to search for it and then select it from the resulting list by double-clicking on it. Once you have selected the consignor/exporter, click on the down arrow to view details, or click on the x to remove them |
| Consignee/Importer | The consignee/importer Select this information from a list by either typing a ? into this box or by clicking on the ellipsis (the 3 dots) to display the Account Lookup Dialog box. Next, enter the information or part of it into the search box, click on the binoculars icon to search for it and then select it from the resulting list by double-clicking on it. Once you have selected the consignee/importer, click on the down arrow to view details, or click on the x to remove them |
| Default Values | |
| Seller | The seller. This will be automatically entered into Box 02 - DE 3/24 and 3/25 of the declaration. For more information click here. Select this information from a list by either typing a ? into this box or by clicking on the ellipsis (the 3 dots) to display the Account Lookup Dialog box. Next, enter the information or part of it into the search box, click on the binoculars icon to search for it and then select it from the resulting list by double-clicking on it. Once you have selected the seller, click on the down arrow to view details, or click on the x to remove them |
| Buyer | The buyer. This will be automatically entered into Box 08 - DE 3/26 and 3/27 of the declaration. For more information click here. Select this information from a list by either typing a ? into this box or by clicking on the ellipsis (the 3 dots) to display the Account Lookup Dialog box. Next, enter the information or part of it into the search box, click on the binoculars icon to search for it and then select it from the resulting list by double-clicking on it. Once you have selected the buyer, click on the down arrow to view details, or click on the x to remove them |
| Nature of Transaction [24] (header level) | The code for the Nature of Transaction. This will be automatically entered into in Box 24 - DE 8/5 of the declaration. For more information click here. Click on the down arrow in the box and select the appropriate information from the drop down list. Once selected, click on the x to remove it |
| Delivery Terms [20] | The Delivery Terms. This will be automatically entered into Box 20 - DE 4/1 of the declaration. The delivery terms consist of two components: 1) The INCOTERM code 2) The location. For more information click here. Select this information from a list by either typing a ? into this box or by clicking on the ellipsis (the 3 dots) to display the Delivery Terms Lookup Dialog box. Next, enter the information or part of it into the search box, click on the binoculars icon to search for it and then select it from the resulting list by double-clicking on it |
| UNLOCODE or Ctry + Location | Enter the UN/LOCODE to which the INCOTERM in the Delivery Terms [20] box above applies. If no UN/LOCODE exists for the location, enter a plain language description for the location in the Ctry & Location box. This should be entered as the country code followed by the place name - e.g. GBCanewdon. Select this information from a list by either typing a ? into this box or by clicking on the ellipsis (the 3 dots) to display the Delivery Terms UNLocode Lookup Dialog box. Next, enter the information or part of it into the search box, click on the binoculars icon to search for it and then select it from the resulting list by double-clicking on it |
| Valuation Method [43] | The Valuation Method code. This will be automatically entered into Box 43 - DE 4/16 of the declaration. For more information click here. Click on the down arrow in the box and select the appropriate information from the resulting drop-down list. Once selected, click on the x to remove it |
| Valuation Indicators [45] | The Valuation Indicators code. This will be automatically entered into Box 45 - DE 4/13 of the declaration. For more information click here. Click on the down arrow in the box and select the appropriate information from the resulting drop-down list. Once selected, click on the x to remove it |
You will be returned to the Client Relationship section of the Account Details editor. You will see a list of all your stored Client Relationship records on the right hand side of the screen.
PLEASE NOTE that you MUST click on the Save button to save this information.
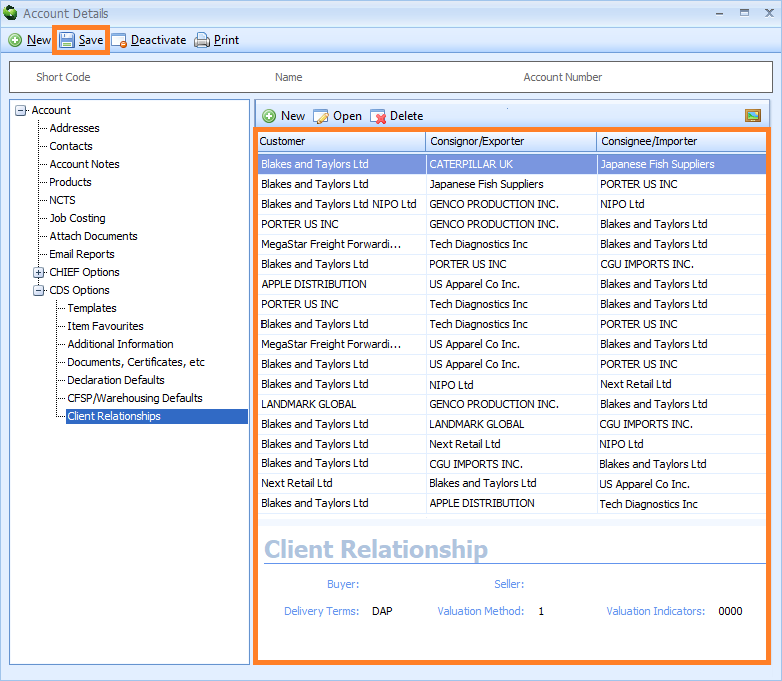
Edit an existing Client Relationship record by either double-clicking on it, or by clicking on it once, and then clicking on the Open button on the Client Relationships toolbar. The Client Relationship editor for that record will appear where you can make your changes.
Delete an existing Client Relationship record by clicking on it, and then clicking on the Delete button on the Client Relationships toolbar.
PLEASE NOTE that you MUST click on the Save button on the main toolbar of the Account Details editor to save any changes or deletions.
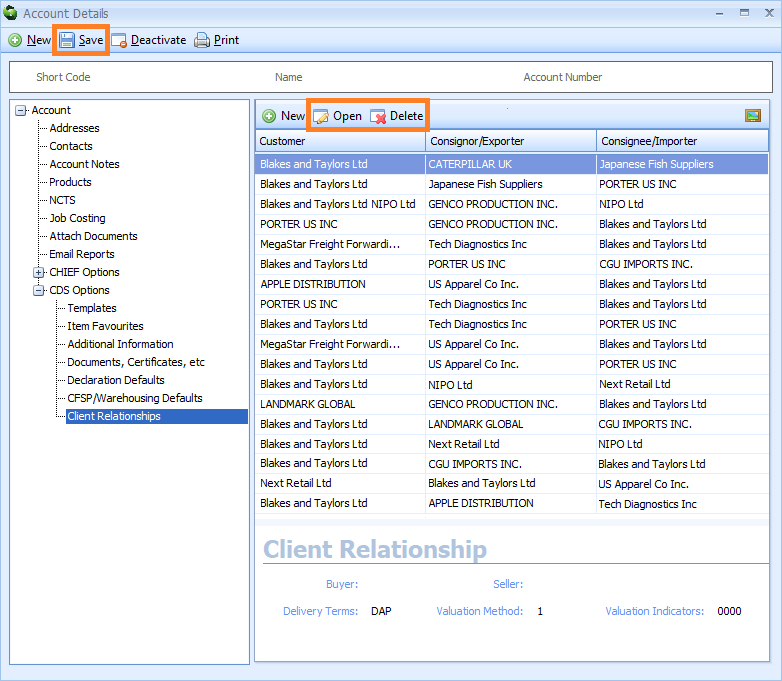
Edit an Account
To edit an account, click on the CRM module at the bottom left hand side of the screen.

A list of your CRM accounts will appear on the right hand side of the screen.
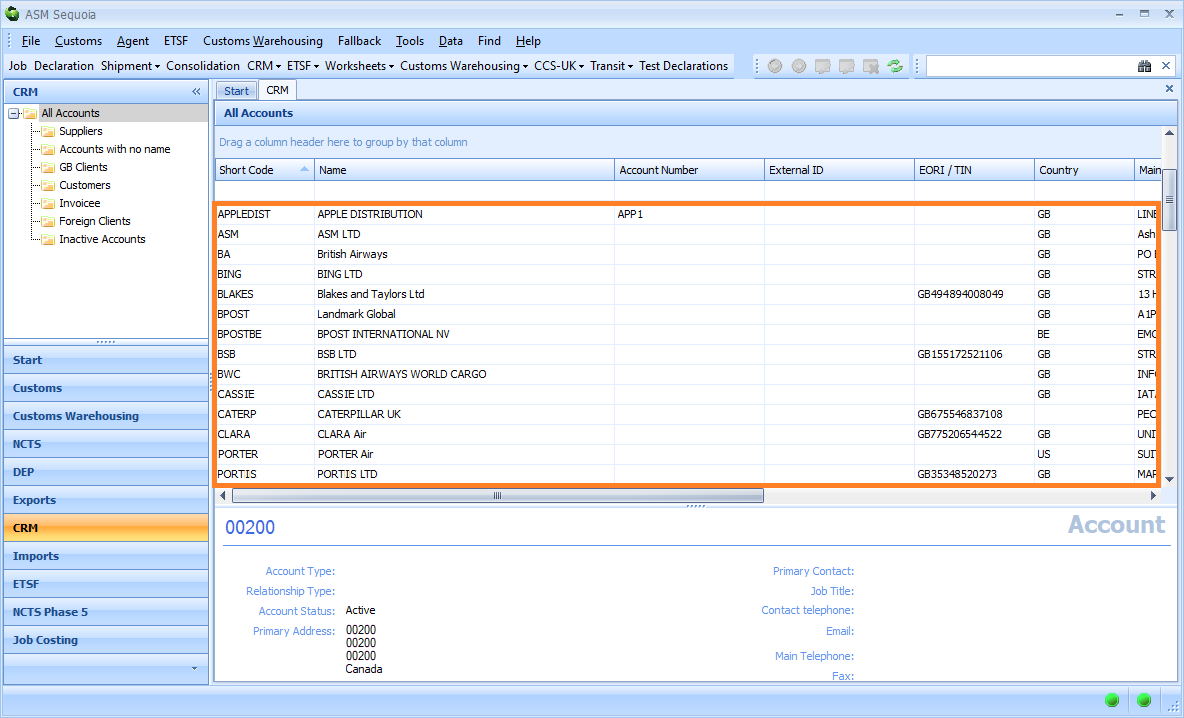
Double-click on an account to open it, or right-click on it and select Open from the context menu.
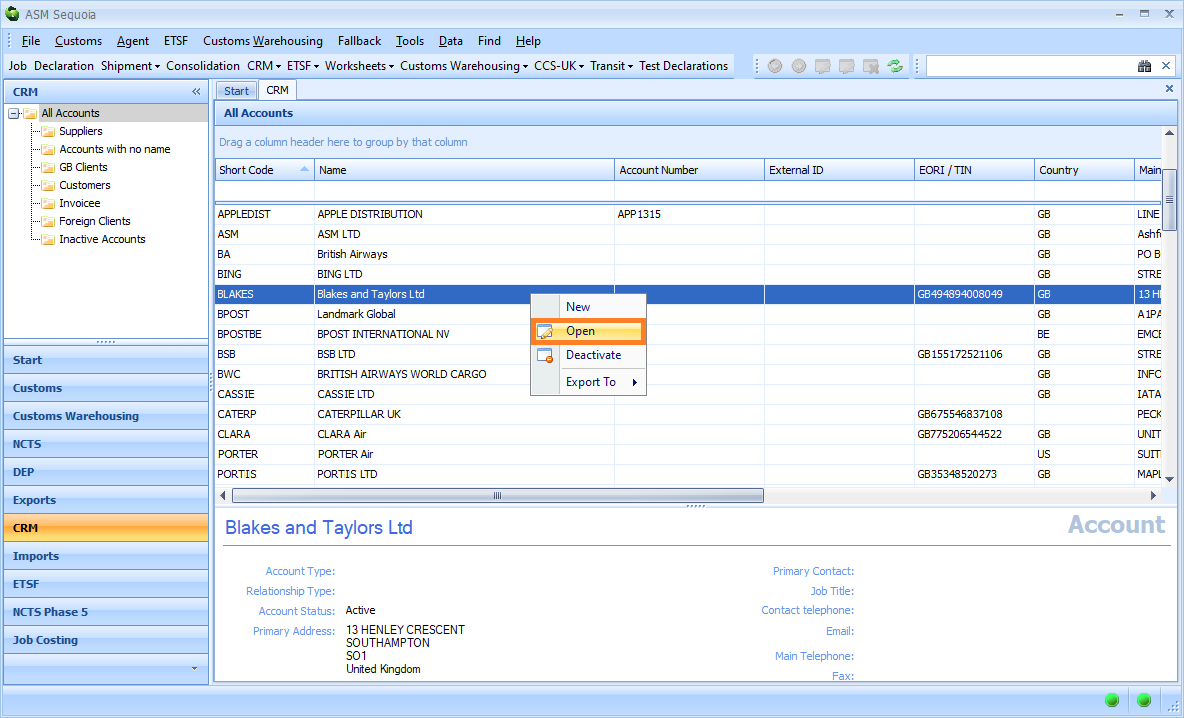
The Account Details editor will appear and that account's information can be edited as required. PLEASE NOTE that you MUST click on the Save button to save any changes you make.
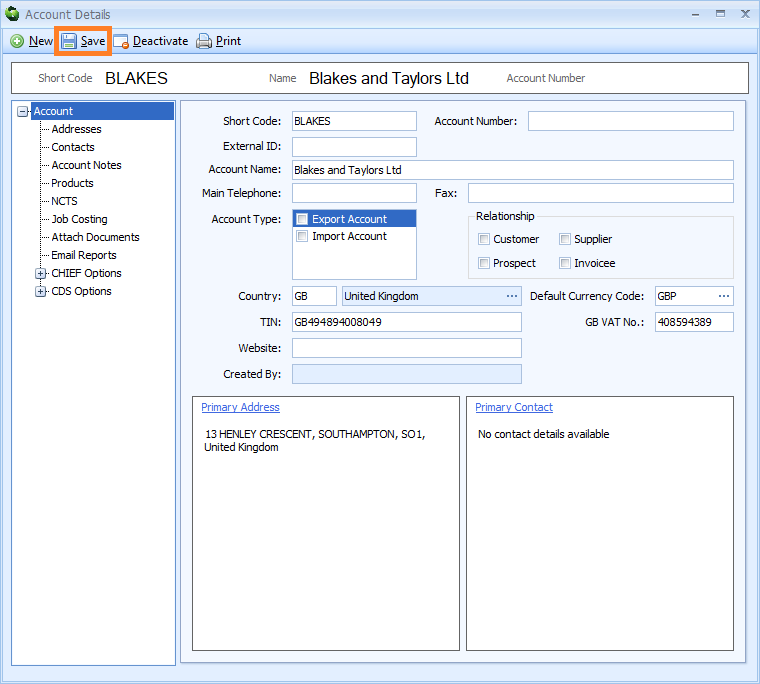
Deactivate an Account
If an account has been referenced in Jobs, declarations etc. it cannot then be deleted. However, if you do not want that account to be used in the future then it can be 'deactivated'. To do this, click on the Deactivate button on the Account Details editor toolbar. PLEASE NOTE that after you have clicked on the Deactivate button, you MUST click on the Save button to save the deactivation.
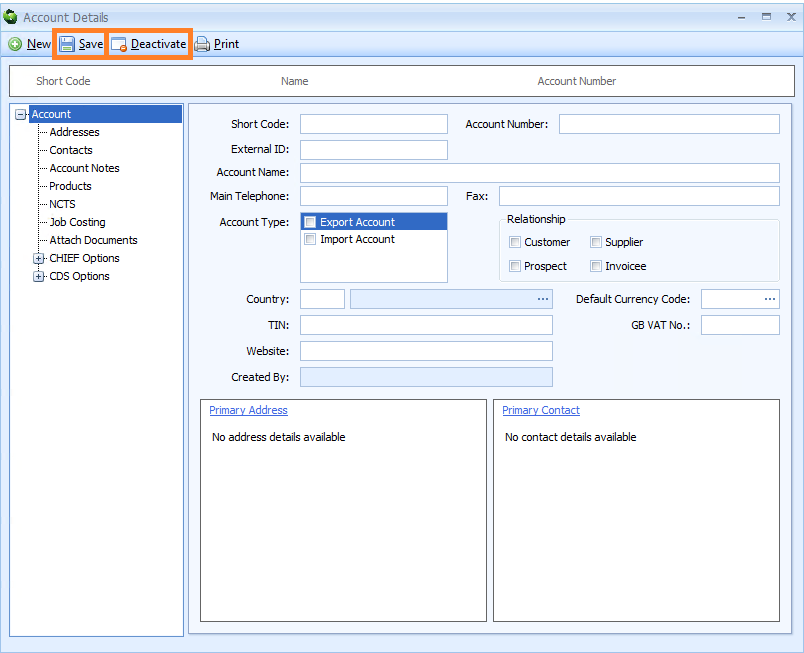
Deactivated (inactive) accounts will appear in the Inactive accounts folder of the CRM module. To access this folder, click on the CRM module, then click on Inactive Accounts. Double-click on an account to open it, or right-click on the account and select Open from the context menu.
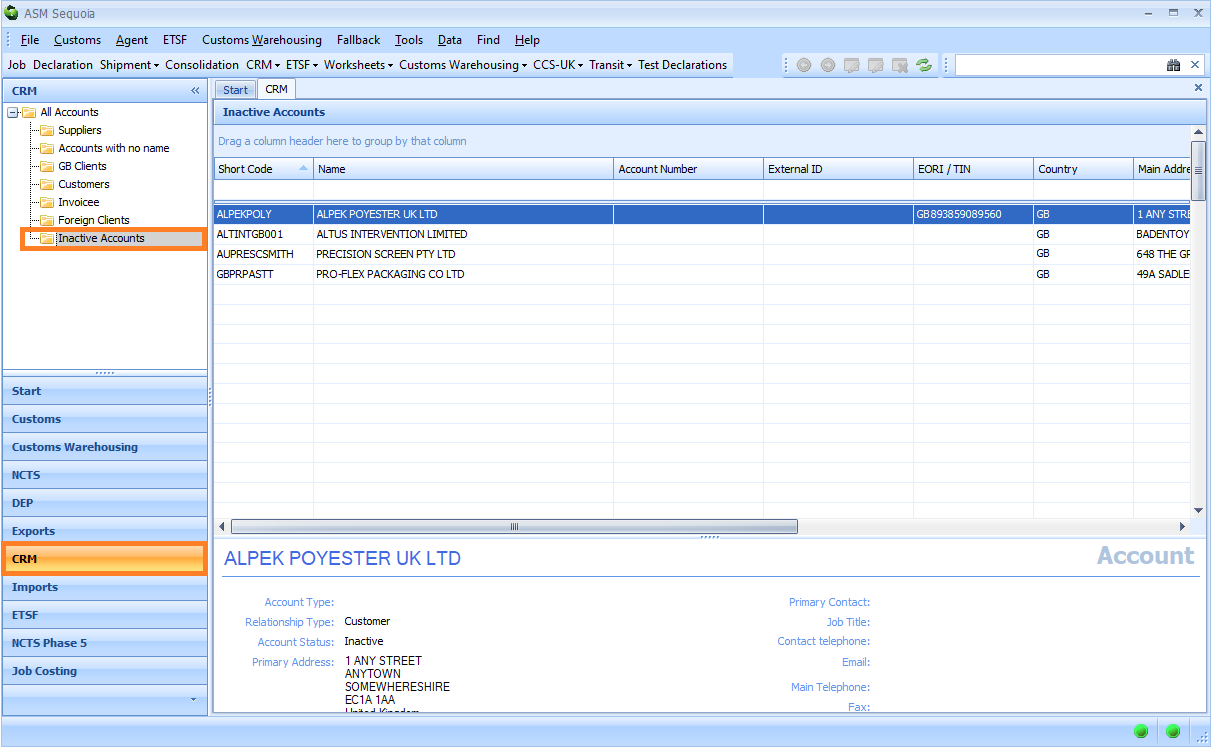
To 'reactivate' an account record, open the Account Details editor and click the on the Activate button on the main editor toolbar. PLEASE NOTE that after you have clicked on the Activate button, you MUST click on the Save button to save the activation.

